List Launch
List Launch is the process in which the final list of email contacts get uploaded into the system for email launch / e-blast. Oracle Demand Center uses Eloqua's marketing automation tool to launch the email lists. The email lists are associated with marketing campaign elements (segments, emails, landing pages) via Eloqua Campaign Canvas.
Final Phone Lists and Final Postal Lists are directly uploaded in GMSS Portal or in Oradocs folder workspace by the analyst.

 People
2 |
 Prep time
30 mins |
 Time
10 mins |
 Difficulty
Medium |
STEP 1 - Eloqua Campaign Canvas
Campaign canvas in Eloqua is where we build workflows of elements of the campaign: segments, emails, landing pages, forms and decision elements, as well as actions. The campaign canvas includes a wide variety of elements that you can use to create rich, multi-step campaigns to best reach your marketing goals. The elements fall into four categories:
- Audience
- Assets
- Decisions
- Actions
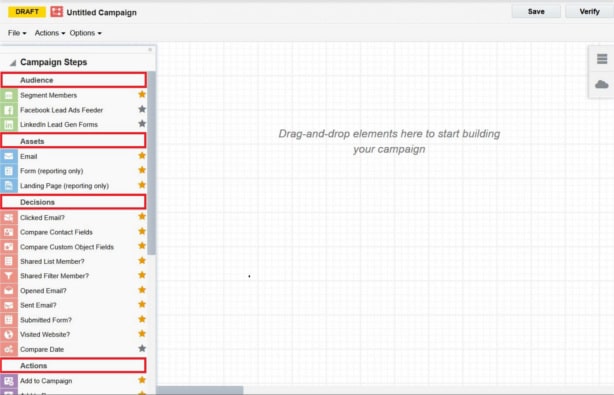
Each category includes built-in elements, such as Wait (which is an action), Clicked Email? (a decision) or Segment Members (audience). All built-in elements are listed under their category headings in the left-hand column of the campaign canvas.
STEP 2 - Shared List Application
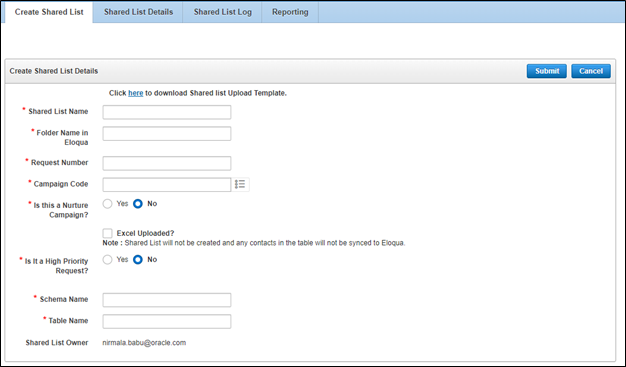
A shared list is a final group of audience set for a particular marketing campaign that is uploaded in Eloqua for an email launch. The final shared list for launch can be prepared in two ways for an Eloqua upload.
- Shared list application
- Excel upload
Final List Upload Process:
The shared list application is a simple internal tool to help upload the final email list in Eloqua for email launch. The shared list application is mainly useful for dynamic data updates in Eloqua, where the final shared list generated from CXD, with the latest contact information, is synched with the existing contacts in Eloqua. Contacts uploaded to Eloqua through the shared list application remain unaffected by the regular monthly purging process of Eloqua contacts.
The illustration below shows the process for creating a shared list using the shared list application.

- Create the final list in CXD by clicking the Shared List Final Table Creation – Template Script.
- After generating the shared list, log in to the shared list application.
- Name the shared list according to the standard naming convention below [ListRequestNumber]_[ShortProgramDescription]_[ShortNameOfListAnalyst]_[version] Example: LRTXXXXX_EMEA_PaaS_Nir_SL_v1
- Complete all the field details and click Load to Eloqua.
Shared List Upload in Eloqua
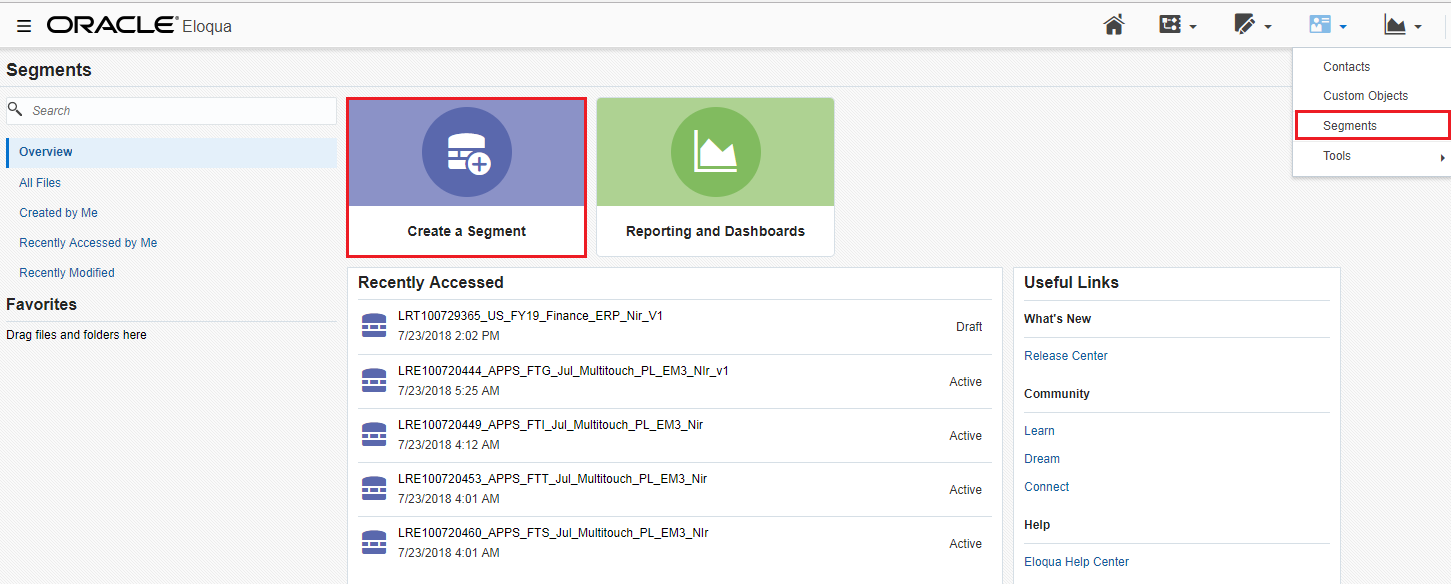
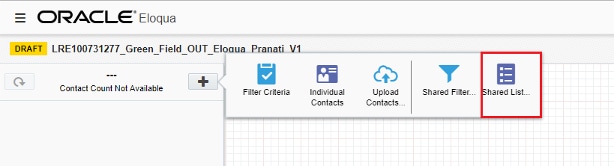
Segments include contacts for email distribution. Contacts can be uploaded to a segment using a shared list, through the shared list application, using the following process.
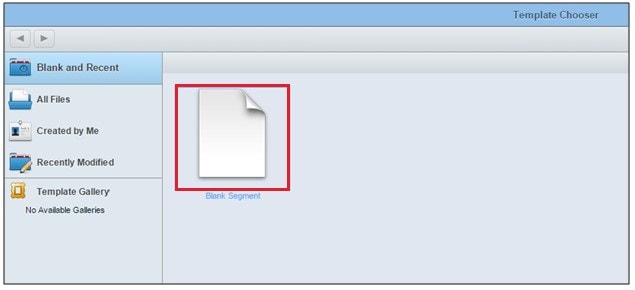
- Click Segments on the Audience icon in Eloqua.
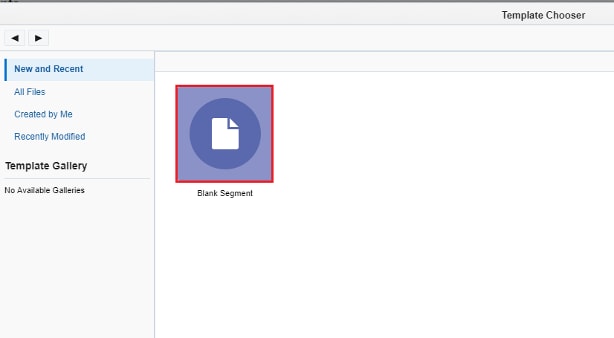
- Click Blank Segment.
- Click Shared List.
- Search for the uploaded shared list in the Shared List Chooser. Click the uploaded file.
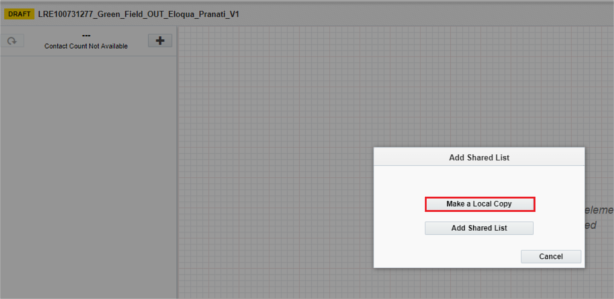
- Click Make a Local Copy since the contact list is static for simple lists. In case of Nurture Requests it should be selected as Add Shared List.
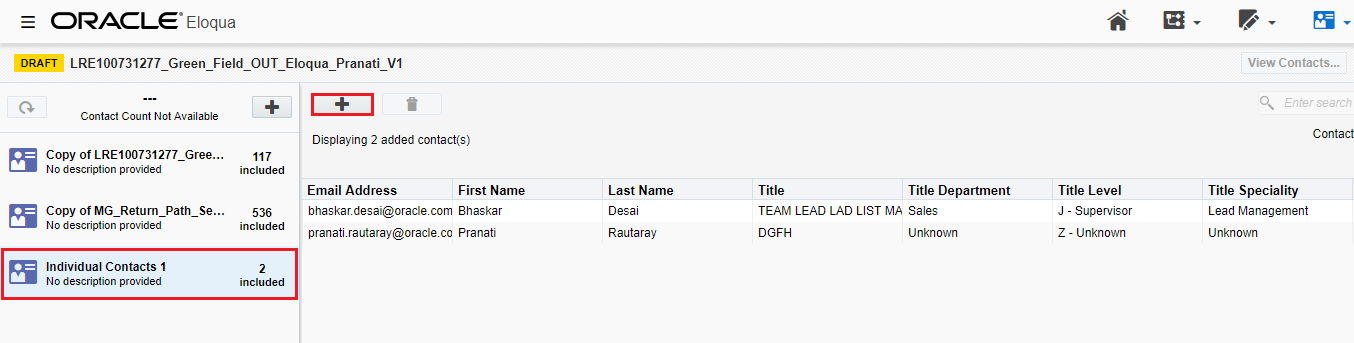
- Add the seed contacts as individual contacts and the return path seeds as shared list. The regional List leads can provide these lists.
Note: When the contact list is associated, the total number of contacts will appear in the left pane of the segment window. - Save the contact list in respective regional folder.
- Name the segment using the following naming convention: [ListRequestNumber]_[ShortProgramDescription]_[ShortNameOfListAnalyst]_[version] Example: LRTXXXXX_ EMEA_PaaS_Nir_v1
- Send a notification email to the Delivery team copying all stakeholders, so that they associate the appropriate email to the list in the campaign canvas and launch the email from Eloqua.

STEP 3 - Excel List Upload Process
In this section, you can see the steps you'll follow to upload the final list to Eloqua using an Excel list.
Follow the process below to generate an Excel list from CXD.
- Generate a final Excel list using the tables created for the request.
- Use the naming convention below for the Excel file.
[ListRequestNumber]_[ShortProgramDescription]_[ShortNameOfListAnalyst]_[version] Example: LRTXXXXX_EMEA_PaaS_Nir_SL_v1
Excel List Upload Process in Eloqua
Segments include contacts for email distribution. Contacts can be uploaded to a segment through an Excel list.
- Click Segments under the Audience icon in Eloqua.
- Click Blank Segment.
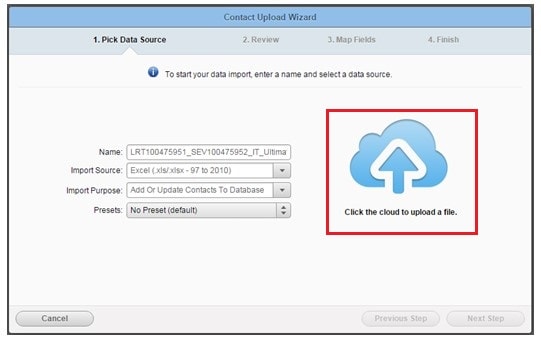
- Click Upload Contacts.
- Enter the file name in the Name field and select the values for other columns as shown.
- Click the cloud image to upload the Excel list.
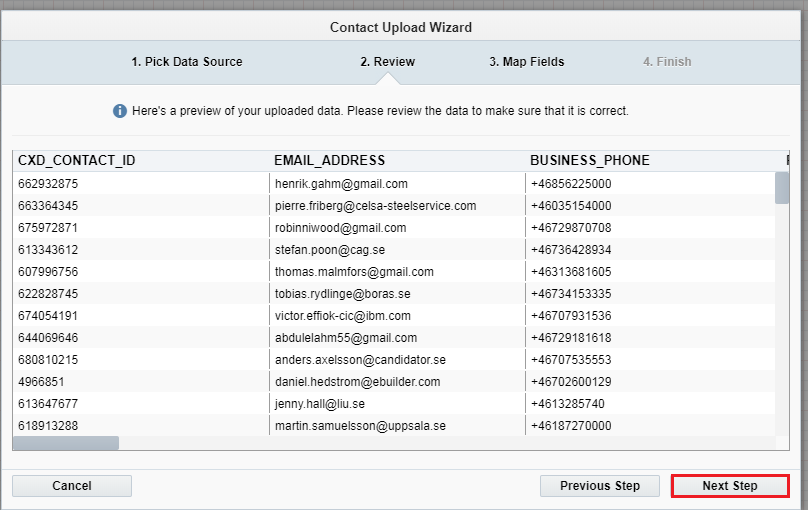
- Click Next Step.
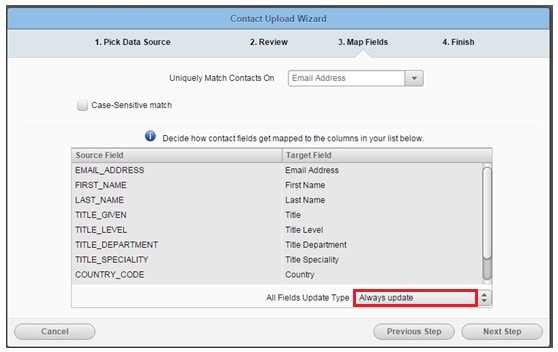
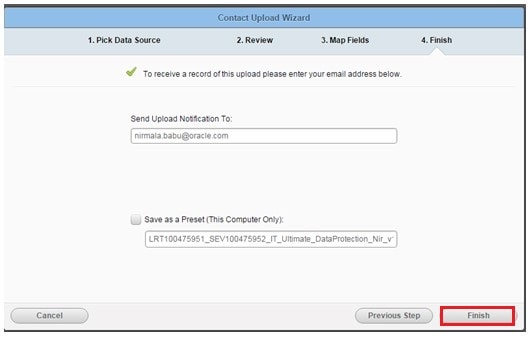
- Select Always update under All Fields Update Type and click Next Step.
- Click Finish.
- Add the seed contacts as individual contacts and the return path seeds as shared list. The regional List leads can provide these lists.
- Name the segment according to the standard naming conventions [ListRequestNumber]_[ShortProgramDescription]_[ShortNameOfListAnalyst]_[version]
- Save it in the respective regional folder. Example: ALL --> FY22_Regional Marketing --> FY22_NA_Segments
- Send a notification email to the Delivery team copying all stakeholders, so that they associate the appropriate email to the list, and launch the email from Eloqua.

Note: When the contact list is associated, the total number of contacts will appear in the left pane of the segment window.

Final list upload process in Unity.
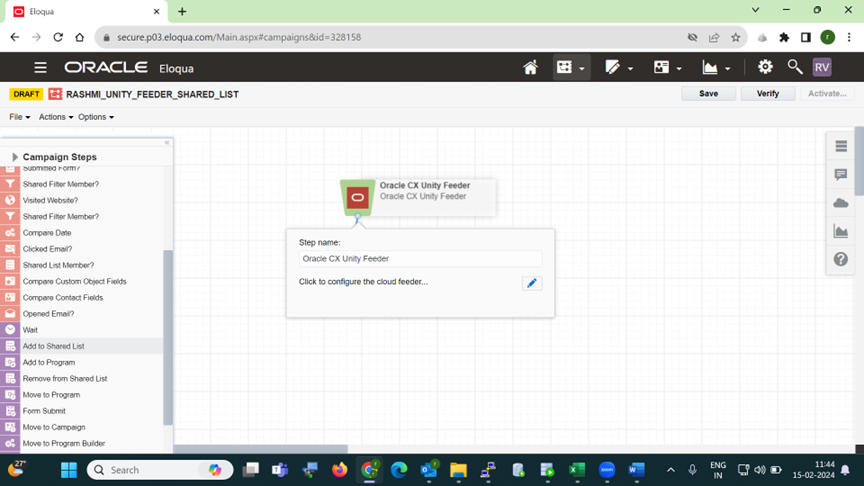
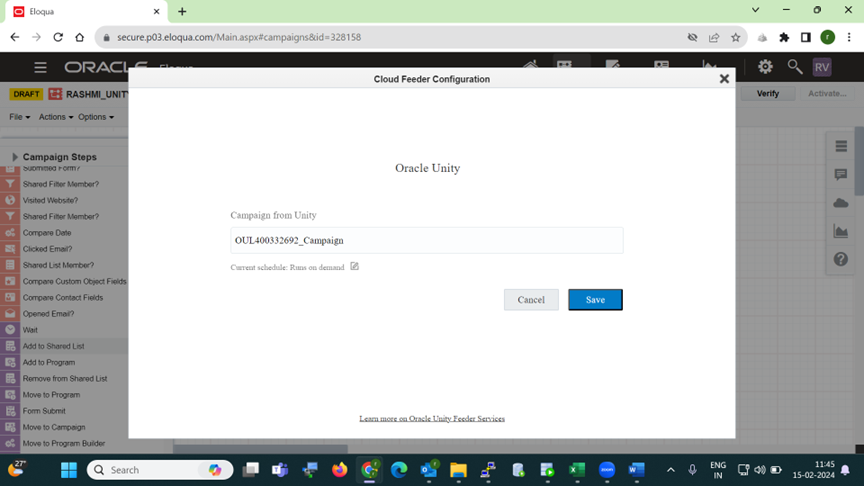
- Once the Preview list is approved, segment in Unity tool is refreshed for counts and saved. In Campaigns section of Unity, New campaign is created under naming convention OUL400XXXXXX_Campaign.
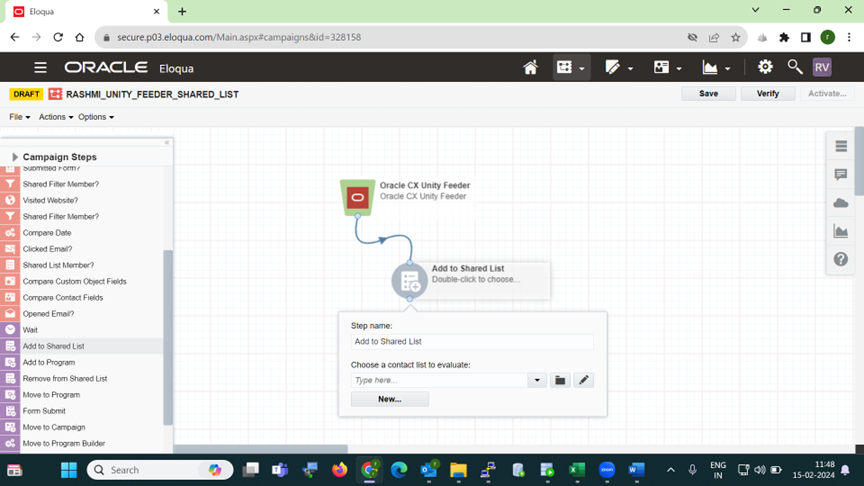
- Once the publish campaign is completed;. Click on Eloqua -- campaigns -create a UNITY_FEEDER_CAMPAIGNADD THE ORACLE UNITY FEEDER SHARED LIST AND ADD TO SHARED LIST STEPS ADD THE campaign created in Unity to the feeder and activate.
Once the campaign job is completed and contacts are moved to the shared list created.
Same steps are to be followed as Shared List Upload in Eloqua
Related Topics
Nailed it?
If yes, click below to confirm completion of this topic.
Yes, I have understood this topic well