Nurtue Campaign Delivery
About Nurture
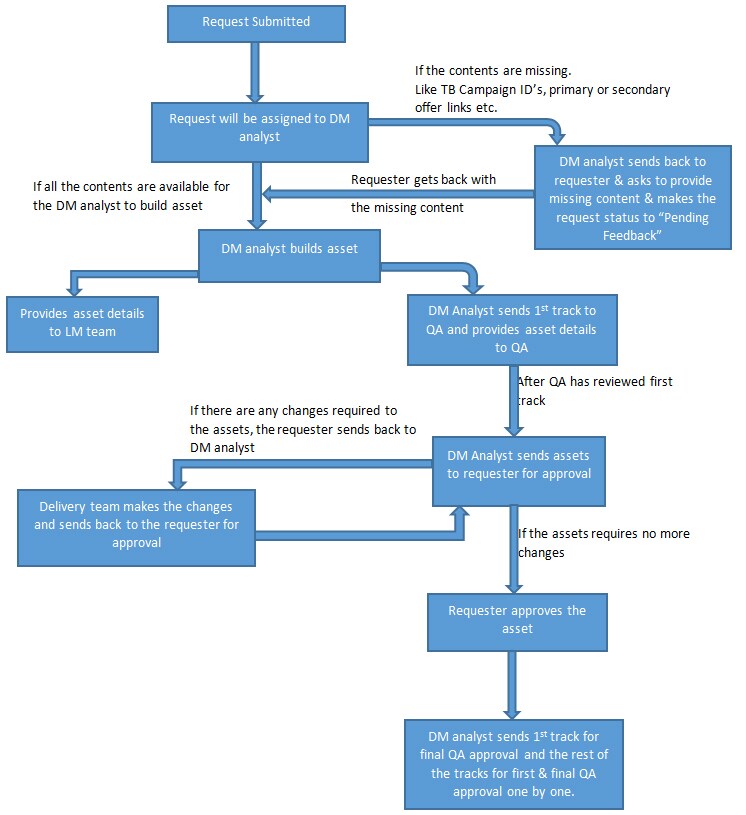
A nurturing campaign is where we use the data gathered from the user's behavior to deliver timed and targeted information that will help guide the prospect/customer through the buying process. We leverage marketing automation to send series of emails to targeted audience with the objective of building relationship and to move them to next stage of the buyers’ journey.
Click here for overall Nurture process works.
Nurture campaign consists of three types of requests.
- SEV [Email content and send]
- LPD [Online offer Landing Pad]
- MCC [Multiple Campaign Canvas] – Request related to list team.

 People
2 |
 Prep time
30 mins |
 Time
10 mins |
 Difficulty
Medium |
STEP 1 - Initial Checkpoints
1. Nurture campaign request initial checkpoints
The following details must be collected from the GMSS portal:
- Primary Target Country – DM analyst must check if the country is same on both Template builder and GMSS Portal
- Program code – Program code must be of the type Digital/Mini nurture both on Template builder and MRM
- MCC request – DM analyst must check if the MCC request has been raised for the same program code.
- Template builder campaign IDs - analyst must check whether the IDs are generated and given in GMSS portal. The TB Campaign Type should be “Nurture/Mini Nurture (Gated & Ungated LP)“
- Multiple Asset Details - the Analyst must update it immediately once it is assigned, into the respective request SEV and LPD.
- Visio diagram – The analyst must cross check the program code mentioned in the Visio Diagram with the program code of the nurture campaign.
2. MRM Process for Nurture
After obtaining the above details from the portal the next process would be to search the program code in MRM.
Following are the steps:
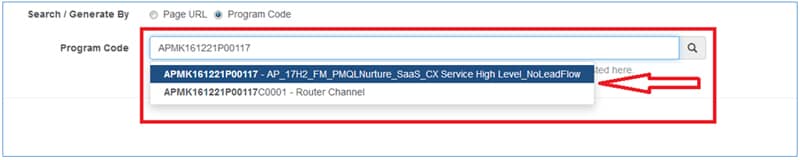
- On the MRM search the program code, as shown in the below image.
- After searching we need to check on two entries.
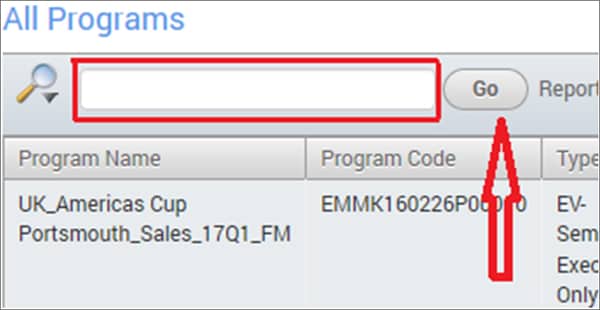
- Type - The type must always be "Digital-Nurture"
- Lead Flow – (must be followed based on the Visio Diagram) this entry may contain Standard Lead flow, Multi-Channel or No lead flow.

STEP 2 - Setting up the Campaign
Download assets
The Delivery team builds the HTML content by downloading the assets from template builder and then uploading it to the canvas. The list management team takes care of building the segment (target audience list) and uploading into Eloqua. The email asset along with the LP asset, and the list are then connected together in the campaign canvas and launched by the list management team.
Below are the few checkpoints to be considered:
- General information to keep in mind while creating email assets (General asset note)
- How to associate the Email and LPD assets in campaign with the segment (target audience) and activate the campaign
General Asset Notes
Keep the following notes in mind while creating emails, landing pages, and so on.
- Asset (content) edits will be managed in the Template builder.
- When we create the online version of the assets, we need to upload a copy into WCS. The resulting URL is the link used to the text “View it in the web browser” or any appropriate text given by the requester.
- The LPD asset’s welcome page URL is the link used to the CTAs of the email.
Mandatory steps for Nurture Request
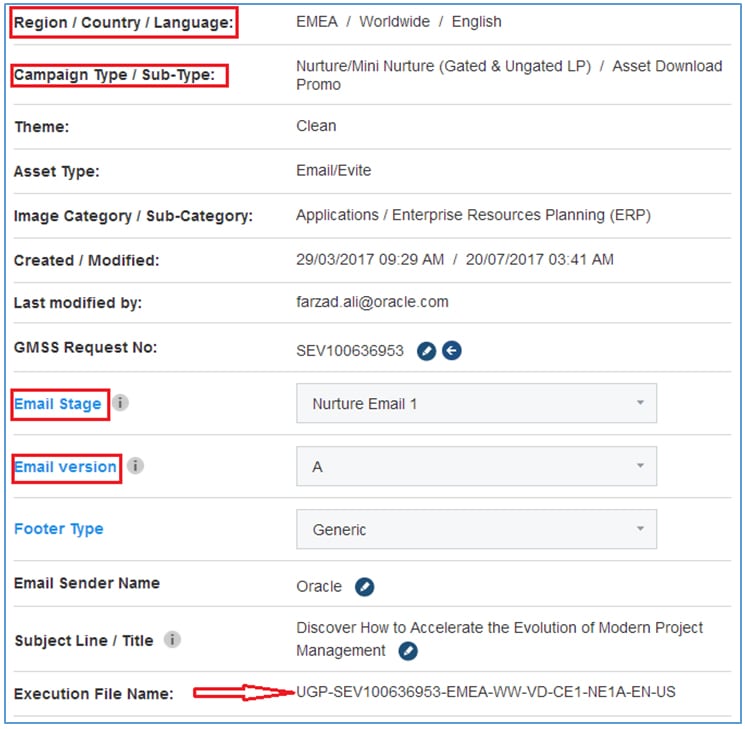
- It is important to have a standard filename for the HTML files that are created via template builder for unique identification of the assets after uploading them into Eloqua. Template builder has an in-built function to create a unique filename. After providing all the mandatory details, the unique file name will be generated from the template builder tool as highlighted in the below image.
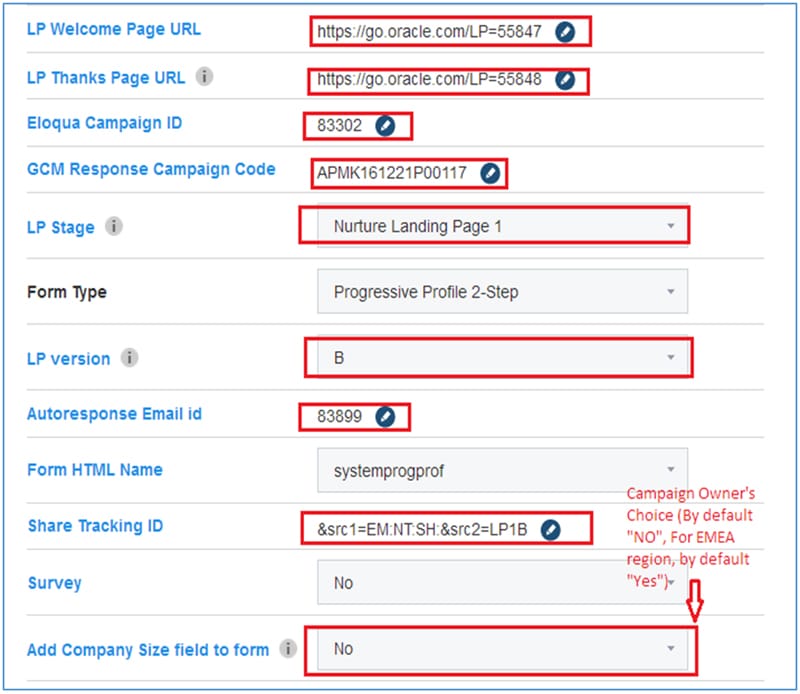
- In order to download the assets from the template builder there are some of the mandatory fields/settings that are to be updated and these are shown in the below image.
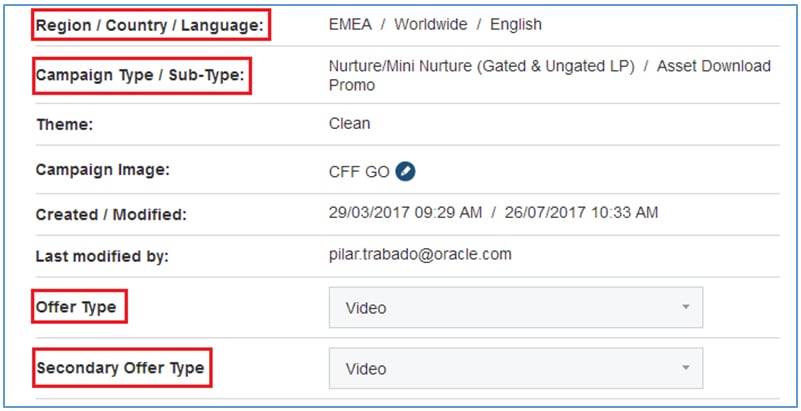
The campaign type must always be Nurture/Mini Nurture
- The highlighted fields are the mandatory fields to download assets from the template builder
- Below is the unique filename generated from the template builder
- UGP stands for ungated LP
- After updating the settings of the assets, enter all the Eloqua ID’s into template builder, save it, re-download and upload to Eloqua so that all the details will reflect onto the live pages.
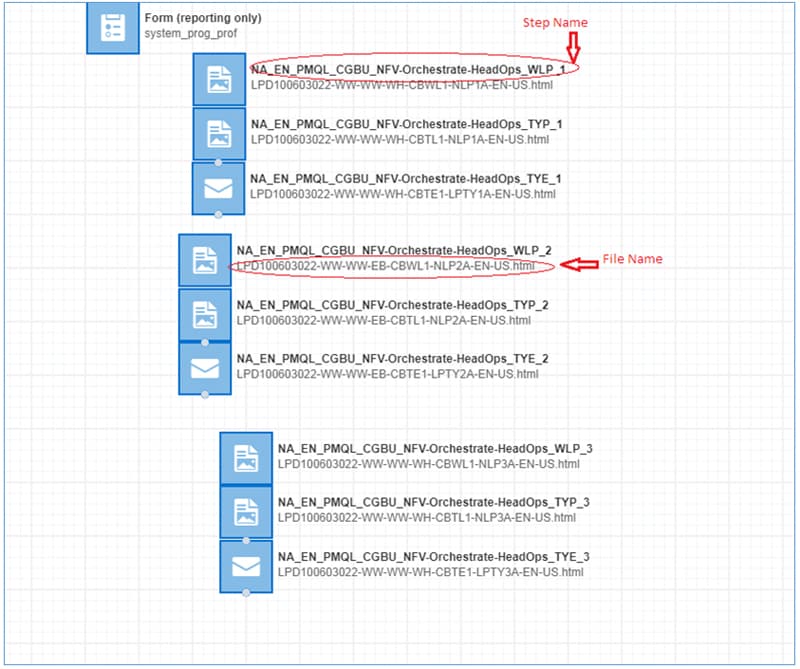
- Step names that are given by the requester in the Visio diagram must be cross checked with the file name updated in the template builder
- Finally drag and drop all the Landing page to the canvas.
The list management team will take care of adding the email assets, the delivery team will take care of landing pad asset. Each asset will have a step name. The requester will provide the step name in the template builder.
STEP 3 - Generate Source Tracking
Generating source tracking for the nurture campaign through tracking URL generator.
Tracking URL must be generated from the GMSS Tracking URL Generator to make a unique identification of the links and enable source tracking.
Following are the steps that are carried out to generate tracking URL:
- There are two options to be selected in the tracking URL generator, one is “Page URL” and another one is “Program Code”.
- After selecting the Program Code or Page URL, a search bar will pop out, enter your Program code or Page URL, and select your campaign.
- If there is any page URL associated to that program code, it will be displayed in the list. To create tracking for new Page URL select the option “Add a new Page URL”
- A new page URL option will pop out and the URL that is needed to track can be entered here. Note : The Page URL must have a standard format; View Page URL Formats here


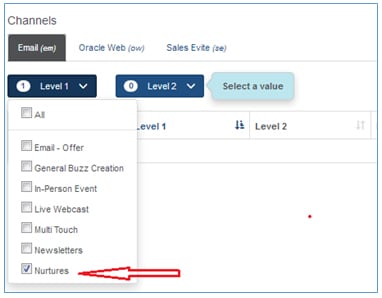
Notice the channels checkbox option in the above image, for nurture we will use only 3 channels. They are:
Email, Oracle Web and Sales evite.
- For Email/Evite tracking, the option must be Email and Sales Evite.
- For Landing Pad Share, Secondary Target and Cross Promotion, the option must be Oracle web.
5. After entering the Page URL and selecting the related channels, select generate option to generate tracking URL
Email / Evite Tracking URLs:
To generate the complete tracking URL there are three levels that is to be selected and along with it standard free text is used to make the URL unique.

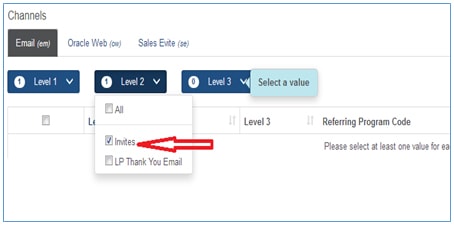
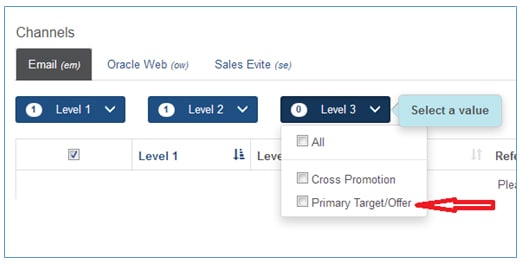
- For Emails and Evite, Click Level 1 and select Nurture
- Next click level 2 and select invites
- And finally click level 3 and select Primary Target/Offer
- After selecting all three levels, free text must be entered to generate the complete Publishable URL.
- For Email and Evite the nurture free text format is given below

- - SEV#STG1, 2, 3 etc.
Ex: https://go.oracle.com/LP=54592?elqCampaignId=74577&src1=:em:ne:ie:pt:SEV100635599STG1
https://go.oracle.com/LP=54592?elqCampaignId=74577&src1=:em:ne:ie:pt:SEV100635599STG2
Share URL, secondary target and cross promotion for landing pad:
To generate the share link for landing pad there are two levels that is to be selected and along with it standard free text.
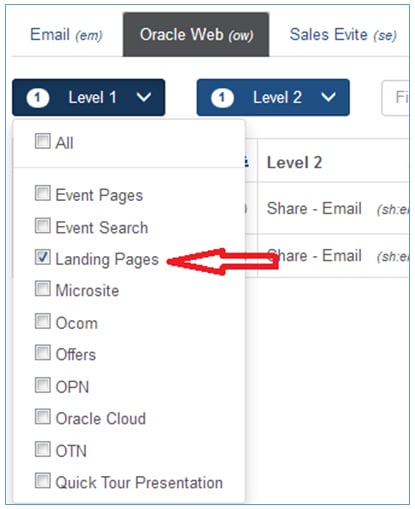
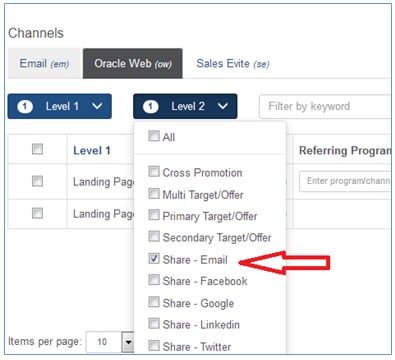
- For share link, click level 1 and select landing page.
- Next click level 2 and select Share – Email
- After selecting all two levels, free text must be entered to generate the share link for landing pad.
- For LPD share link the nurture ‘free text’ format is given below

- LPD#NLP1, 2, 3 etc.
- For Ungated LP : LPD#UGNLP1, 2, 3 etc.
EX: 1. &src1=:ow:lp:sh:em::NLP1&intcmp=BUMK161115P00032:ow:lp:sh:em::LPD100635601NLP1
&src1=:ow:lp:sh:em::NLP2&intcmp=BUMK161115P00032:ow:lp:sh:em::LPD100635601NLP2
If the landing pad URL is present in the secondary module those are called as secondary target and other than secondary module if the landing pad URL is present, those LPs are cross promotional.
Secondary Target:
For secondary target the level 1 would be same, that is, landing page and the level 2 must be selected as Secondary Target/Offer

- After selecting level 2 as Secondary Target/Offer, free text must be entered. The free text format for Secondary Target is given below.
- LPD#TYLP1 for Thank you page
- LPD#TYEM1 for Thank you Email
Cross Promotion:
- For Cross Promotion the level 1 would be same, that is, landing page and the level 2 must be selected as Cross Promotion.
- After selecting level 2 as Cross Promotion, free text must be entered. The free text format for Cross Promotion is given below.
- CPO + LPD#TYLP1
- CPO + LPD#TYEM1
STEP 4 - Setting up the Canvas
The task of creating an asset, generating the segment list and launching the campaign is shared between the delivery team and the list management team.
The following table shows responsibility matrix for the delivery and list management team analysts for nurture campaigns.
| Team | Tasks |
|---|---|
| Delivery Team |
|
| List Management Team |
|
Adding an LP asset to the Canvas
The campaign canvas is where we drop all of the elements of your campaign. To add a landing pad to the campaign canvas, upload it into Eloqua, drop it on the canvas and then configure it.
Select or search for the campaign in Eloqua to arrive at the appropriate campaign canvas.
- Select the existing campaign or search with campaign name.
- Select desired Campaign.
- Open Canvas.
Follow these instructions to add a landing pad.
- From the left navigation, drag the landing pad icon onto the canvas.
- Double-click the icon to search for the already uploaded welcome landing pad and add to canvas.
- Similarly add thank you landing pad.
- From the left navigation, drag the email icon onto the canvas.
- Double-click the icon to search for the already uploaded thank you email and add into the canvas.
Adding the form to the canvas
A form is a web interface that collects information from registrants. It can also be used as a questionnaire or survey. Users might complete a form to get access to a white paper or other asset, or they might complete a form to register for an event.
There are different types of forms:
- Standard registration form
- Progressive form
(For nurtures, It is progressive profiling (2-Step))
The forms and landing pages of a campaign must be linked by dropping them on the canvas. This ensures all the reporting metrics (landing page visits, number of forms completed by customer and so on) are captured for that campaign.
Below are the steps to add form into campaign canvas:
- On the campaign canvas, drag the form icon onto the canvas.
- Double-click the form and search for system_prog_prof and select.
- Save the canvas.
NOTE:
- We are not required to connect assets/elements in the canvas manually, as they are connected internally by codes. Eloqua will automatically connect them to any linked emails when you save the campaign.
- Share the asset details spreadsheet with the MCC/List assignee
STEP 5 - QA & final review
The Email and LPD which has been uploaded into Eloqua must go through quality check, without the QA approvals the delivery team cannot launch the campaign.
In the GMSS portal, the delivery team will raise a DQA request, one in SEV and one in LPD request. The QA team will close the LPD request and all the necessary or related comments are updated in the DQA request of SEV.
Nurture campaign final review checkpoints
- Personalization in browser title of online version (For emails with personalization in subject line).
- Online version greeting/personalization texts.
- Meta tag in LP (meta name="ROBOTS" content="NOINDEX, NOFOLLOW").
- Eloqua tracking for links in Emails.
- "mailto" links opening a new blank tab.
Post activation
- After the campaign has been activated by the list management team, the delivery team must ensure that the QA has approved all the email and LPD assets.
- The next step would be to close the LPD request of the nurture by providing the details of the launch to the campaign owner/requester.
- The same details should be provided in the SEV request, keep the SEV request in approved status and GMSS Status as “Published”, in case if the requester comes back with the changes.
- Update the Live URLs spreadsheet and upload in the respective CMP# resources section of template builder. Share the live url spreadsheet in the request portal with the final comments.
If there are any concerns and queries related to Nurture Request Please contact: gm_nurture_team_in_grp@oracle.com
Related Topics
Nailed it?
If yes, click below to confirm completion of this topic.
Yes, I have understood this topic wellIntegrated Cloud Applications & Platform Services
We're here to help
- For any issues raise a ticket under the appropriate section in the communication tracker.
Discussion Forum
- To participate in our discussion forum join the slack channel #mktg-demandcenter or click here