Certain Additional Forms


Overview
People

3 - 6

Prep time

5 min

Time

30 min

Difficulty

Easy

STEP 1 - Certain Additional Forms Help (5 min)

  • Capture Registrations from different sources.
  • Enable Assisted and Tele registration form for internal employees / tele sales to register for the event behalf of customer.
  • Walk-In form to help customer register at the time of the event.

We will now learn how additional forms are supported in Certain

  • A. Assisted Registration Form (Internal Courtesy)

    1. Form dedicated for Internal Use Only (Oracle employees i.e Sales Reps)

    2. Supports

    • All registration types with respective status
    • Agenda functionality
    • Government attendance

    3. Not Supports

    • Registration fees and payments
    • Additional registration questions for customer to answer
    • Comp codes
  • B. Tele Registration Form (Inbound)

    1. Form dedicated for authorized agency

    2. Supports

    • All registration types and respective status
    • Agenda functionality, additional questions
    • Data entry access, no lookup access, inbound tele-registration call from customer
    • Provide the instruction to agenda to handle all government registration and script

    3. Not Supports

    • Fees, other payments, comp codes
  • C. Assisted and Tele registrations form validations / difference

    Internal Curtesy Tele-Agency Inbound
    Form Include Ethics confirmation Form does not Include Ethics confirmation
    Form checks for Oracle Email address in the sale rep's email address field Form checks for Agency Email address in the sale rep's email address field
    Throws an error if its a Government Employee Form accepts Government Employee registration with a disclaimer to be read out
    Excludes Marketing opt-in check Includes Marketing opt-in check
    Confirm ation email sent to customer with sales rep in cc Confirmation Email sent to Customer only
  • NOTE: Government Employee Validation Check:

    1. If Government Exclusion?="No" selected in the portal, Kindly remove the logic since no validation is required.
    2. If Government Exclusion?="Yes" selected in the portal, No Action is required, since logic will be already added to validate the government employee.

    In Certain tool, please make sure to do this update: If Government exclusion: "No", Move Logic2 from right panel to left panel. certainlogic

PRE-REQUSITE

STEP 2 - GMSS Portal Details (5 min)

Understanding GMSS Portal Request Details

Requester/Marketer needs to complete the fields on the OER request form when submitting their GMSS request.

We will now learn how additional forms are supported in Certain

Certain Add On

Follow same process of Government employee validation check which is updated for Non-My Profile set up to all forms.

STEP 3 - Enabling Assisted Registration Form (5 min)

Note: In Master template, by default, assisted registration form is enabled to support waitlist functionality. We need to make the status change and other form sequence flow changes based on other registration types.

Logic Rules – For Assisted Registration Form

Logic Rules

Descriptions:

  • Logic 1. Assign Attendee Type - Helps to assign the registration attendee type = Attendee / Oracle Staff.
  • Logic 2. Government Employee Check - Assisted registration forms should not allow registration of government employee . If the customer selects government employee option as "yes" while registering, then it shows an error message.
  • Logic 3(1). Check for Assistant's Email with Oracle.com – It validates the email address and shows an error message if they enter non oracle email address under the form field "Your oracle email address".
  • Logic 3(2). Check for non Oracle Customer email address – It validates the customer email address, that should be non oracle email address; otherwise it shows an error.
  • Logic 4. Assign registration status both orders (1&2) – It helps to check capacity of the attendee type and set the status of registrants for the event.

We will now learn how additional forms are supported in Certain across 3 types of Registration Methods

  • A. Enabling Waitlisted Registration

    1. Go to Plan -> Forms (Select Assisted / Tele registration forms based on the requirement)
    2. Check the form setup status should be "Do Not Change"

    3. Enable Waitlist
    4. Agenda functionality can be included based on the demand.
    5. Confirm Section -> Default thank you page content will contain copy for all types of registration – it is important for us to retain what is relevant to the type of registration we are working with. In this case, content relevant to waitlist thank you page is to be retained and saved.
    6. waitlisttypage
    7. Save

  • B. Enabling Standard Registration

    1. Go to Plan -> Forms (Select Assisted Registration Form)
    2. Select the form setup status to "O_Registered"

    3. Enable Standard
    4. Agenda functionality can be included based on the demand.
    5. Confirm Section -> Default thank you page content will contain copy for all types of registration – it is important for us to retain what is relevant to the type of registration we are working with. In this case, content relevant to standard thank you page is to be retained and saved.
    6. standardtypage
    7. Save

  • C. Enabling Monitored Registration

    1. Go to Plan -> Forms (Select Assisted Registration forms)
    2. Select the form setup status to "O_Registration Pending"
    3. Enable Monitored
    4. Agenda functionality can be included in both the forms, based on the requirement, but additional questions only can be included in tele registration forms. (refer the topic 'about assisted and tele registrations forms' ).
    5. Confirm Section -> Default thank you page content will contain copy for all types of registration – it is important for us to retain what is relevant to the type of registration we are working with. In this case, content relevant to monitored thank you page is to be retained and saved.
    6. monitoredtypage
    7. Save

STEP 5 - Enabling Registration Notifications (Self Registration, Assisted and Tele Registrations Forms) Custom Blocks (5 min)

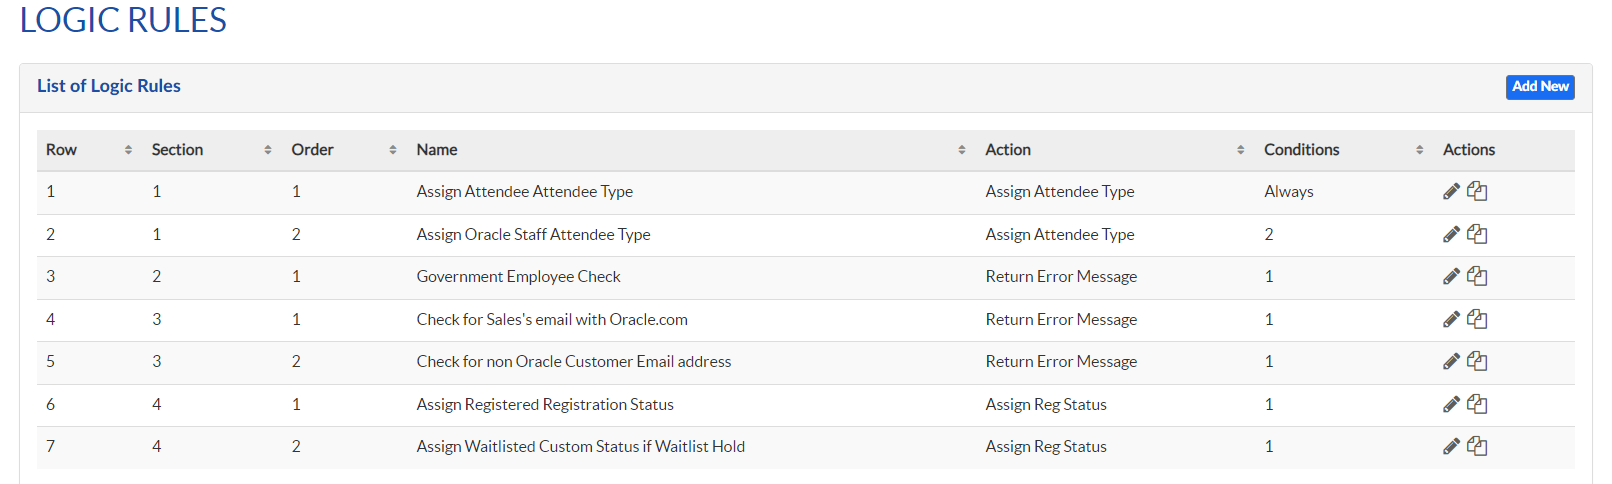
By default, three custom blocks have been created in the Master template. These custom blocks have been associated to the respective display rules, so that the relevant thank you note content will be displayed when we get the notification from the tool after registration from different registration channels. In this section, we will see how we can enable to the notification to display the thank you note based on the registration type and registration forms.

customblock

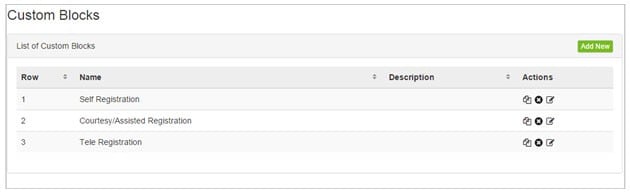
Self registration (through my profile and non my profile):

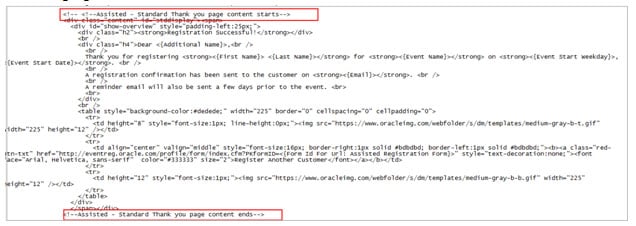
This contains the default thank you note, and is displayed if any registrants comes through default registration forms (my profile and non my profile)

self content

Courtesy / Assisted Registration

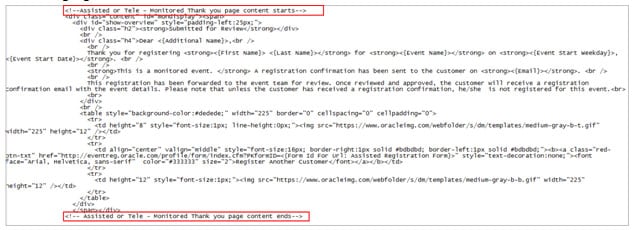
This contains the default thank you note, and is displayed if any registrants comes through courtesy/assisted registration forms.
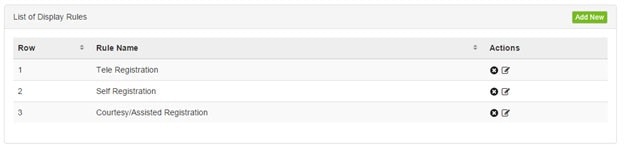
courtesy content


Display Rules

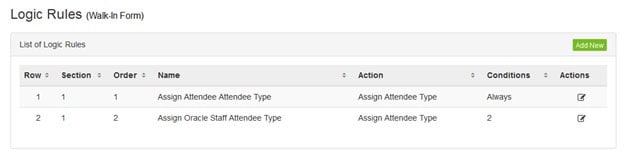
By default, three display rules have been created to accommodate the above three custom blocks. This section helps to validate the registration channel and display the respective content in the notifications. In this section we will see how the logic has been setup and how to enable the notification with display rules.
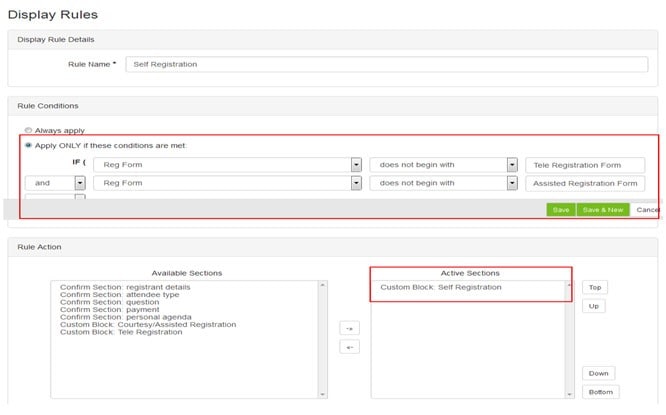
Display Rule

Self Registration:

This section validates, if the registrants not registered through assisted / tele, then treated as a self registration from default forms (my profile and non my profile) and displayed the standard thank you note in the notifications.

self-displayrule

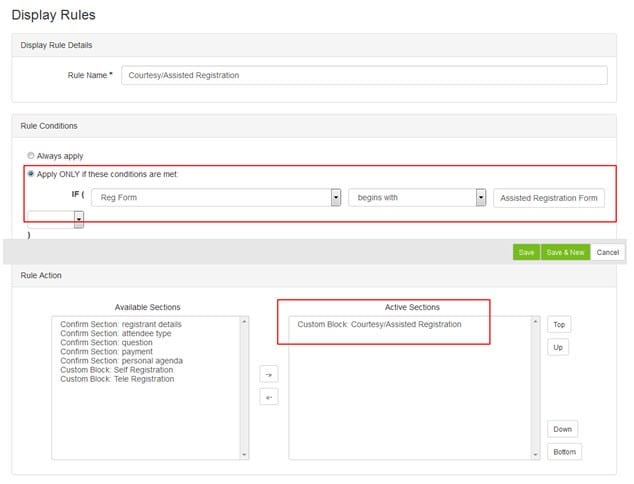
Assisted / Courtesy Registration:

This section validates, if the registrants registered through assisted registration form, then treated as a registrants from assisted form and displayed the assisted thank you note in the respective notifications.

courtesy-displayrule

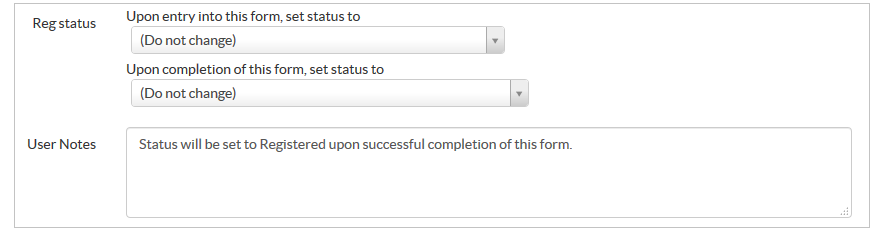
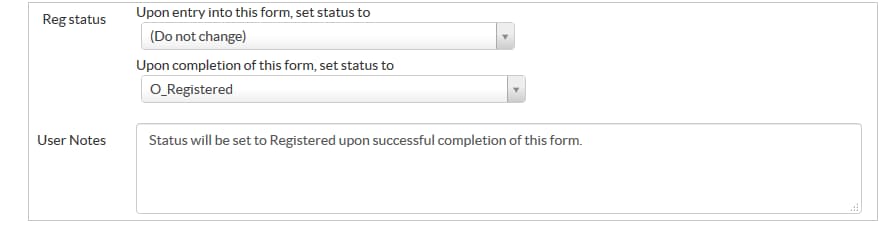
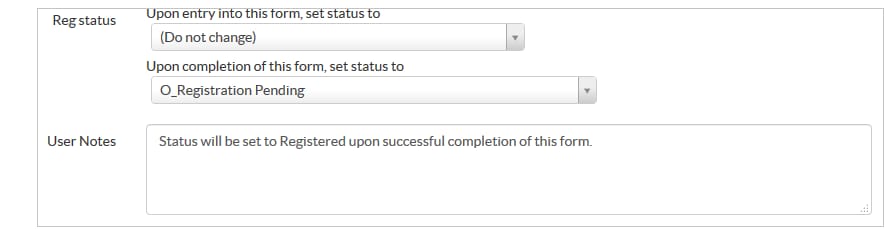
Enabling Notifications Based on the Registration Types

The display rules has been enabled in the initial/first notification which will be triggered to the registrants when they registered for the event.

In this case, if you work for the standard registration type event, then the display rules should be included in the Registration confirmation, and if you work for monitored registration type event, then the display rules should be included in the Pending notifications.

Notification details by registration types

  1. If registration type = Standard
    Email Registration Confirmation
  2. If registration type = Waitlisted
    Waitlist Email Registration Confirmation
    Waitlist Waitlisted Email
  3. If the registration type = Monitored
    Monitored Pending Email
    Monitored Approved Confirmation
    Monitored Declined Email

Steps

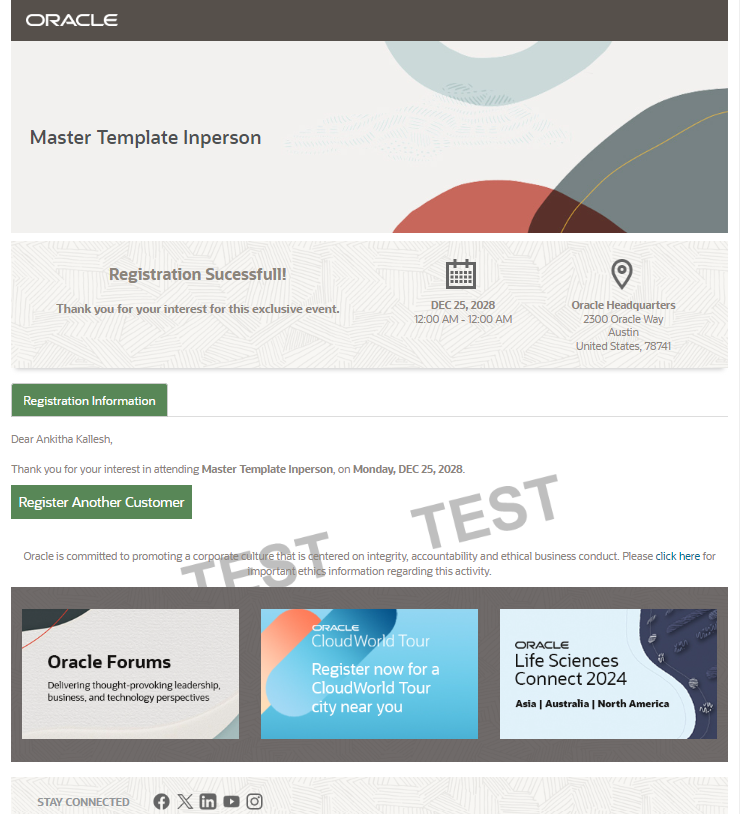
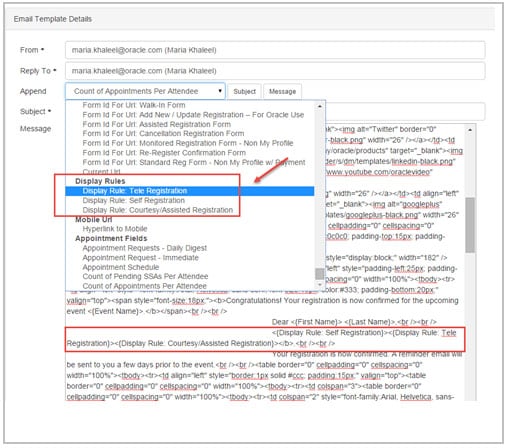
1. Click respective email template.
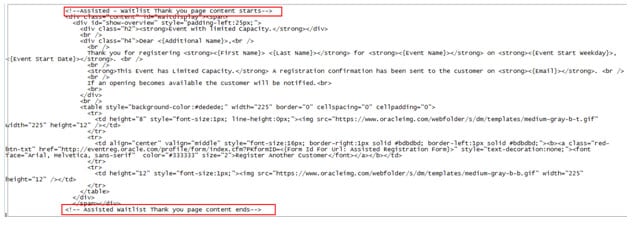
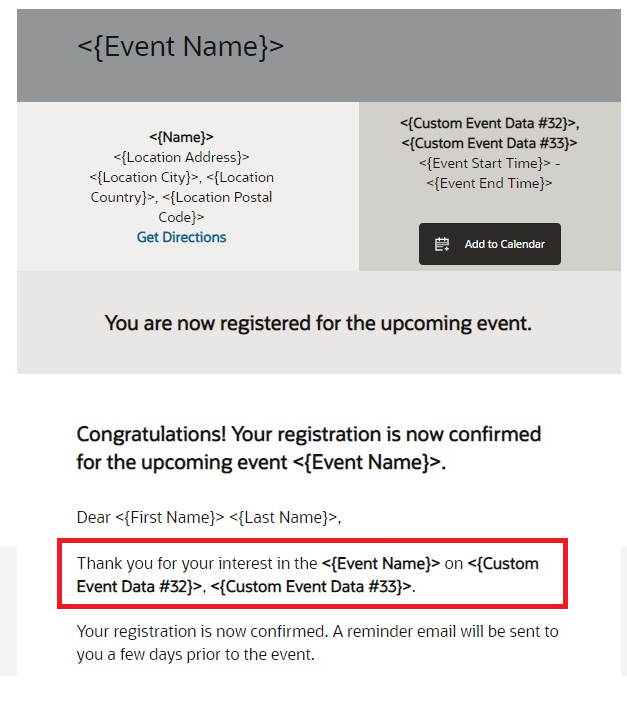
2. Find the default thank you note in the template as shown in the below preview screenshot.

Email

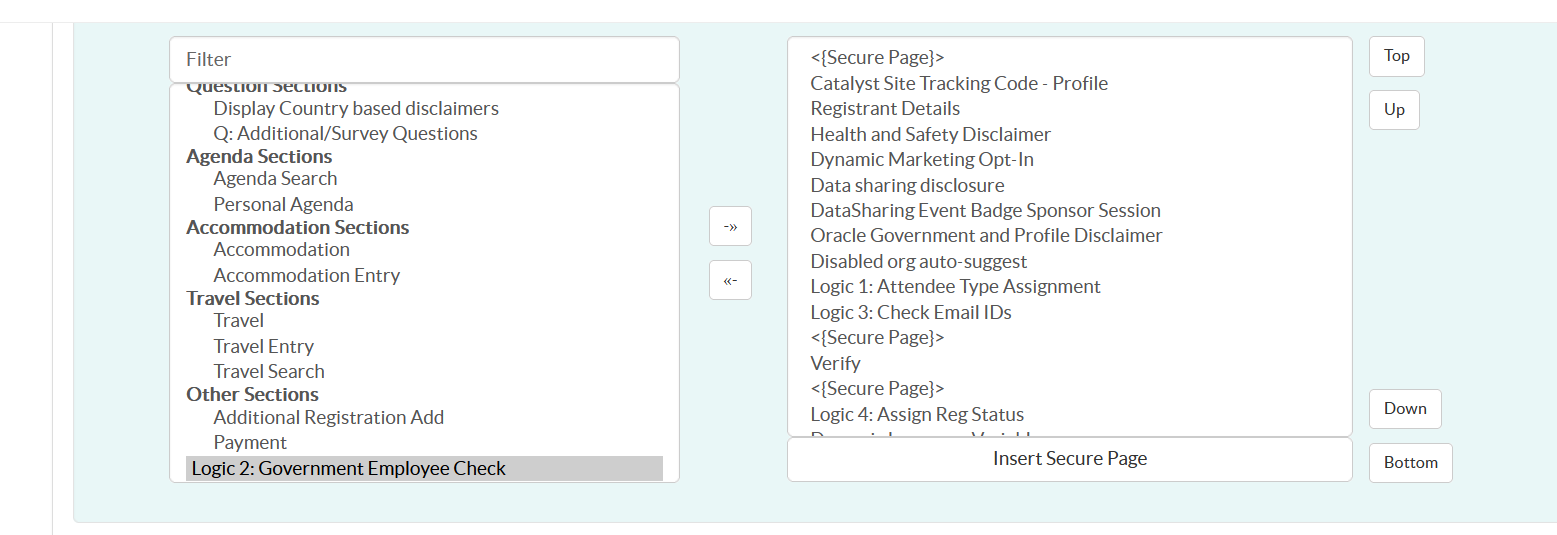
3. Above highlighted sentence Include / add the three display rules

Display Rule

4. Include / add the three display rules by selecting one by one to the highlighted section. Refer the below screenshot.

Display Rule

5. Save

STEP 6 - Enabling Walk-In Form (5 min)

This form will be enabled and helps the registrants to register for their event, when they walk-in directly to the venue. This form will act as self service, where registrants can fill their profile details, select the sessions and providing their additional feedback. The default status of registrants will be placed as "O_Check In Walk In" as shown in the below screenshot.

Logic Rules

Key points

  1. Form dedicated for Onsite usage, hence the form open date should be during the event.
  2. Registration Status set to 'O_Check In Walk In' otherwise requested.
  3. Same scrutiny applies as to pre-registration.
  4. If payment or other sensitive information is collected, customer should enter their own registration.
  5. Confirmation Page should redirect to back to the form after 30 seconds.
  6. No emails triggered.

Logic Rules included in the walk-in forms

walkin-logic

Logic 1 – To validate the registration source (Attendee type or Oracle staff) and assign the attendee type.

Thank you page Content

walkin-TYpage

Nailed it?

If yes, click below to confirm completion of this topic.

Yes, I have understood this topic well

Integrated Cloud Applications & Platform Services

We're here to help

Discussion Forum

  • To participate in our discussion forum join the slack channel #mktg-demandcenter or click here