Payment Process Guidelines for Certain Registration
Certain has a feature called online payment which can be used to process the payment online at the time of customer registering for the event. This functionality can be accommodated with different scenarios like validating promotional/offer code, paying for event admission or for business courtesy collection where public sector selects and pays for the items they want to participate in an event.
Online payment process will help marketers to collect the payment through certain easily and manage the cancellation process easily with refund policy.
Points to keep in mind:
! Upon receiving a payment OER, email the Marketing Compliance (marketingcompliance_ww@oracle.com) team with the marketer in CC to ensure approval has been granted if an approval email is not already attached to your request.
! If your event is collecting payments for sponsors, ensure your marketer has received appropriate approval from Marketing Compliance and reference these guidelines for regulations around sponsor registration payments. If your event is a Tier 1, reach out to scott.morgan@oracle.com. Also reach out to senthil.m.murugan@oracle.com and traci.delvecchio@oracle.com for additional guidance on event creation.
! All payment events (not Business Courtesy payments but true paid registration) must be added to this Oradocs as Maria Khaleel will be accessing it. Her team works with Cash Apps to ensure the amount collected routes to the cost center in the setup. She will need the following details:
- GMS Portal Request Number
- GMS Portal Request Name
- MRM Code analyst assigned
- GMSS requester details
- Request status
- Needed by date
- Due date
- Currency
- Event Country
! Payment events must be made live in Certain to test the payment processing. Ensure the following is correct before making live since these details cannot be changed once the event is out of testing:
- Program code
- Payment processing account (note, this account controls the currency type collected)
! Marketers may ask the DMS analyst to handle refunds and additional payments.
! Right before and after the event, you must check registrations for any balances due. Work with the marketer to fix any discrepancies so the books are balanced.

STEP 1 : ADD PAYMENT DETAILS IN EVENT DETAILS
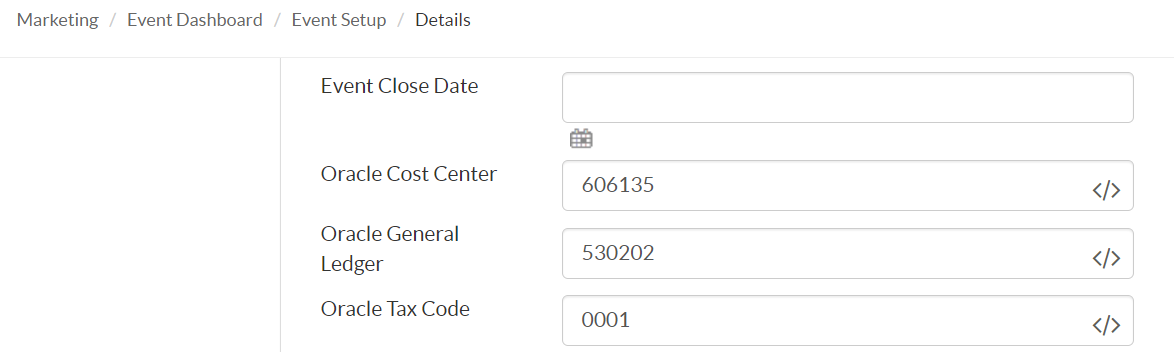
- Go to Plan > Event Setup > Details and update the following fields:
1. Oracle Cost Center: This info is found in your GMSS portal of your request; this is where the money collected will route to.
2. The marketer must supply the cost center payments details of where it should route.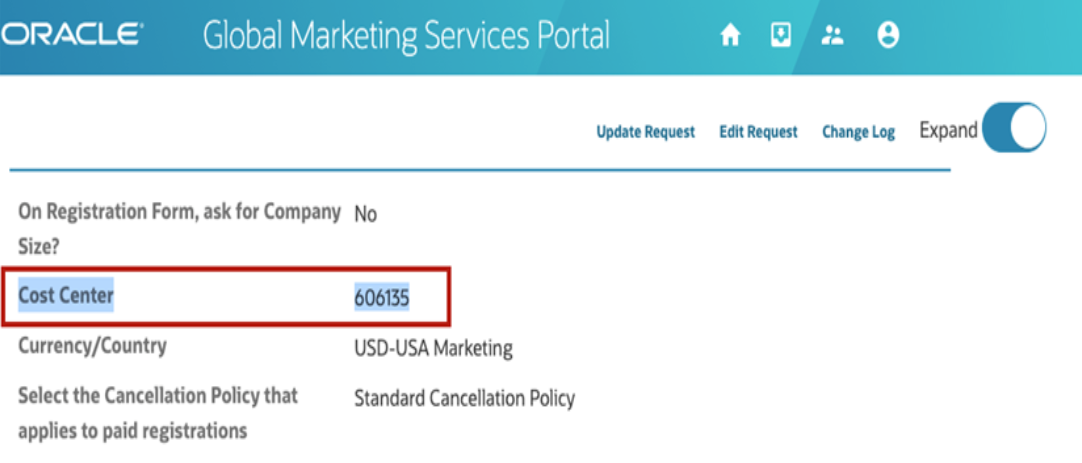
- Oracle General Ledger (GL):
a. For standard payment collection use the Marketing Events – External GL account: 530201
b. For sponsor payment collection use the Marketing Sports/Other Events Sponsorship GL account: 530002 - Oracle Tax Code: Use the table below to add the tax code related to the country of the event.
Country
Tax Code
Canada
0040
United States
0001
Singapore
0066
United Kingdom
0030
Japan
0050
* If the country is not available in this list, contact Maria Khaleel and Senthil for further guidance. There is currently no merchant account for Brazil or UAE, a pre-existing merchant account must be used instead.
PRO TIP
Need a quick checklist?
See these top 9 points and instructions HERE.
STEP 2: CONFIGURE THE FINANCIALS TAB
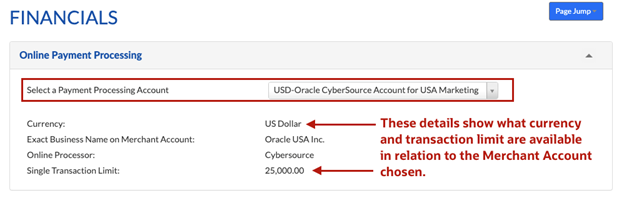
Go to Plan > Event Setup > Financials and configure the following:
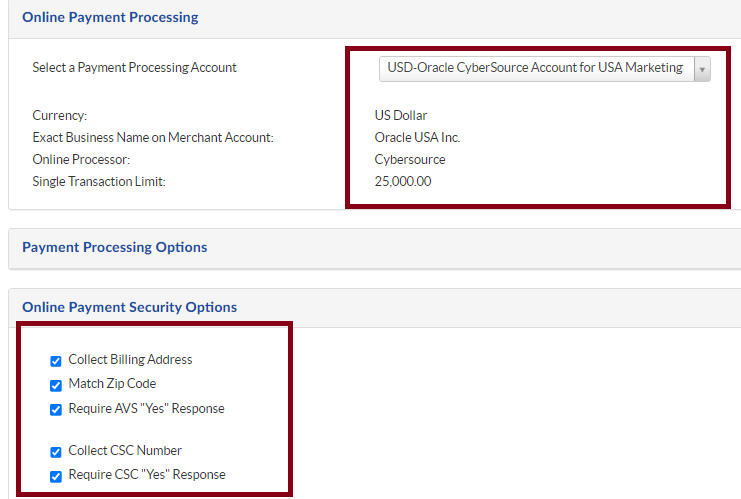
- Select a Payment Processing Account from the dropdown. This must correlate with first the currency being collected, then the country of the event. In some situations, a payment account may not exist that matches both the currency and country.
In this situation, you will need to ask the marketer which of the existing currencies would be preferred to collect payments instead.
Note: The payment processing account cannot be updated once the event is live.
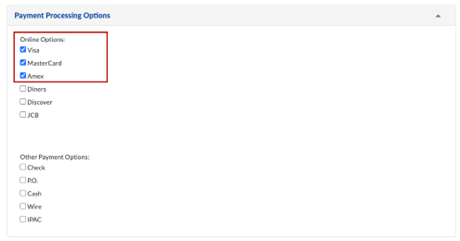
- Under Payment Processing Options make sure these options are updated:
a. For USD payment accounts check: Visa, Mastercard and Amex
b. For GBP (British pounds) payment accounts check: Visa and Mastercard
c. For SGD (Singapore dollar) payment account check: Visa and Mastercard
d. For other payment accounts the types of cards accepted may vary. Generally, Visa, Mastercard and Amex will be the only 3 accepted, and in some situations, Amex may not process and should be tested prior to public distribution.
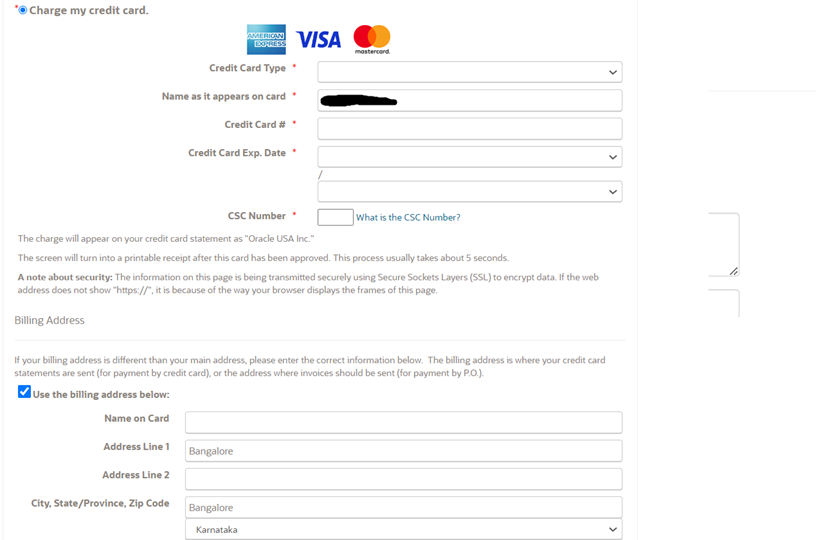
Note: None of the other payment options are allowed in Certain. - Under Online Payment Security Options make sure to check all boxes:
a. Collect Billing Address
b. Match Zip Code
c. Require AVS “Yes” Response
d. Collect CSC Number
e. Require CSC “Yes” Response
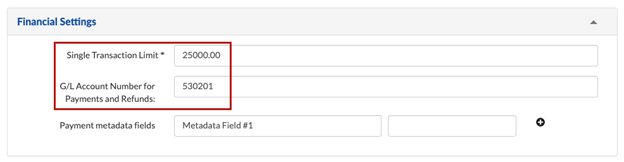
- Under Billing Address Options:
a. Bill to: Name on Card
b. Set the GL Account Number to the same General Ledger number from the Event Details section.
c. Save
STEP 3: CONFIGURE FEES AND DISCOUNT CODES (THROUGH ATTENDEE TYPE)
There are a few different ways to configure fees and discount codes in Certain. The below is a general guide. You will need to decide what is best for your payment event.
Setting up fees and discounts by Attendee Type
This is an option if you have event attendance fees associated to specific attendee types.
Go to Plan > Event Setup > Attendee Types:
- Click Add new or edit the existing attendee type for the fee updates.
- Ensure under Registration Fees, Fee Type to be Fixed Fee/Discount
- Tax Rules change to Non-Taxable
- Discount Rules leave as Apply Discounts (Note: we have noticed issues in the past changing from exclude discounts to apply discounts after an event has gone live.)
- Set the expiration date and time of the fee:
- If tiered such as Early Bird, General, Late your marketer should have provided the dates they want the fees to change. You will have to modify to fit Pacific Time if the event is in a different country. NOTE: The max tiers in Certain is 5.
- If it’s a single fee for the entire event, then select a date and time after the event ends. You will have to modify to fit Pacific Time if the event is in a different country.
- Enter the Fee Code which must be unique. Note: this code is visible on the reg form and invoice so make sure it’s appropriate and understandable for a customer.
- Leave Display for Reg Form blank (this will otherwise create a duplicate label on the reg form).
- Enter the Amount
- Save
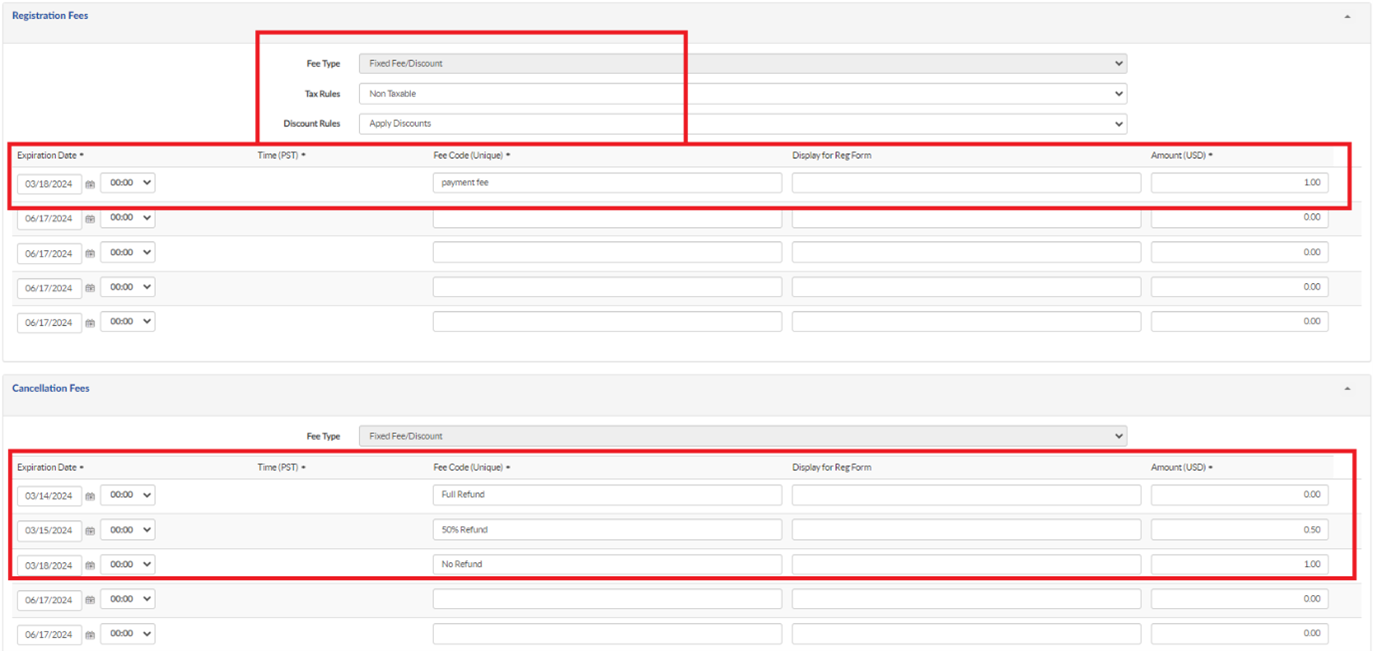
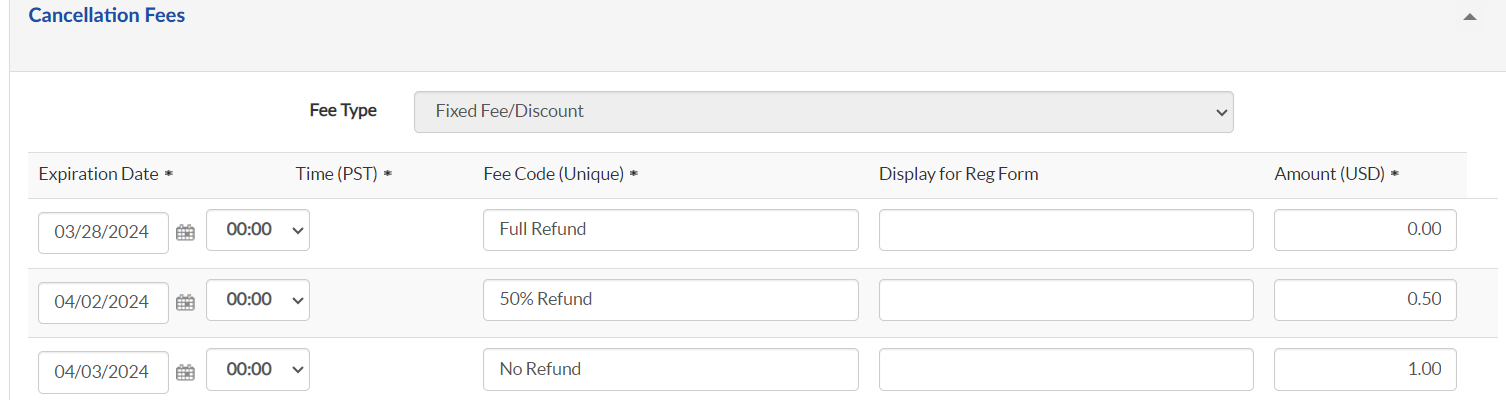
Cancellation Fee setup - Automated steps (this is optional, enable based on the demand)
Set up cancellation Fees in the attendee type itself. This will help to set the refund process manually/automated based on the cancellation policy.
Generic Cancellation/Rescheduling Policy
Oracle may cancel or reschedule an event at its discretion. If it does, reasonable effort will be taken to notify you at least one week in advance of the cancellation/rescheduling.You will not be charged for any event cancelled by Oracle. If the event is rescheduled, any payment made will apply to the new date, unless you choose to cancel your registration, in which case you will be refunded the full amount paid of the event.
Full Refund:
• Cancel your registration seven (7) or more calendar days prior to the event, Oracle will assess no charge, and any payment made will be refunded to you.
50% Refund:
• Cancel your registration 1 to 6 calendar days prior to the scheduled start date of the class, Oracle will assess 50% of the event fee.
No Refund:
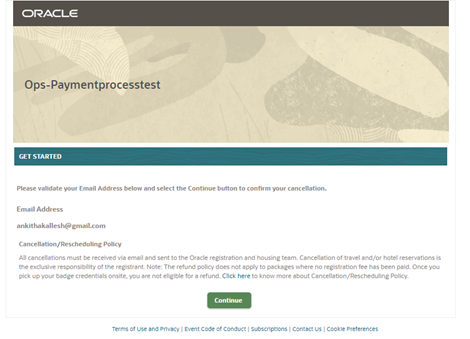
• Do not show up for the event, or cancel on the day of the event, Oracle will assess 100% of the event fee. If you would wish to cancel your registration to the event, follow the Cancellation Link in the confirmation email.
STEP 4 : CONFIGURE THE INVOICE
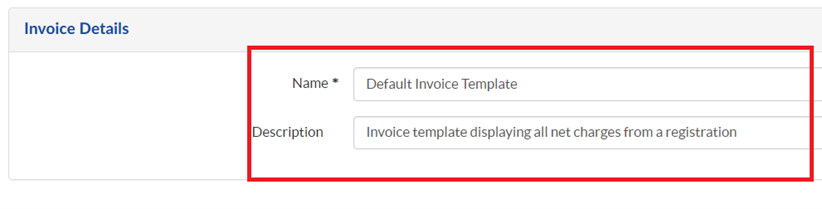
- Go to Promote > Invoices > Add New
- Default Invoice is created, if you require to create a new one, only then you can you go ahead and copy/modify based on your requirement or else use the default one which is available in the template.
- Invoice Header: (Do not modify the PO address, the event name merge field may be modified if the c/o name needs to be different)
		<div> <span style="font-size:16px; font-family:'Oracle Sans', Noto Sans, Helvetica, Arial, Sans;">Oracle America, Inc. <br> c/o <{Event Name}>
			<img alt="Oracle" src="https://www.oracle.com/webfolder/dms/m/oracle-certain-invoice.png" style="max-width: 255px; float: right; height:auto;" /></span></div>
<div>
<span style="font-size:16px; font-family:'Oracle Sans', Noto Sans, Helvetica, Arial, Sans;">PO Box: 884471<br />
Los Angeles, CA 90088-4471</span></div>
<h3>
  </h3>
<div>
  </div>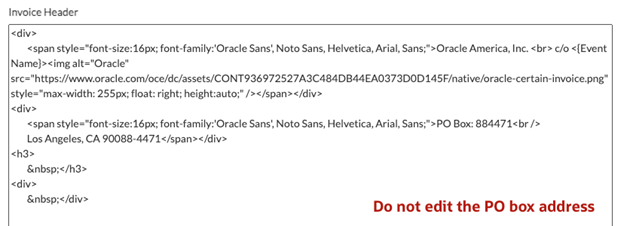
- Date and Time Format: You may update to match your event country’s preferred format.
- Leave all other fields as default and save.
STEP 5 : ADD PAYMENT RELATED EMAIL TEMPLATES
Go to Promote > Email Templates and make sure these emails are existing in your event.
Cancellation To Be Refunded Email
Please make sure the below emails have been associated with the invoice template by selecting the check box “Attach Invoice PDF”.
- Email Registration Confirmation
- Event Reminder Email
- Refund Issued Email
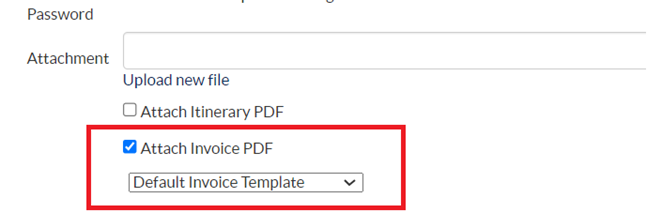
The above emails received after paying online should always have the invoice attached and the cancellation policy. The marketer may request the cancellation policy to be dynamically displayed to only those who have paid via a custom block.
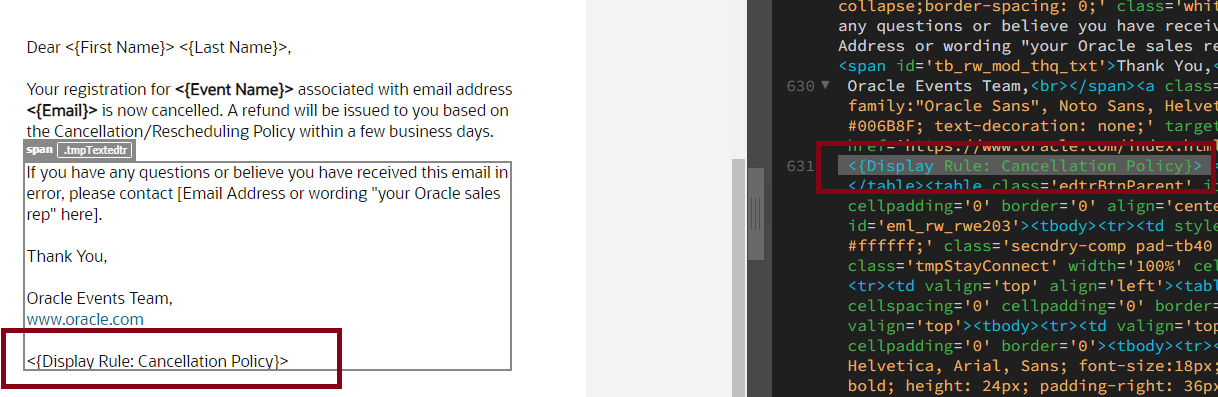
Content block HTML example for email:
Please make sure display rule is added after a closing content table of the emails:
STEP 6 : REVIEW THE PAYMENT REG STATUSES
Go to Plan > Event Setup > Custom Statuses and make sure these are added:
- If the marketer wants this email automated for cancellations, usually recommended and is setup by default:
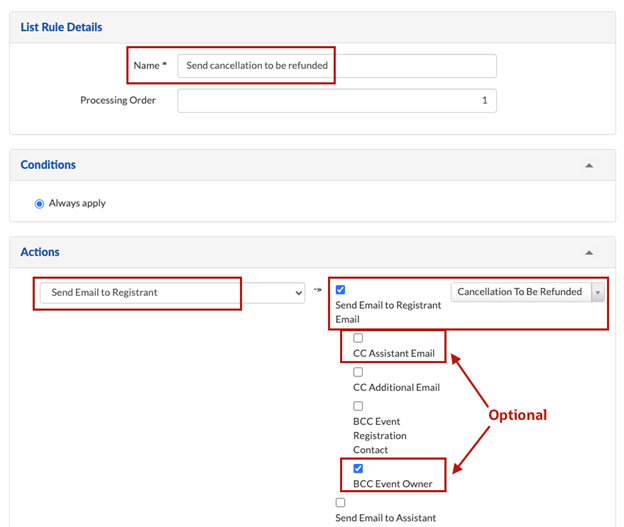
- Go to O_To Be Refunded Custom status - Click the “Advanced” button on the bottom left, and click on Send to Be Refunded Email logic rule, under actions check the Send email to Registrant Email and select the Cancellation To Be Refunded email from the drop-down and you may optionally decide to check CC Assistant and BCC Event Owner if the marketer wants to be notified of cancellations requiring refunds.
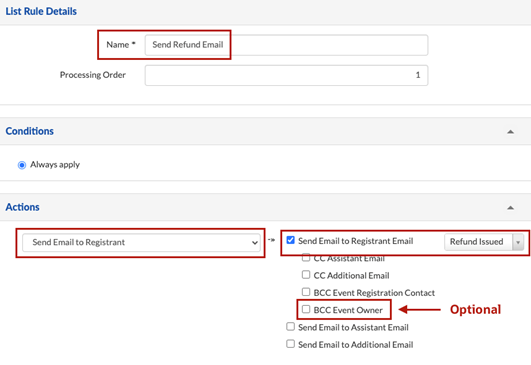
- For O_Cancelled Refunded status - Click the “Advanced” button on the bottom left, click on Send Refunded Email, under actions check the Send email to Registrant Email and select the Refund Issued email from the drop-down and you may optionally decide to check BCC Event Owner if the marketer wants to be notified when the refund has been processed.
If requested to CC Assistant, we may need to confirm with Marketing Privacy is this is okay due to the invoice attachment.
STEP 7 : UPDATE THE REGISTRATION FORMS WITH PAYMENT DETAILS
Follow the below steps on each registration form that requires payment processing.
Note: If using a monitored event, payments will not process when the reg status is set to a “Pending,” “Denied,” or “Cancelled” type. The payment will process only when an “Accepted” status type is used. You can check a custom registration status type under Plan > Custom Statuses > You’ll see the type listed on the right.
Configure the Payment form:
For each form, even if copied from an already configured form, you must follow these steps each time since the payment settings resets to default.
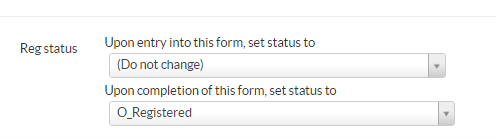
- Ensure Reg status is set to O_Registered and upon form completion, you would receive an Email registration confirmation email.
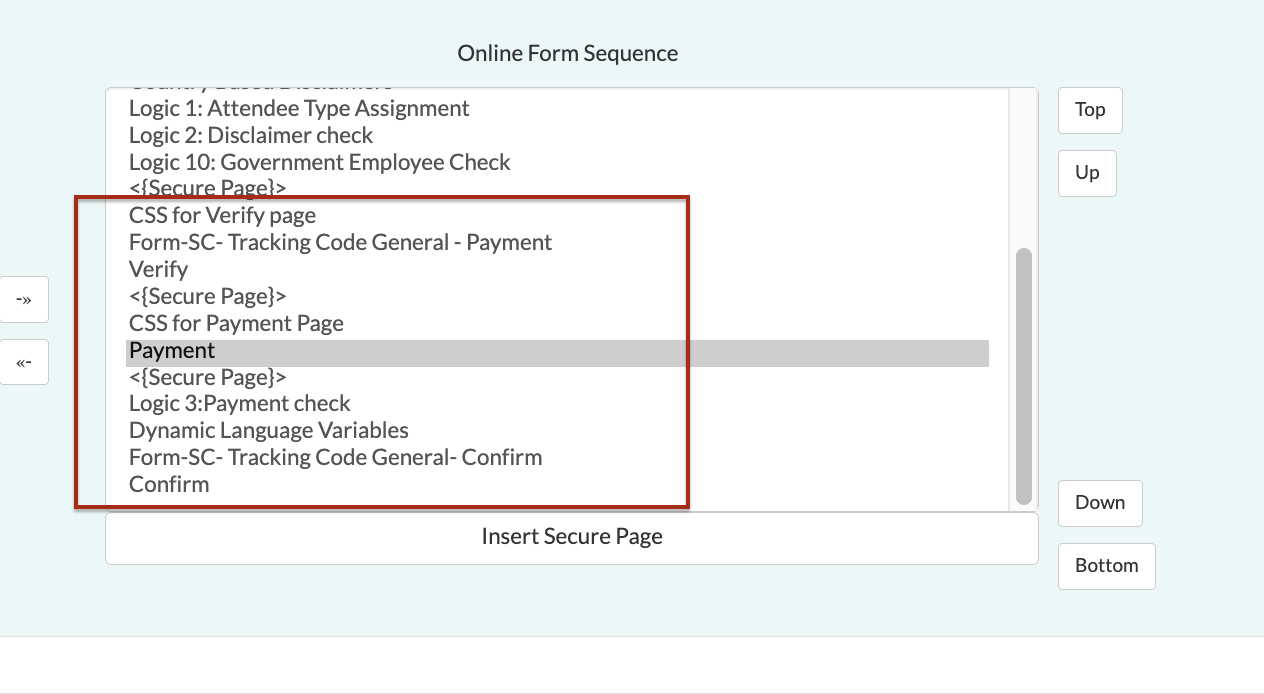
- Go to the form’s Setup tab of payment form and in the Online Form Sequence you should add as per the below screenshot.
- Verify page (this should be placed after all registration questions have been answered and just before the payment page)
Note: CH: Cancellation Policy and Payment page (these should be on the last page of a registration form, after a verify page)
Configure the form’s Payment Tab
- Go to the form’s Payment tab.
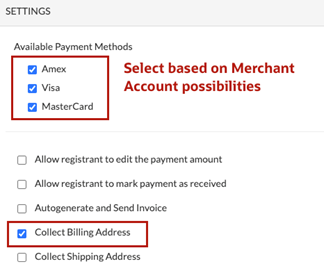
- Under Settings:
(Note: Once you select the Payment Processing Account below as per the point 3, these checkboxes need to be updated back again as it will be unchecked. It would be better if you select the Payment Processing Account first and then update the other checkboxes.)
a. Check the same payment methods that align with your Merchant Account: Amex, Visa and/or MasterCard.
b. Check Collect Billing Address
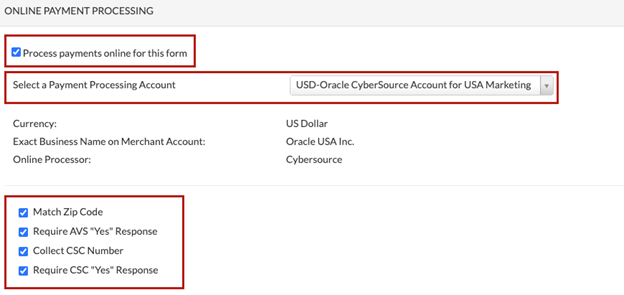
- Under Online Payment Processing:
a. Check “Process payments online for this form”
Note: IF this is not checked, payments will not process, they will instead be in limbo on a registration card.
b. Make sure you should select a Payment Processing Account dropdown with the same Merchant account selected in the Event Setup Financials tab.
c. Check these boxes:
i. Match Zip Code
ii. Require AVS “Yes” Response
iii. Collect CSC Number
iv. Require CSC “Yes” Response
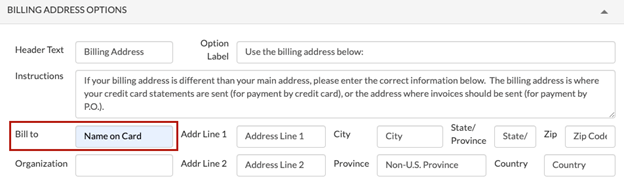
- Under Billing Address Options:
a. Bill to: Name on Card-
Note: If this is left blank, some customers may hit an error on the payment form or the payment may not process.
- Before the setup of the logic Tab, set up the Custom Registration Property under the Plan -> Options Tab to identify the Payment Completed status based on Attendee Types.
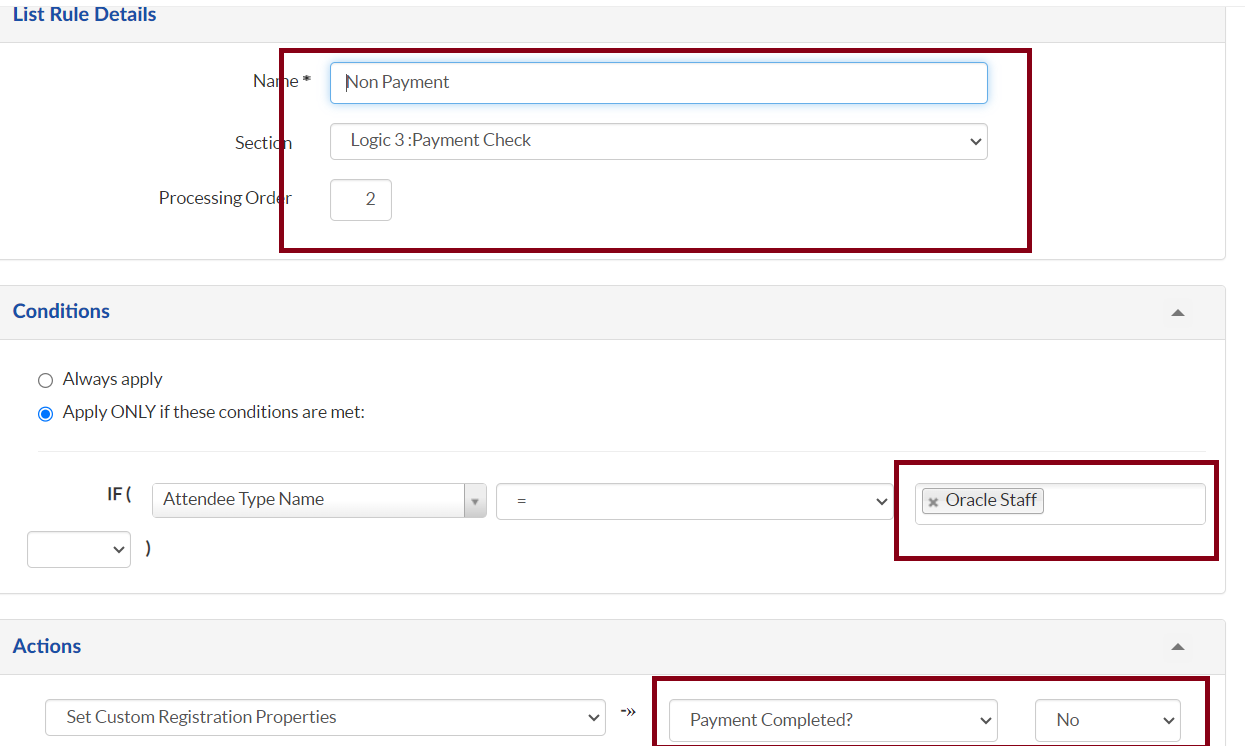
- Ensure the Payment form’s logic tab is configured to differentiate between the Attendee and Oracle staff.
a. Attendee
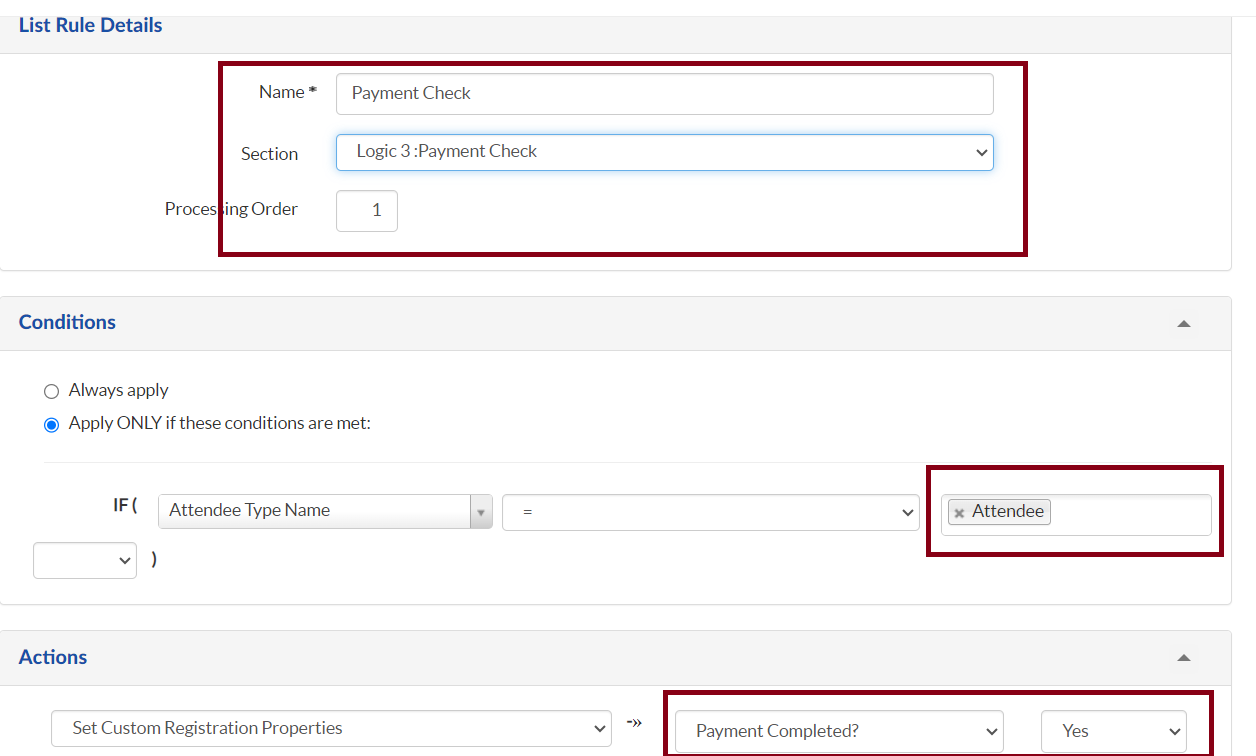
b. Oracle Staff
- Go to the form’s Setup tab of the Cancellation form and in the Online Form Sequence you should add as per the below screenshot.

Note: CH: Cancellation Policy and Payment page (these should be on the last page of a registration form, after a verify page)
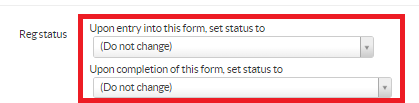
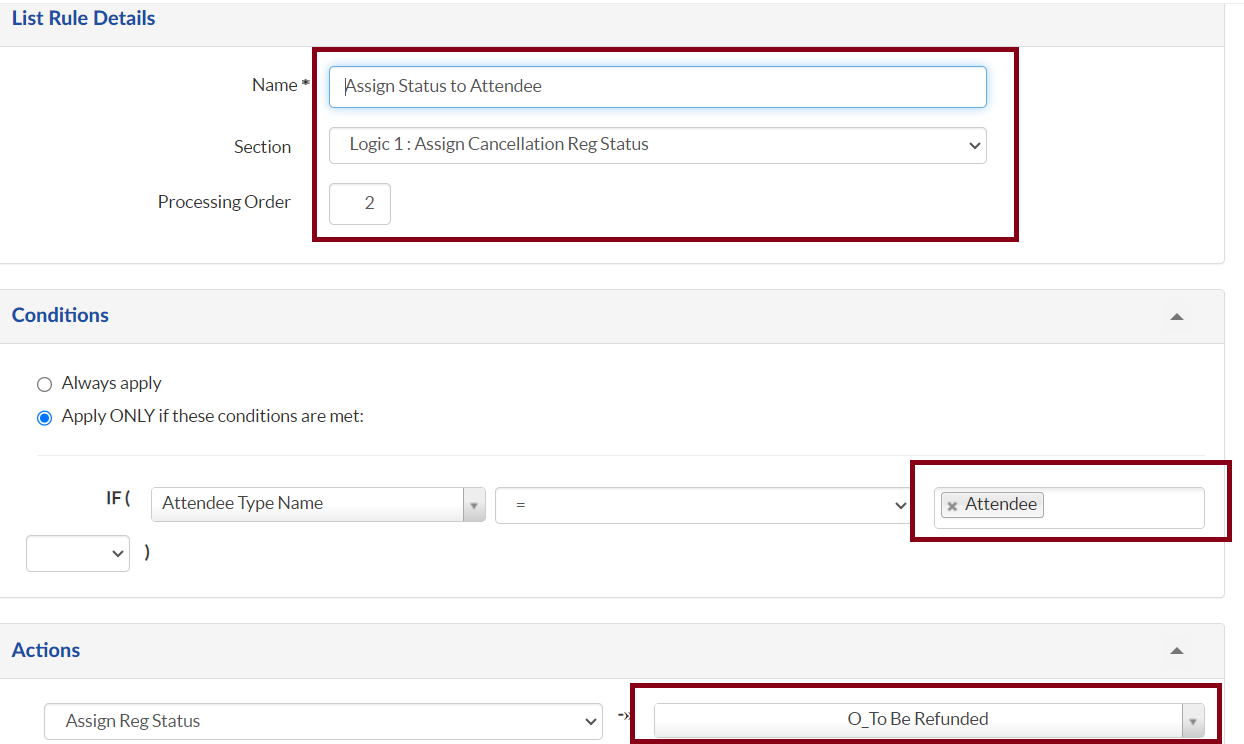
- Set the registration status to Do not change as we will be creating logics based on attendee types and reg status would be assigned as per the logic set below.
- Ensure the Logic below is added
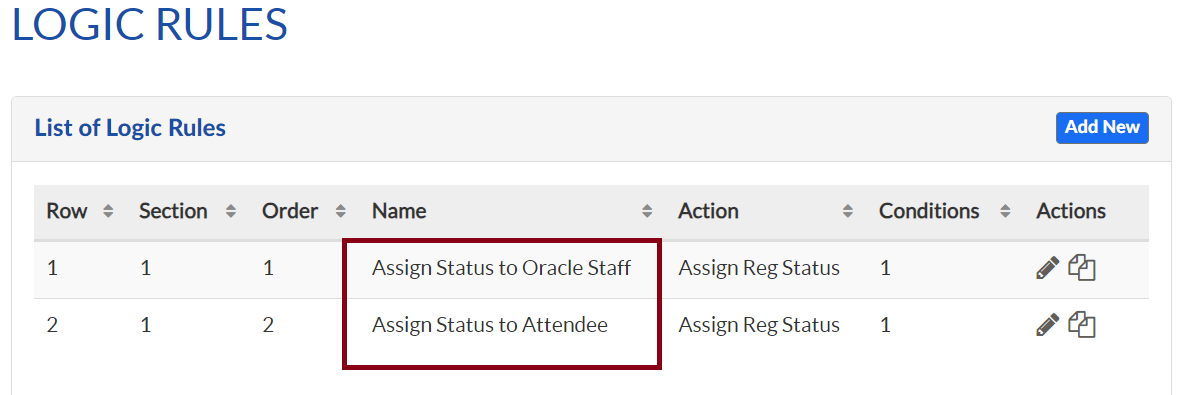
a. Assign status to Oracle staff
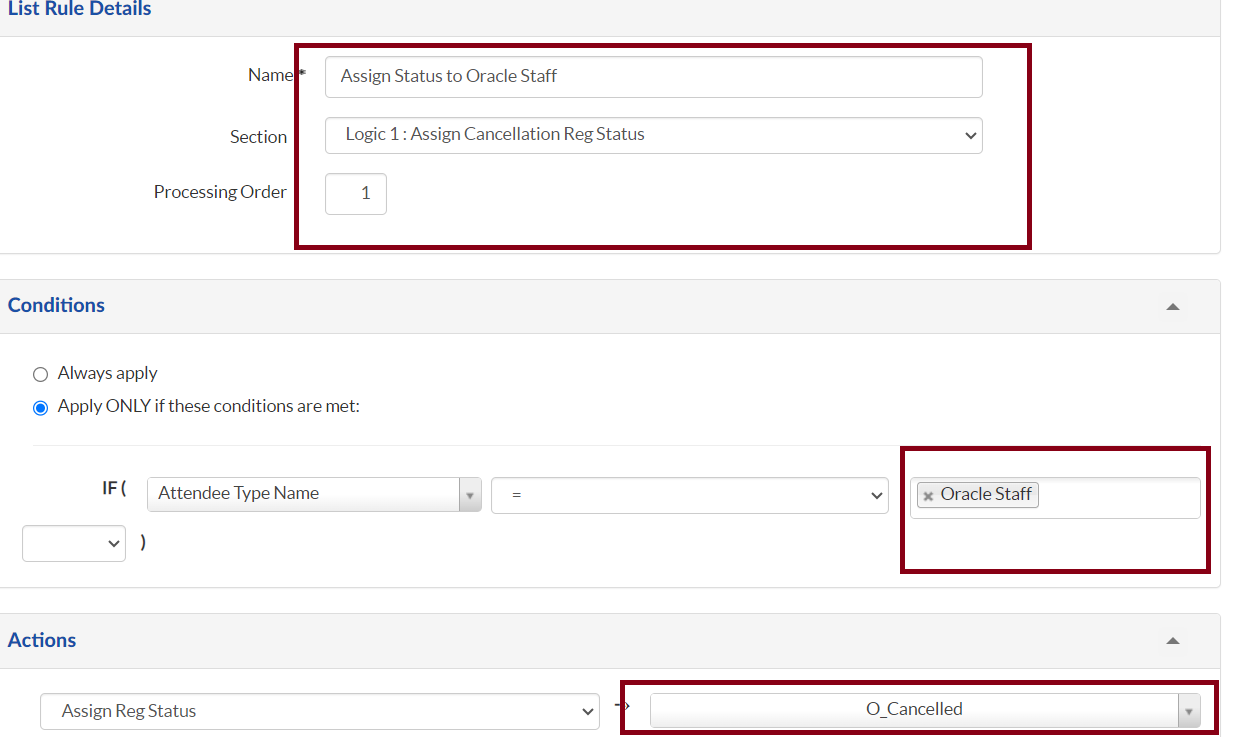
b. Assign status to Attendee
- Ensure the Cancellation policy is displayed based on the attendee type (used the logic to display the custom HTML)
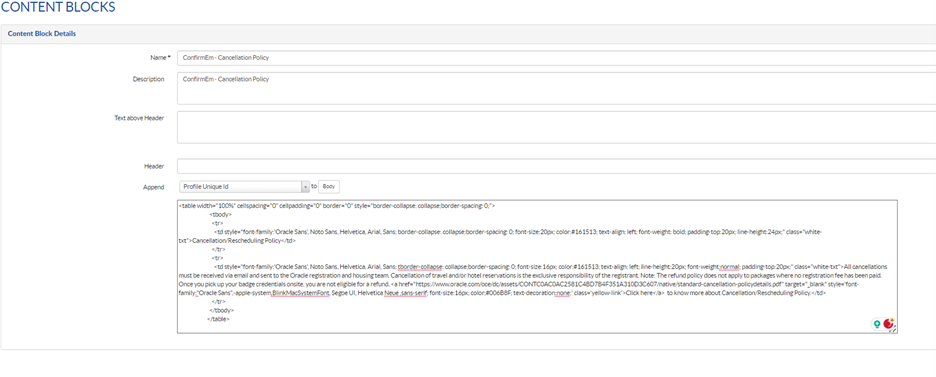
- Go to the Event set up->Content Blocks tab and create a new Content Block Details
1. Section name: ConfirmEm - Cancellation Policy
2. Include the cancellation policy for your event.
Configure the form’s Logic’s Tab:

Update the cancellation form:
Configure the CONTENT BLOCKS
Note: 1. Make sure this is added and you can modify based on your requirement.
Make sure the cancellation Policy is added to both forms(Payment form and Cancellation form)
STEP 8: TEST AND APPLY REFUND
Testing
To test a paid event, you must first take the event live in Certain. Make sure to triple check the program code and merchant account are correct prior to taking the event live. You can put a note in your DQA you had to take the event live for testing payment processing.
Tips for testing payment processing is working:
-
1. You do not need to make a test payment in the full amount, especially if it’s a high dollar amount. You can update the fee you are testing to $1.00, create a new fee item for $1.00 or if your event is using promo codes, create a promo code to reduce the amount to $1.00.
2. Even as a test, if you use your Oracle Corporate credit card, you will be required to submit an expense report with invoices for both the charge and refund. Keep in mind not all merchant accounts accept AMEX, so in some cases testing your personal card may be a preferred route, but up to your discretion. You may also reach out to a team member with a corporate card to test the event if you are uncomfortable testing the account with a personal card.
NOTE: You cannot delete any reg cards associated with a successful payment. It is ideal to keep paid tests to a minimum and ensure they are put in a cancelled status with the Test attendee type so your marketer can scrub them from reports.
Tips for bypassing payments for testing:
- 1. For QA or other testing purposes where you need to bypass the payment portion, you can choose to do one of the following:
a. Go to the payment form, fill all the details necessary and add the credit card details for the amount deduction and update the billing details.
b. You should be able to see below details as per the screenshots.
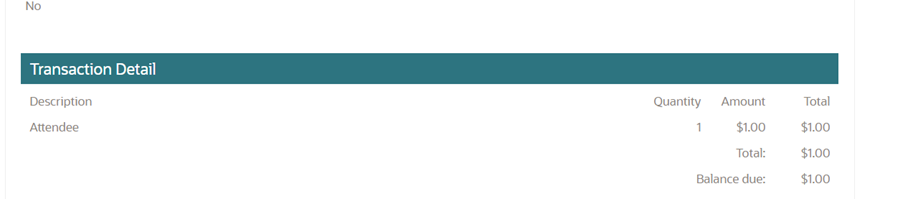
c. Once submitted you will be receiving the confirmation email with the invoice bill.
Refunding
After testing the event, you must issue refunds to keep the books balanced for the event.Note: Marketers may also ask the DMS team to apply refunds to registrants.
To apply a refund, follow these steps:
There are two ways of refunding,
- Open the registration card of the registrant requiring a refund.
- Before any further steps make sure you’re clear on what has happened in the financial tab of this registrant and what reg status the registrant needs to be in to make the refund. You’ll want to ensure the balance is always 0 when you are done. If you have any confusion, consult with your marketer first.
- Refund automation:
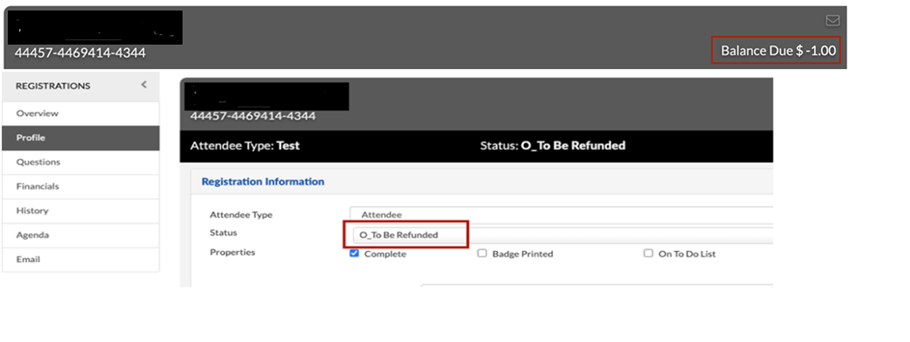
If the event cancellation fee is updated as per the generic cancellation refund policy, this process setup automatically takes care of the refund based once registration is canceled. The Reg status from O_Registered to O_To Be Refunded will be automatically set. You will be able to see the refund amount shown in the balance due based on the event cancellation fee setup, and do the refund as explained in the above section. You can change the status to O_Cancelled_Refunded manually for each record after refund is processed.
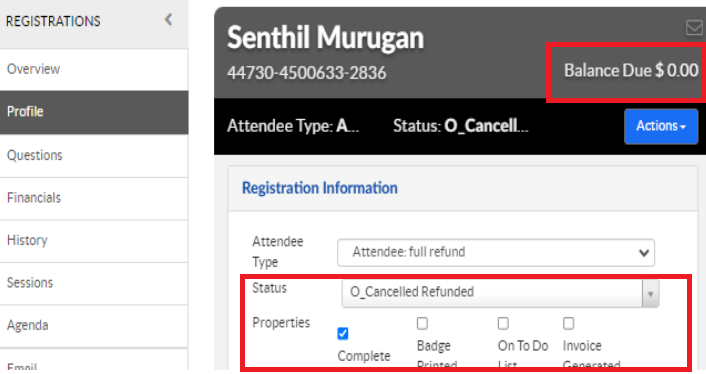
a. If the registrant has cancelled, in the profile tab, set the registration status to O_To be refunded if this has not already been done (Note: if this person should receive the to be refunded email if this status is setup to auto trigger that email). Upon changing this status, you should see the balance due change to a negative amount (Meaning: Oracle owes this amount to the registrant) Ignore this step if registrant is still attending.
a. Go to the Financials tab of the reg card.
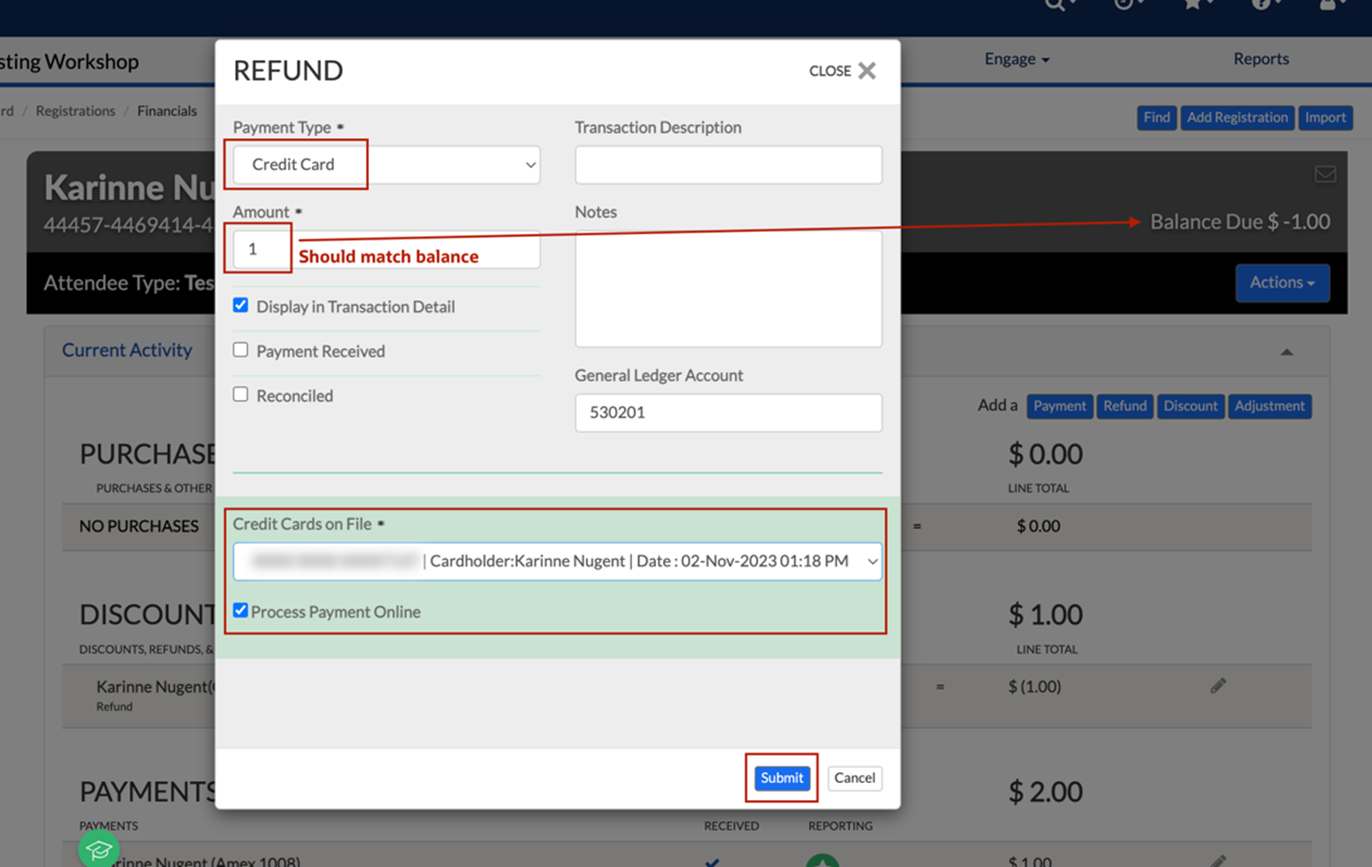
b. If for a full refund, click the blue “Refund” button
-
1. Select Payment Type: Credit Card
2. In the Amount field, match the Balance due (example balance due $-1.00, Amount should be 1.00
3. Under Credit Cards on file, select the credit card of the registrant.
4. Ensure Process Payment Online is checked
5. Optionally: If the marketer would like to add any transaction description or notes that will appear on the invoice, you may put those details in those fields respectively.
6. Click Submit to process the refund (Note: you may have to refresh the financials tab to see the balance due adjust properly)
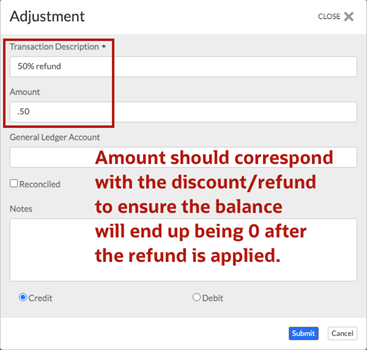
c. If for a partial refund, click the blue “Adjustment” button
1. In the Transaction Description, type a description that corresponds to the partial refund you will be giving that is appropriate to be seen on the invoice for the customer (example: 50% refund)
2. In the Amount, put in the dollar amount that corresponds with the discount/refund to ensure the balance will end up being 0 after you apply the refund. (Example: If the registrant paid $2.00 and needs a 50% refund you would put in 1.00 for the Amount because you’ll be refunding 1.00, if the registrant paid $1000 and needs a 25% refund you would put 750 in the amount so you’re only refunding 250)
3. Select Credit
4. Click Submit (Note: you may have to refresh the financials tab to see the balance due adjust properly)
5. After the adjustment has been made and the balance due matches the exact amount you need to refund, click the blue Refund button and follow steps above for a full refund.
d. If cancelled, when the balance has reached 0 on the reg card, you then set the reg status to O_Cancelled Refunded to trigger the refund email with invoice to the registrant. If still attending, follow the next step instead.
e. If still attending, in the Financials tab, click “Generate New Invoice”. After the new invoice is generated, star it as the primary invoice. Once the primary invoice is select, it is recommended to then email the registrant an invoice only email for his/her records.
STEP 9: TROUBLESHOOTING
- Make the event live
- Mark test records as live:
- In each individual registrant card collected in test mode, you can make a manual payment using the below:
-
a. Open the registrant’s card and click the Financial tab
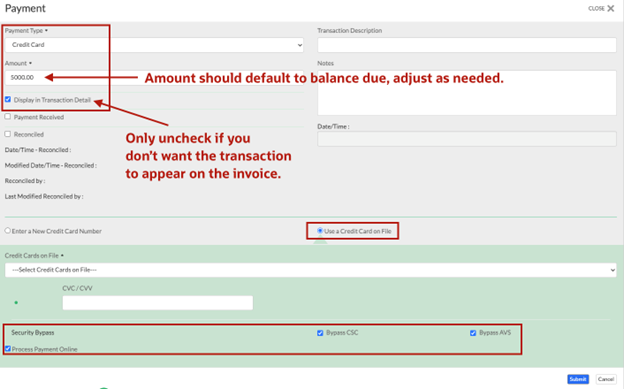
b. Click the blue Payment button
c. Select Payment Type: Credit Card
d. Amount: Should default to the balance due, change as needed
e. Transaction description / Notes: Optional, this would be additional info that should appear on an invoice or Certain reports
f. Select Use Credit Card on File
g. Select the registrant’s credit card from the drop down
h. Check:
-
i. Process Payment Online
ii. Bypass CSC
iii. Bypass AVS
Note: If step 3 does not work, you will likely need to either have the marketer collect the CVC number of the credit card or ask the registrant to go through a re-reg form for the payment to process
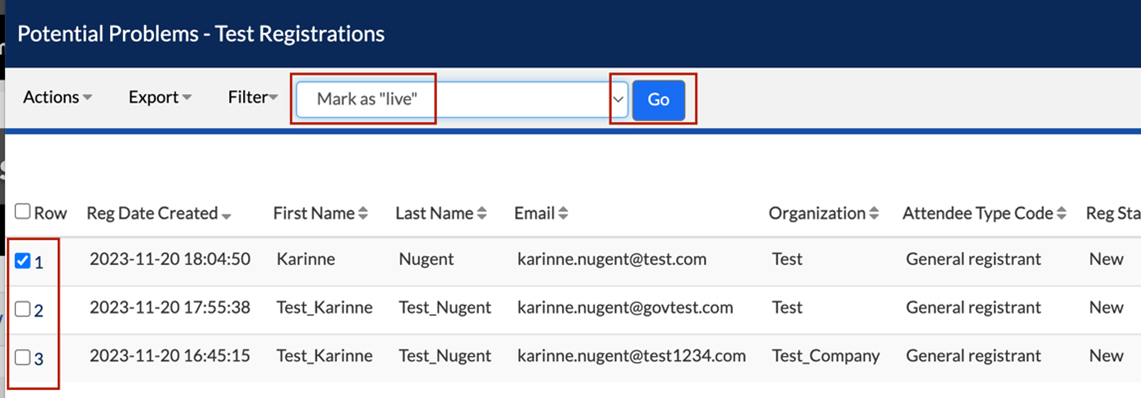
-
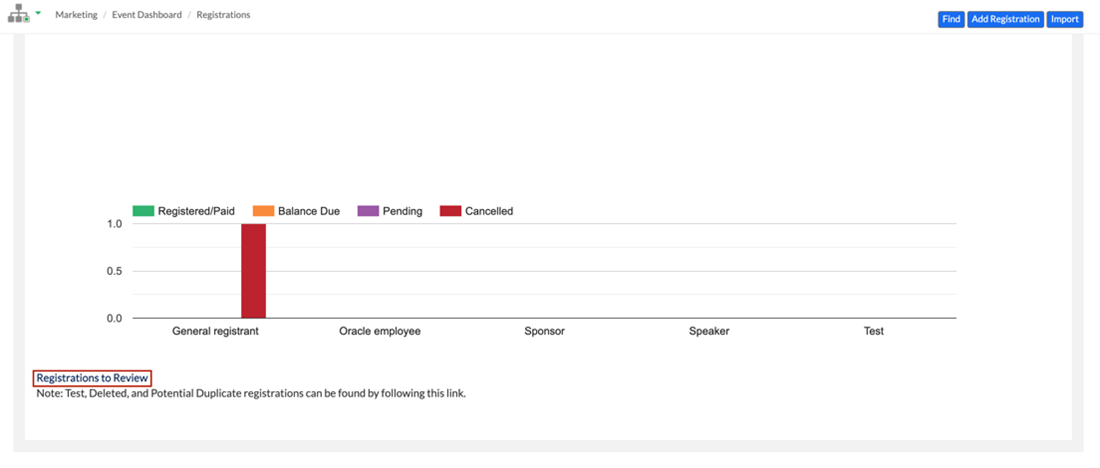
a. Go to the Event Dashboard and click the link “Registrations to Review”
b. Click the number link related to “Test Registrations”
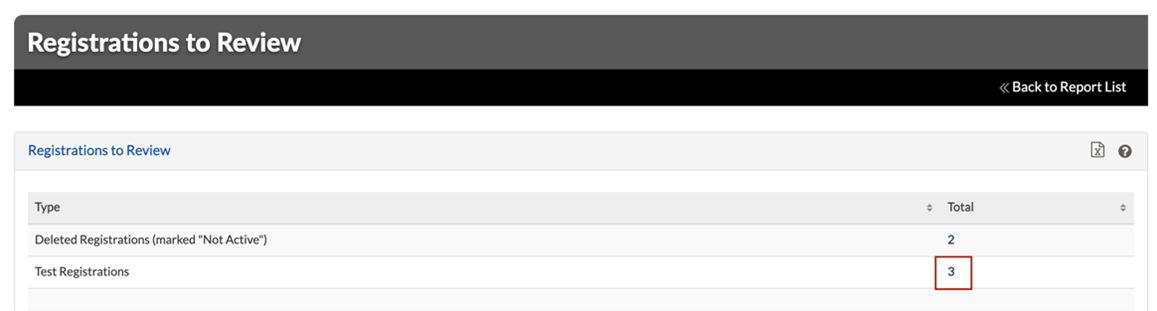
c. Check the box of each registrant and select the mass action “Mark as live” and click the blue “Go” button.
Related Topics
Integrated Cloud Applications & Platform Services
We're here to help
- For any issues raise a ticket under the appropriate section in the communication tracker.
Discussion Forum
- To participate in our discussion forum join the slack channel #mktg-demandcenter or click here