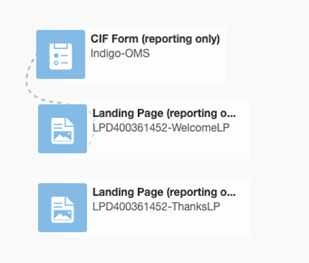
Indigo CIF Form
The Indigo CIF is a specialized form routing leads by region. Please note, it is currently only configured for English with a standard set of 9 questions. Please do not edit the Indigo-OMS form asset in Eloqua.
In this section you will learn how to configure the:
• MRM channel codes
• Welcome page
• Thank you page
• Eloqua canvases
• Validating form data

STEP 1 - MRM Channel Codes
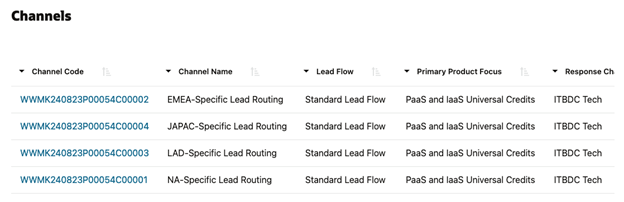
1. Log in to MRM and pull up your Program Code. For detailed steps on searching MRM codes, click here.
2. Verify if channel codes have already been created for all the regional routing options.
a. If channel codes have been made, take note of them and their correlating region.
b. If no channels have been created, check your request for the regional form options and create channel codes. Consult your marketer as needed.
When creating a new channel:
1. Under Details > Lead flow
a. Take a screenshot of the current Lead Flow steps.
b. Change Lead Flow field to Multi-Channel.
c. Update the Response Channel to match the original setting from your screenshot.
d. Save.

2. Under Channels > Create a new channel for each routing option:
a. Name: Input a name in line with the routing option (examples: NA Leads, or NA-Specific Lead Routing, etc.)
b. Referencing your screenshot of the original lead flow settings, fill in Lead Flow, Response Channel and Product Focus to match.
c. Save and repeat for each region required.
Step 2 – Create Welcome Page
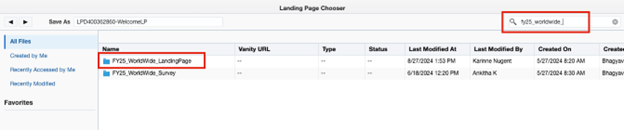
1. Log in to Eloqua > Click Assets > Landing Pages.
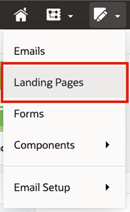
2. Click “Create a Landing Page”.

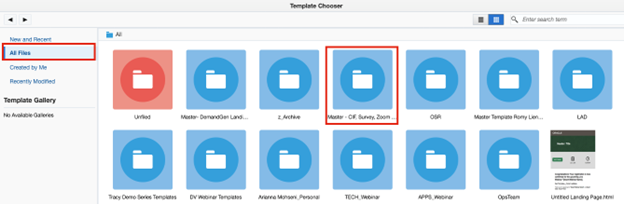
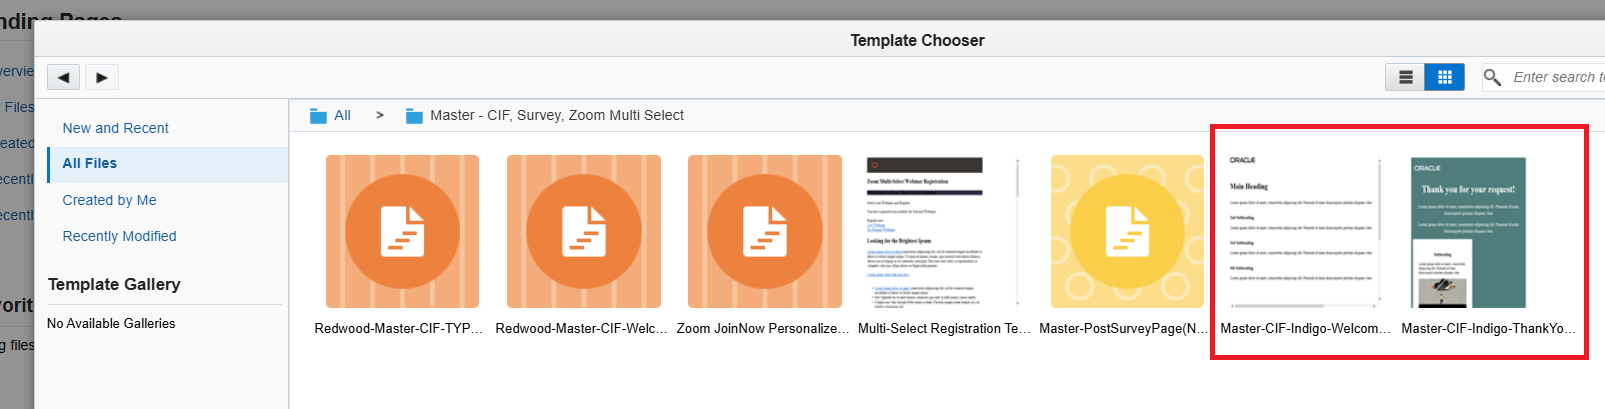
3. Navigate to All Files > select the folder “Master – CIF, Survey, Zoom…” > select the “Master-CIF-Indigo-Welcome-Page” template.
Master Template
4. Update the file name with “PortalRequest#-WelcomeLP” or something similar.
5.Select go.oracle.com domain.

6. Go to File > Save As… and place in the appropriate regional Landing Page folder.
7. Update the following scripts and header details in the code:
a. var ora_stepName = 'Home page - XXXX'; // Update with the product name; pro tip, save this name to a notepad for use in the thank you page (examples: Oracle Database@Oracle Cloud or Oracle Integration RPA Demo) **This script is located above the Title tag**
b. <title>XXXX</title> // Update with an appropriate browser tab name for your landing page.

c. var s_pageName = 'Welcome Page:/XXXX; // Update with the same product name used in the ora_stepName parameter. **This script is located at the bottom of the code**

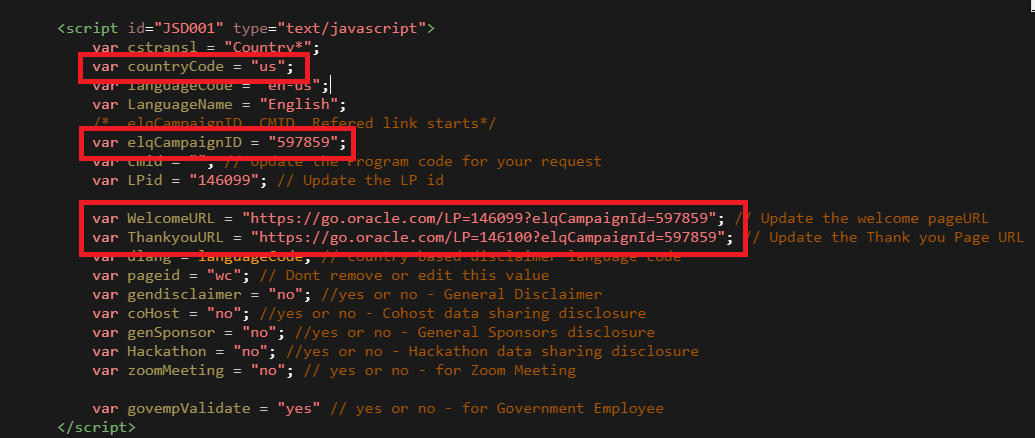
d. var countryCode = "us"; // Update to the target country to have the java scripts adjust the footer links appropriately.
e. var elqCampaignID = "XXXX"; // Update with the Eloqua Campaign ID number for your welcome page.
f. var LPid = "XXXX"; // Update with the Eloqua ID number for your welcome page.
g. var WelcomeURL = "https://go.oracle.com/LP=XXXX?elqCampaignId=XXXX"; // Update the LP ID number for your welcome page. Do not forget to add the campaign ID.
h. var ThankyouURL = "https://go.oracle.com/LP=XXXX?elqCampaignId=XXXX"; // Update the LP ID number for your thank you page. Do not forget to add the campaign ID.
i. All other variables, leave as is.
8. Update the following form details in the code:
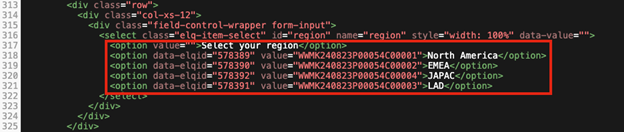
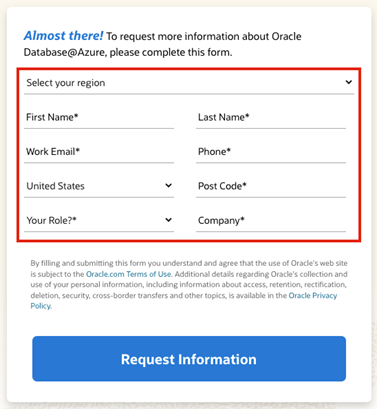
a. Locate the Select your region question and related options.
b. For each routing region:
i. Update data-elqid="XXXX" to the specific region’s channel code Eloqua canvas ID number. Not the main canvas ID.
ii. Update value="PC-Channel" to the specific channel code for that region.
iii. Update text between the opening and closing <option> tags to match the region name to appear on the form for users as required by your marketer.
9. Update the body content and imagery per marketer’s requirements.
10. When you provide the welcome page URL to your marketer, manually append the main canvas campaign ID to the URL. Example: https://go.oracle.com/LP=144190?elqCampaignID=578391
PRO TIP
1. Before starting the landing page creation, organize all your routing names with their associated channel codes and Eloqua canvas IDs in a notepad.
STEP 3 - Create the Thank You Page
1. Navigate back to Assets > Landing Pages.
2. Click “Create a Landing Page”.
3. Navigate to All Files > select the folder “Master – CIF, Survey, Zoom…” > select the “Master-CIF-Indigo-ThankYou-Page” template.
4. Update the file name with “PortalRequest#-ThanksLP” or something similar.
5. Select go.oracle.com domain.

6. Go to File > Save As… and place in the appropriate regional Landing Page folder.
7. Update the following scripts and header details in the code:
a. var ora_stepName ="Thanks page - XXX" // Update with the same product name used in the ora_stepName parameter in the Welcome Page. (examples: Oracle Database@Oracle Cloud or Oracle Integration RPA Demo) **This script is located at the top of the code just under the <head> tag**

b. var s_pageName = "Thanks Page:/XXX"; // Update with the same product name used in the ora_stepName parameter. **This script is located at the bottom of the code**

c. <title>XXXX</title> // Update with an appropriate browser tab name for your landing page; should be the same as your welcome page unless otherwise requested by your marketer.

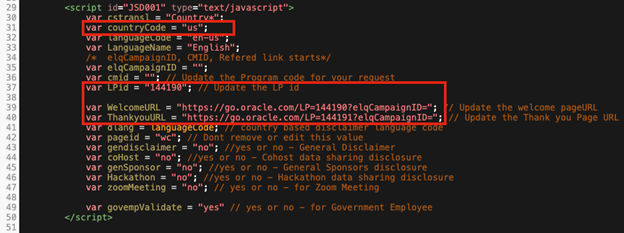
d. var countryCode = "us"; // Update to the target country to have the java scripts adjust the footer links appropriately.
e. var LPid = "XXX"; // Update with the Eloqua ID number for your thank you page.
f. var WelcomeURL = "https://go.oracle.com/LP=XXXX?elqCampaignId=XXXX"; // Update the LP ID number for your welcome page. Do not forget to add the campaign ID.
g. var ThankyouURL = "https://go.oracle.com/LP=XXXX?elqCampaignId=XXXX"; // Update the LP ID number for your thank you page. Do not forget to add the campaign ID.
h. All other variables, leave as is.
8. Update the body content and imagery per marketer’s requirements.
STEP 4 - Configure and activate Eloqua canvases
1. For all Eloqua canvases (main canvas + all routing channel code canvases):
a. Add the form: Indigo-OMS
b. Add the WLP you created
c. Add the TYP you created
d. Check allow contacts to enter the campaign more than once.
e. Set the canvas to stay active for at least 1 year or if needed longer than 1 year based on the MRM settings for the campaign end date.
f. Save and Activate
STEP 5 - Validating the Form Data
1. Open your full welcome page URL (with main campaign ID appended) in a browser tab.
2. Select a region and make note of it – you need to know both the MRM channel code and Eloqua canvas ID number associated with the choice you select.
3. Submit the remainder of the form and ensure the thank you page appears properly.
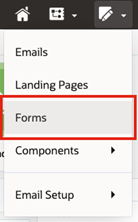
4. Log in to Eloqua > Click Assets > Forms
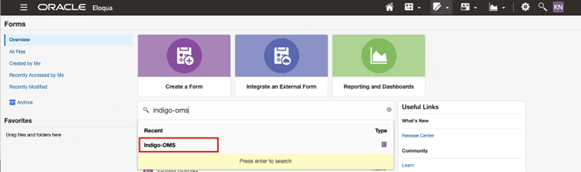
5. Search for “Indigo-OMS” and open the form. Please do not make any edits to this form.
6. Navigate to Actions > View Submission Data.

7. Your submission should be on the top or close to the top depending on how much time has elapsed. Verify the following data fields align with the routing option you chose:
a. cmid = MRM channel code
b. elqCampaignId = Eloqua canvas of that MRM channel code

Related Topics
Nailed it?
If yes, click below to confirm completion of this topic.
Yes, I have understood this topic well