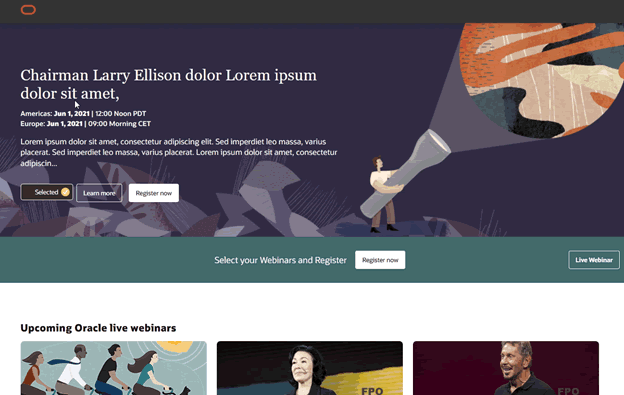
Zoom Multi-Select Registration Webinars
Zoom Webinar can be setup to support Multiple selection registrations from a single page that supports registrations for Live Webinars and On-Demand Webinars.
Here, you will learn:
- Multiple Registration Design
- Content Update
- Welcome and Thank you page Configuration
- Canvas Setup

 People
1 |
 Time
30 min |
 Difficulty
Moderate |
STEP 1 - Multiple Registration Design
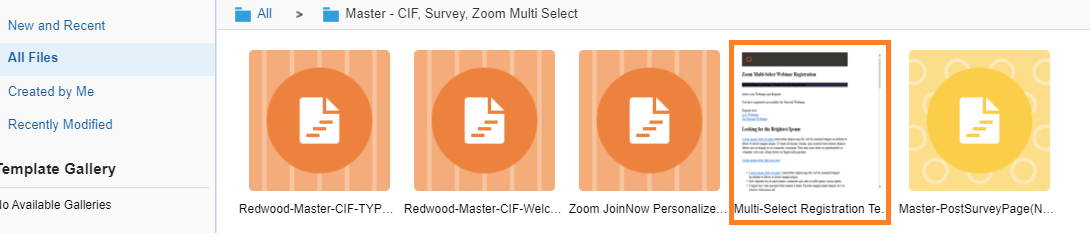
Zoom Multi-Reg Webinar Series – Content Template: Find it here.
Open Eloqua → Landing Pages → Create Landing Page → Select Template → Zoom Multi Select Reg. Save this template as the Welcome Page(zoom-multi-sel-welcome-ddmmyy-analystname).
STEP 2 - Content Update
The Zoom Multi Selection Registration template has been created such that the content update for the Welcome page and Thank you page is the same. There is only a slight difference in the setup which you will learn about in the next section. Let's get started with the content updation for the Welcome page here:
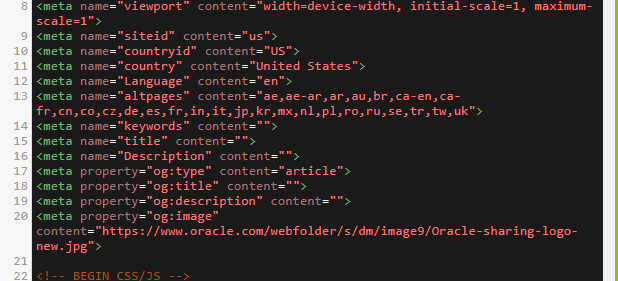
Update the title and update the relevant details after the thank you section class “thankyousection” for H4 id="tycommantoptxt we need to update text as per language.
<section class="rh03 rh03v3 rw-plum-170bg bgimg-full bgimg thankyousection" data-trackas="rh03" data-ocomid="rh03" style="background-image: url("https://www.oracle.com/webfolder/dms/m/rh03v3full-bgse-fpo-01.jpg");" data-bgimg="https://www.oracle.com/webfolder/dms/m/rh03v3full-bgse-fpo-01.jpg"><div class="rh03w1 cwidth"><div class="rh03bc"></div><div class="herotitle" ><div id="thankyouhead"></div><h4 id="tycommantoptxt">Hi <span class=eloquaemail >FirstName</span> <span class=eloquaemail >LastName</span>, Niektóre wybrane przez Ciebie aktywności mogą mieć Sponsorów. Jeśli aktywność jest sponsorowana, wskażemy</h4></div></div></section>-
All your content update is to be made in the Live Webinar section irrespective of the webinar being Live or On-demand. Find the div lwdiv.
<!-- lwdiv Start -->

<div class="col-w1" id="lwdiv"> - Within the lwdiv, All webinars are listed on separate tiles on the template using the div lwblock.
• Let's look at the basics of updating content in the lwblock. There are default lwblocks available in the master template which can be made use of. Make a copy of the lwblock div if there are more webinars.
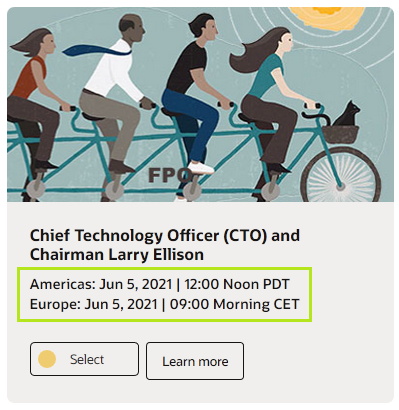
Update the content accordingly and make sure to update the highlighted variables as suggested:
Date, Time, Tile Placement, Banner Images and Sponsor
<div class="col-item rw-neutral-30bg lwblock" data-wendtime="Wed Jun 1 2021 14:56:00 GMT+0530" data-primaryorder="3" data-sponsorsdetails= "yes" data-primarysecimg="image URL"  data-vplayer="youtube" data-videoid="AT0_F5wxZ64" data-wid="">


            <div class="col-item-w1 eventbgimg"  style="background-image: url('');">
-
• data-wendtime - This variable defines the Live webinar End date, time. The Live webinar will automatically be hidden from the page based on the end time value updated here. Ensure that the it is updated in the given format.
data-wendtime="Tue Dec 1 2020 23:00:00 GMT+0530"
• data-primaryorder - A minimum value places the Live Webinar on the header. Mandatory field to control the order of placement of webinars. (The sequence order to be provided by the marketer)
• data-primarysecimg - Mandatory to add image of size - 1,680px × 315px. This image is the banner used when the webinar becomes the primary webinar.
• background-image: url('') - Mandatory image of resolution 432 X 200px. This image is used as banner of each tile.
• data-sponsorsdetails= "yes" - This variable defines the Sponsors. To keep Sponsor CTA and Sponsor section mandatory to update data-sponsorsdetails= "yes" else "no" when Sponsors are not available.
Learn more section
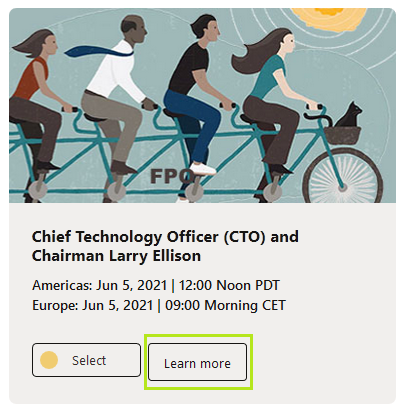
The 'Learn more' section is to be updated with - Webinar Details, Webinar Description, Event Speaker details and Speaker images. Here's a sample div of the button and the lightbox div. Ensure that the anchors are named correctly.
<div class="obttn1"> <a href="#lw1" rel="lightbox" data-theme="dark" data-lbl="lightbox-open-read-more" data-trackas="lightbox" class="">Learn more</a> </div>


            <div class="cb52 cb52v0" data-trackas="cb52" style="display: none;" id="lw1">
Sponsors section
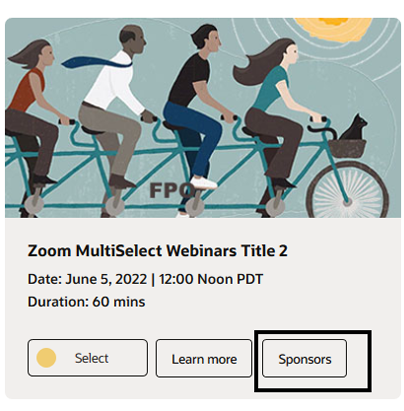
The 'Sponsor' section is to be updated with - Event Sponsors details and Sponsors Logos. Here's a sample div of the button and the lightbox div. Ensure that the anchors are named correctly.
<div class="obttn1 Spcls"> <a href="#lw1sp" rel="lightbox" data-theme="dark" data-lbl="lightbox-open-read-more" data-trackas="lightbox" class="">Sponsors</a> </div>


            <div id="lw1sp" class="Spclssec">
In this lw1sp section please update all Sponsor images and Sponsor details which will display in both learn more CTA and sponser CTA popup.
Update Webinar sequence
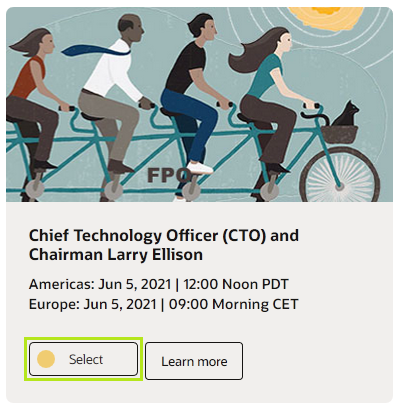
<label class="switch">

            <input type="checkbox" class="webcast-checkid" name="webcast-check" id="togBtn" value="la">

            ...
            </label>
This template has features such as multiple webinar selections with a single click registration, automatically converts Live Webinars to On-demand, For these features to work flawlessly, the input values of these selections are required to be updated with standard values(la, lb, lc, etc). The webinars are given values in sequence and these values are important as it influences the flow in canvas.
Keep in mind:
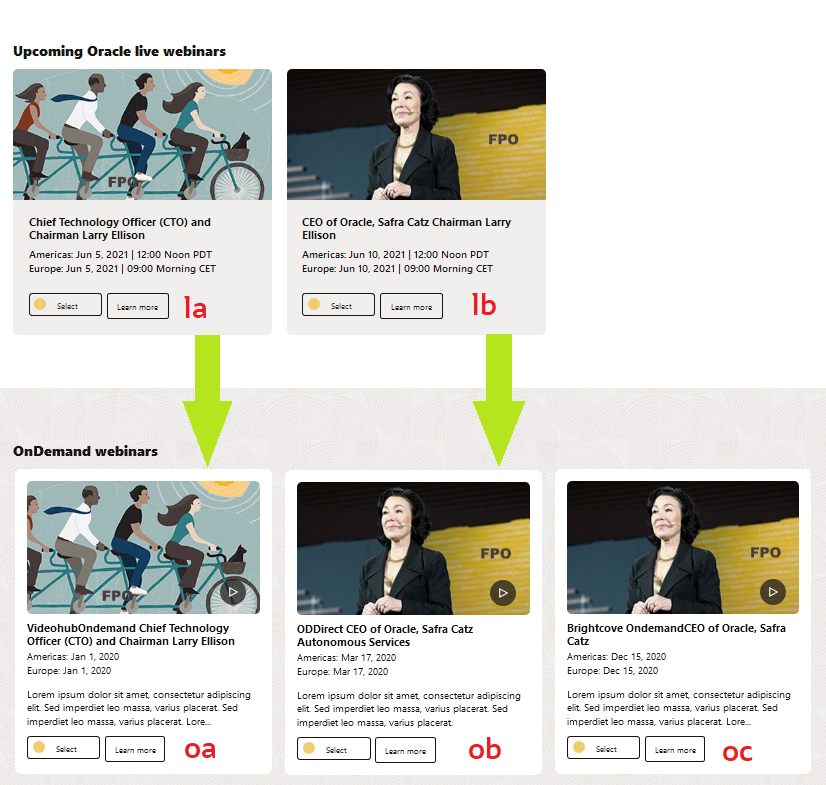
• The standard sequence values for Live webinars are to be given as - la, lb, etc.
• When these Live webinars convert into On-demand webinars, these values automatically change to oa, ob.
• If an On-demand webinar is added directly without a Live Webinar convertion(or rather when you are setting the tile with ODDirect), ensure that the value doesn't clash with the converted On-demand webinar values.
E.g.: Since Live Webinar la, lb will be converted to oa, ob once they become an OnDemand Webinar, use the value oc instead.
-
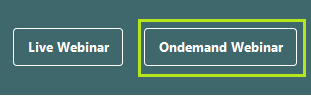
On-Demand Webinars
Webinar Placement
Variables such as ODready and ODDirect helps convert the Live Webinar to On-demand and moves it to the 'On-demand Webinar' section.
• For conversion and placement, either of the highlighted variables can be made use of in the lwblock div.
OR
<div class="col-item rw-neutral-30bg lwblock ODready" data-wendtime="Wed Jun 1 2021 14:56:00 GMT+0530" data-primaryorder="3" data-primarysecimg="image URL"  data-vplayer="youtube" data-videoid="AT0_F5wxZ64" data-wid="">


<div class="col-item-w1 eventbgimg" style="background-image: url('');"><div class="col-item rw-neutral-30bg lwblock ODDirect" data-wendtime="" data-primaryorder="3" data-primarysecimg="image URL" data-vplayer="youtube" data-videoid="AT0_F5wxZ64" data-wid="">
<div class="col-item-w1 eventbgimg" style="background-image: url('');">-
• ODready - To be added ONLY when the On-demand video is available after the Live Webinar is over. Adding this variable makes the webinar details tile available in the 'On-demand webinar' section with the details populated. Ensure that the variables and values required for displaying the video has been updated.(Learn how to do that in the next section)
• ODDirect - Enables addition of On-demand video when there is no Live webinar available. data-wendtime="" to be set to blank. Make sure the other variables and values required for displaying the video have been updated.
Video: On-Demand webinar
To set up On-demand videos, update values for the variables highlighted according to type of video - youtube, videohub, brightcove.
<div class="col-item rw-neutral-30bg lwblock  ODready" data-wendtime="Wed Jun 1 2021 14:56:00 GMT+0530" data-primaryorder="3" data-primarysecimg="image URL" data-vplayer="youtube" data-videoid="AT0_F5wxZ64" data-wid="">


            <div class="col-item-w1 eventbgimg"  style="background-image: url('');">
-
• data-vplayer - Update video player (videohub, youtube, brightcove)
• data-videoid, data-wid
1. If videohub: data-videoid = "entry_id value", data-wid = "wid value". Update the entry_id and wid values picked from the vidohub URL. Use this decoder link if you want to decode the code and pull out the entry id and wid id if not noticable.
Please see image below for details.
2. If youtube: data-videoid = "Z5DNqx7mAFk"
Value picked up from the youtube link. Eg: https://youtu.be/Z5DNqx7mAFk
3. If brightcove: data-videoid = "Brightcove id will be provided by marketer"
PRO TIP
- 1. When placing a link in the content of your 'Learn More' CTA sections. Always make sure to use hyperlink with simple texts (ex. Check the link here.) instead of placing the actual URL as text.
STEP 3 - WELCOME AND THANKYOU PAGE CONFIGURATION
-
WELCOME PAGE: You have now completed updating the content in your offline Welcome page. Now you need to configure the page. The page is to be uploaded into Eloqua to capture the values for the variables mentioned below:
var LPWC = "106620"; // Zoom Welcome Page LP Id

              var LPTY = "106945"; // Zoom Thank You Page LP Id

              var thankYouEmail = "0"; // Zoom Thank You Email Id

              var elqCampaignId = "274662";


              var cmid = "OPS12345";

              var campStepId = "405057";

             var countryCode = "el";


var languageCode = "en-us";  //Please update lanaguge code as per this ar, cs, da, nl, en-us, fi, fr, fr-ca, de, el, he, hu, it, jp, kr, no, pl, pt-br, pr, ro, ru, sr, zh-cn, sk, es-lad, es, sv, tzh, tr, ua


var addlDisc = "";//Please add customized disclaimer here. If you don't have, then keep it empty.


var zoomMeeting="yes"; // yes or no for Zoom Meeting


			  var tybtntxt = "Watch Now"; // You can change thank you page on-demand video button text here

              var pageId="wc";

              var Formpageheading = "Registration Information";
• LPWC - Capture the Welcome page LP ID once uploaded into Eloqua.
• LPTY - Follow Step 2 - THANK YOU PAGE.
• thankYouEmail - Upload file and capture ID from Eloqua (if there is a requirement)
• elqCampaignId - Eloqua Campaign ID
• cmid - Program code
• campStepId - Identify the campStepId from your Eloqua Canvas. Know more.
• var countryCode - Update preferred Country code for webcast country.
• var language_value - Update preferred language code(reference provided in comments) to display on the PP Form.
• var addlDisc - Update Custom disclaimer which will populate in the lightbox of PP Form. Find Data Sharing disclaimer translations here.
• var zoomMeeting - Update zoommeeting value as "yes" or "no" if yes then related disclaimer will display in form page.
• var tybtntxt - Make use of this variable to modift the Video button text in Thank you page if required.
• pageId - "wc" for Welcome page
• var Formpageheading - "Registration Information" for form page title update we need to update this variable and you can update translation also.
-
THANK YOU PAGE: Create a copy of the Welcome page created and upload to Eloqua as the Thank you Page. All other variable values remain the same as updated in Welcome page except those mentioned below:
• LPTY - Update Eloqua LP ID once uploaded(remember to update this value in Welcome page too)
• pageId - Update to "ty" for Thankyou page
var pageId="ty";
• Update the stepnumber ="2" for thank you page
 var ora_stepNumber ="1"  // for thank you page give 2
              var ora_stepName ="Zoom Multireg Webinars"
• Update variable s_pageName in the Site Catalyst code with "Thanks Page".
<!--Start Landing Page SiteCatalyst code -->


<script language="javascript" type="text/javascript">var s_pageName = "Thanks Page"</script> -
Identify the campStepId
Create your second canvas (name it something similar to MS_Registrations). Complete the first step of Canvas 2 where you add your Find Program Code Matches component and save canvas. (See Canvas Setup, Canvas 2 - Channel code 1 - Registrations, #1 in the section below for those details).
a) Now open your Eloqua MS_Registrations Canvas (preferably Google Chrome).
b) In the browser, go to Developer Tools → Network tab.
c) If there are no links displayed, refresh the page again.
d) Search for link with same number as the Eloqua Campaign ID of canvas.
e) Identify id as shown below: The id just above "Find Program Code Matches".
STEP 4 - CANVAS SETUP
Canvas 1 - Main Canvas - Program Code
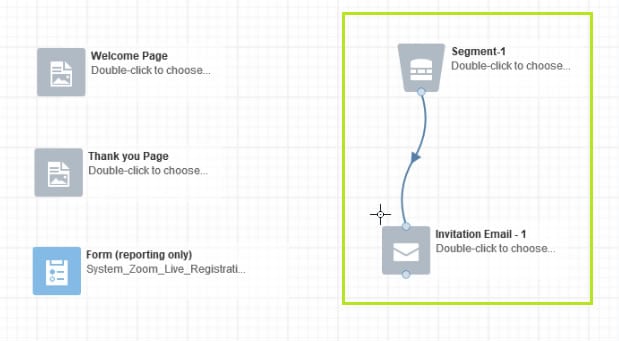
Add the following assets and associate the respective form and pages into canvas as shown in the below screenshot.
1. System_Zoom_Live_Reg form.
2. Invitation emails can be sent from this canvas to promote the event, the email will direct the customers to the LP to register for the event.
If an invitation email needs to be sent, add the email asset & list segment and activate the campaign again to deploy the emails. If there is a second invitation, deactivate the canvas again and repeat.
Note: Make sure to set the Campaign End Dates to 5 years.
Canvas 2 - Channel code 1 - Registrations
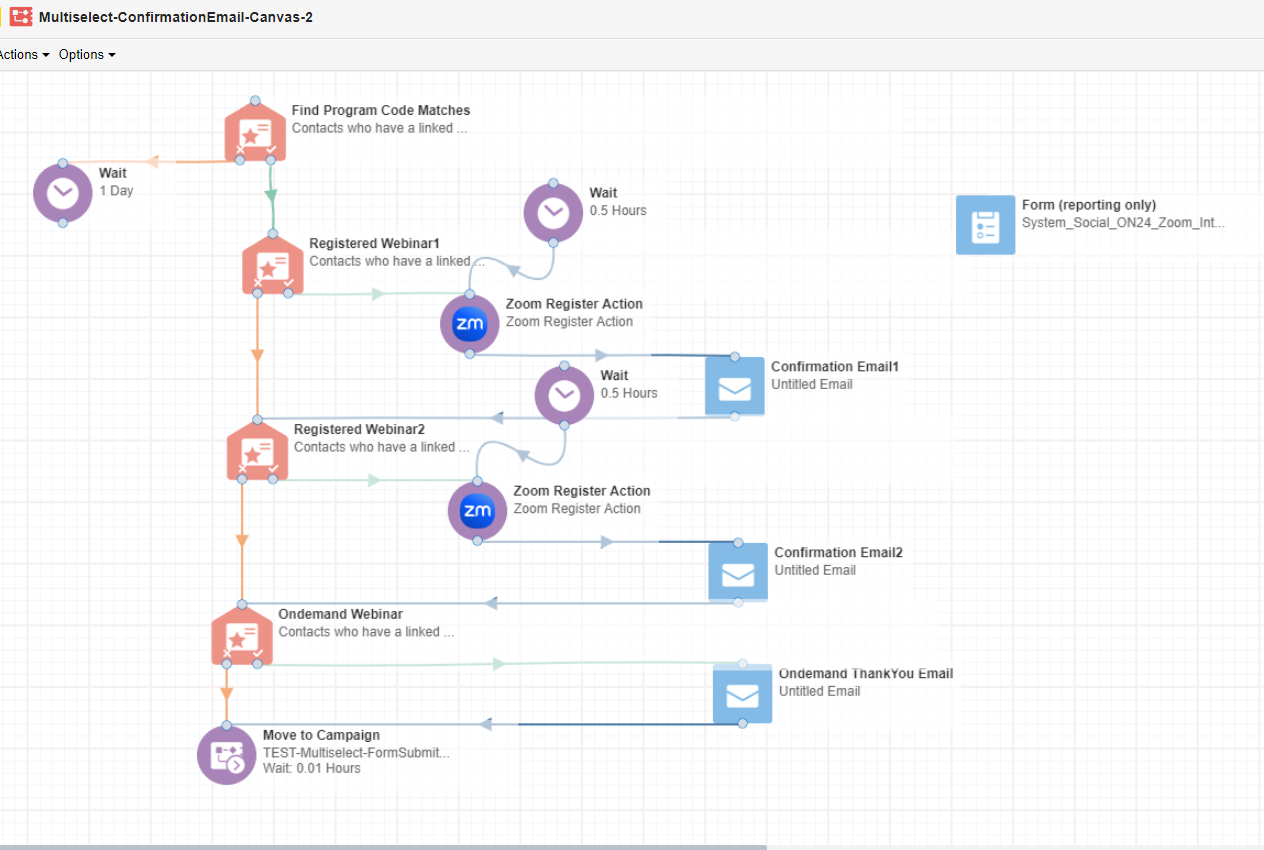
Create a Channel code 1. Refer Eloqua Master canvas - MultiSelectRegistration-Canvas-2 and keep the content document provided by the marketer handy.
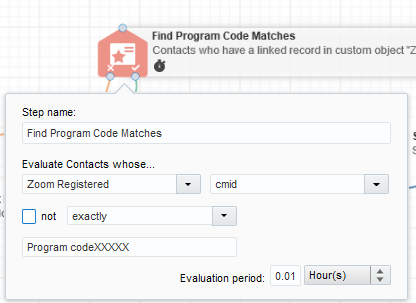
- The first component in the canvas is 'Compare Custom Object Fields' named as 'Find Program Code Matches'. Map as shown below and update Program code of your Zoom Multi Registration page.
-
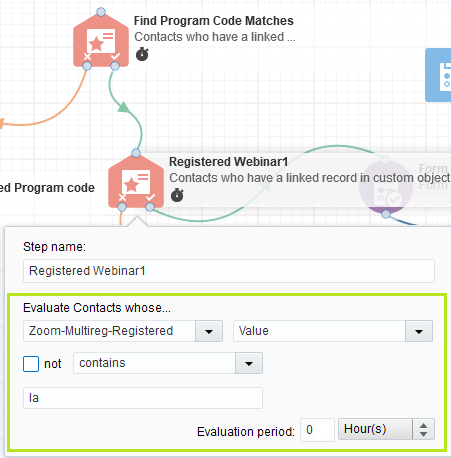
Live Webinar
• If Live Webinar has been selected, 'Compare Custom Object Fields' to be linked and mapped as shown in the image. Ensure that Zoom-Multireg-Registered is always mapped to Value with the appropriate sequence value updated for the webinar (E.g. la)
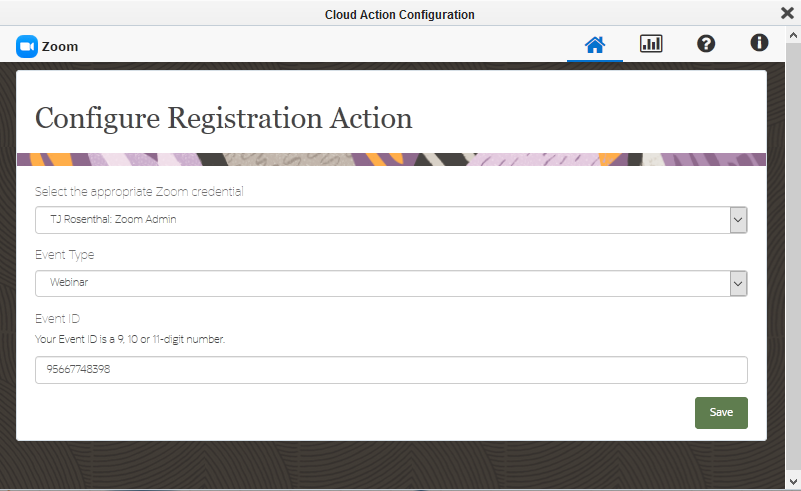
• Connect it to the corresponding Zoom Registration Action and configure accordingly.
-
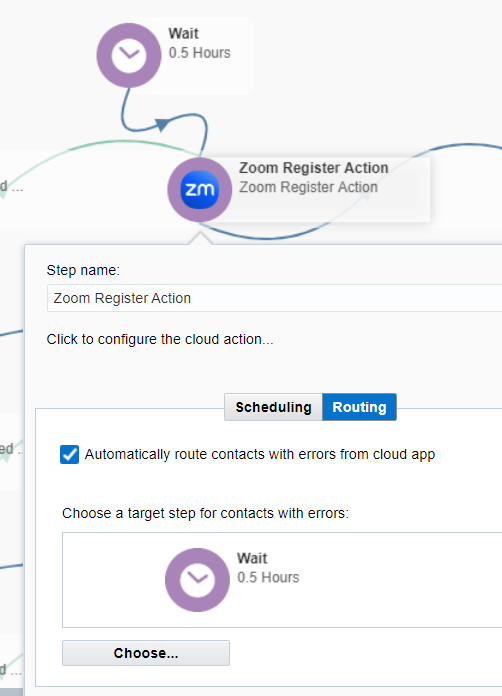
Configure Zoom Register Action feeder as shown below:
- Double click Zoom Register Action
- Go to Routing Tab.
- Enable the check box next to "Automatically route contacts with errors from cloud app"
- Click Choose and specify a target. In this case we will add it to a Wait Step above
- Click Save and close the tab once you have completed your configuration.
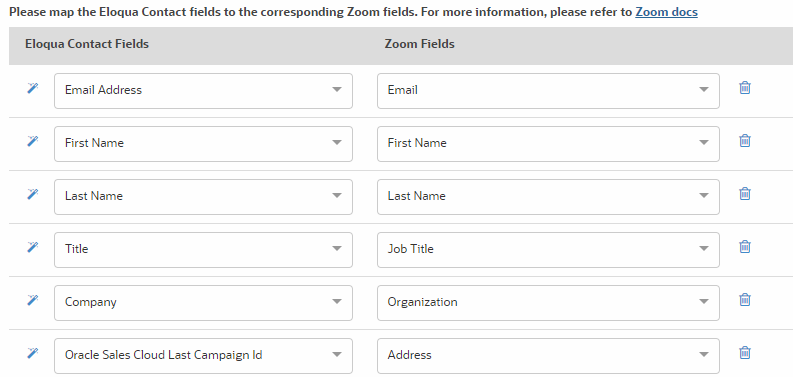
Map the Eloqua contact fields to Zoom fields as per the below image
- Email Address = Email
- First Name = First Name
- Last Name = Last Name
- Title = Job Title
- Company = Organization
- Oracle Sales Cloud Last Campaign Id = Address
Kindly place the following comments in the portal for Marketers so that they can enable the Address field while setting up the webinar / meeting.
Please ensure the Address and Last Name fields are set as mandatory when setting up new Webinars or Meetings in Zoom. Capturing the MRM code in the Address field is crucial for our analytics. This requirement applies only to new requests. Do not edit existing ones, as it may cause data flow issues due to dependencies between Zoom settings and Eloqua mapping.
• Next is to connect it to the corresponding Confirmation email for each Live Webinar.
Note: For Eloqua notificaton emails, ensure bypass supression and allow contacts are checked.
• Once your Confirmation Email is setup, connect it to the next Webinar flow.
-
On-Demand Webinar
• Continue mapping from last live webinar to on-demand webinars.
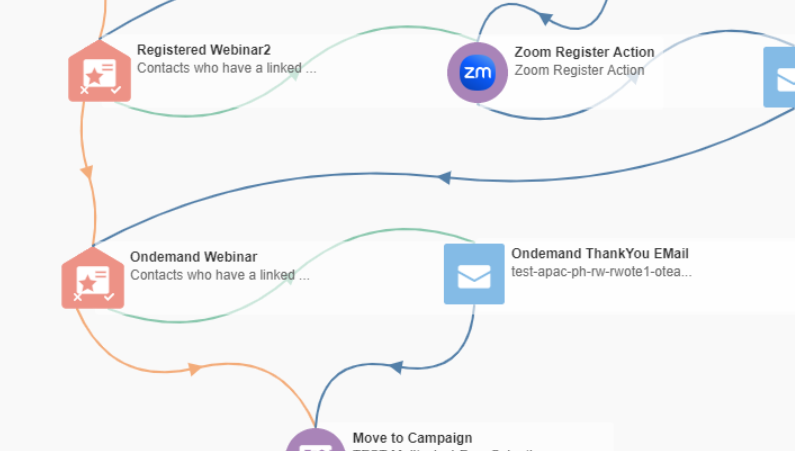
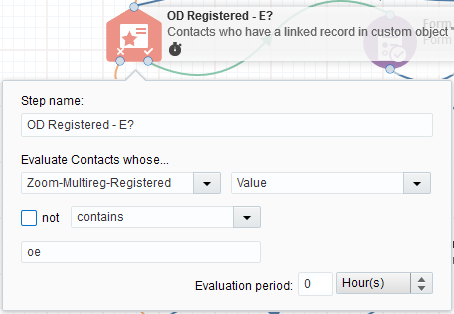
• If On-demand Webinar has been selected, 'Compare Custom Object Fields' to be linked and mapped as shown in the image. Ensure that Zoom-Multireg-Registered is always mapped to Value with the appropriate sequence value updated for the webinar (E.g. oe)
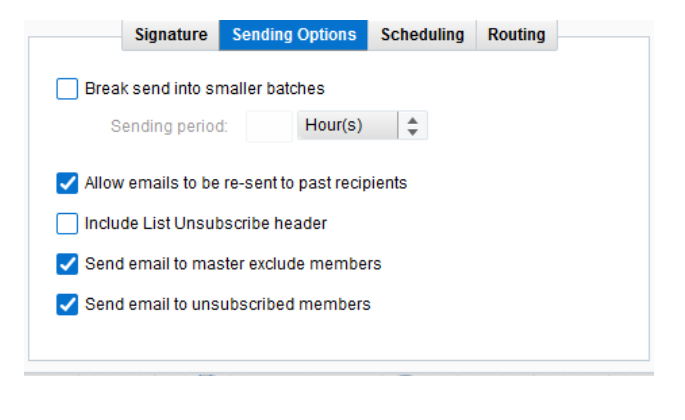
• Once the configuration is done. Connect the 'Yes Condition' to the Thank You Email. Bypass supression and allow emails to be re-sent should be checked.
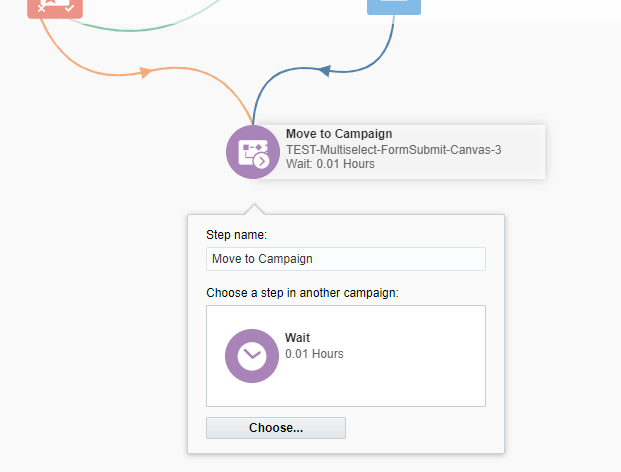
• Once Both the live and on-demand setup is complete, connect both the last Compare Custom Object 'No Condition' and the Thank you Email Submit to the Move to Campaign element.
• The Final step is to configure the Move to Campaign element to the 3rd canvas' initial Wait Step. It will be discussed next.
-
Create Channel code2. Find out how. Name it as "PostEvent".
-
a) Edit Zoom Attended Feeder (Campaign Steps → Segment → Zoom Attended Feeder(Last one).
b) Update the following:
1. Zoom Credential: Select default
2. Event Type: Select Meeting / Webinar
3.Store Attendance Data in :Select Custom Object
4.Select Custom Object to store data in: Zoom Feeder - Attended CDO
Note: By the selecting required CDO Name, you can save the attendee details to it.5. Mapping value from Zoom Fields to Eloqua Contact Fields. :
Email - Email Address
Join Time - Lead description
Leave Time - Lead description
Total Duration - Lead description
Polling - Lead description
Q&A - Lead description
6. Mapping value from Zoom Fields to Eloqua CDO:Event ID + (Email) - Unique Code
Email Email - Address
Event Type -Event Type
Event ID - Event ID
Join Time - Join Time
Leave Time - Leave Time
Total Duration - Total Duration
Polling - Polling
Q&A - Q&A
7. Run Every: 6 hours
8. Until: End Date Time + 1 Day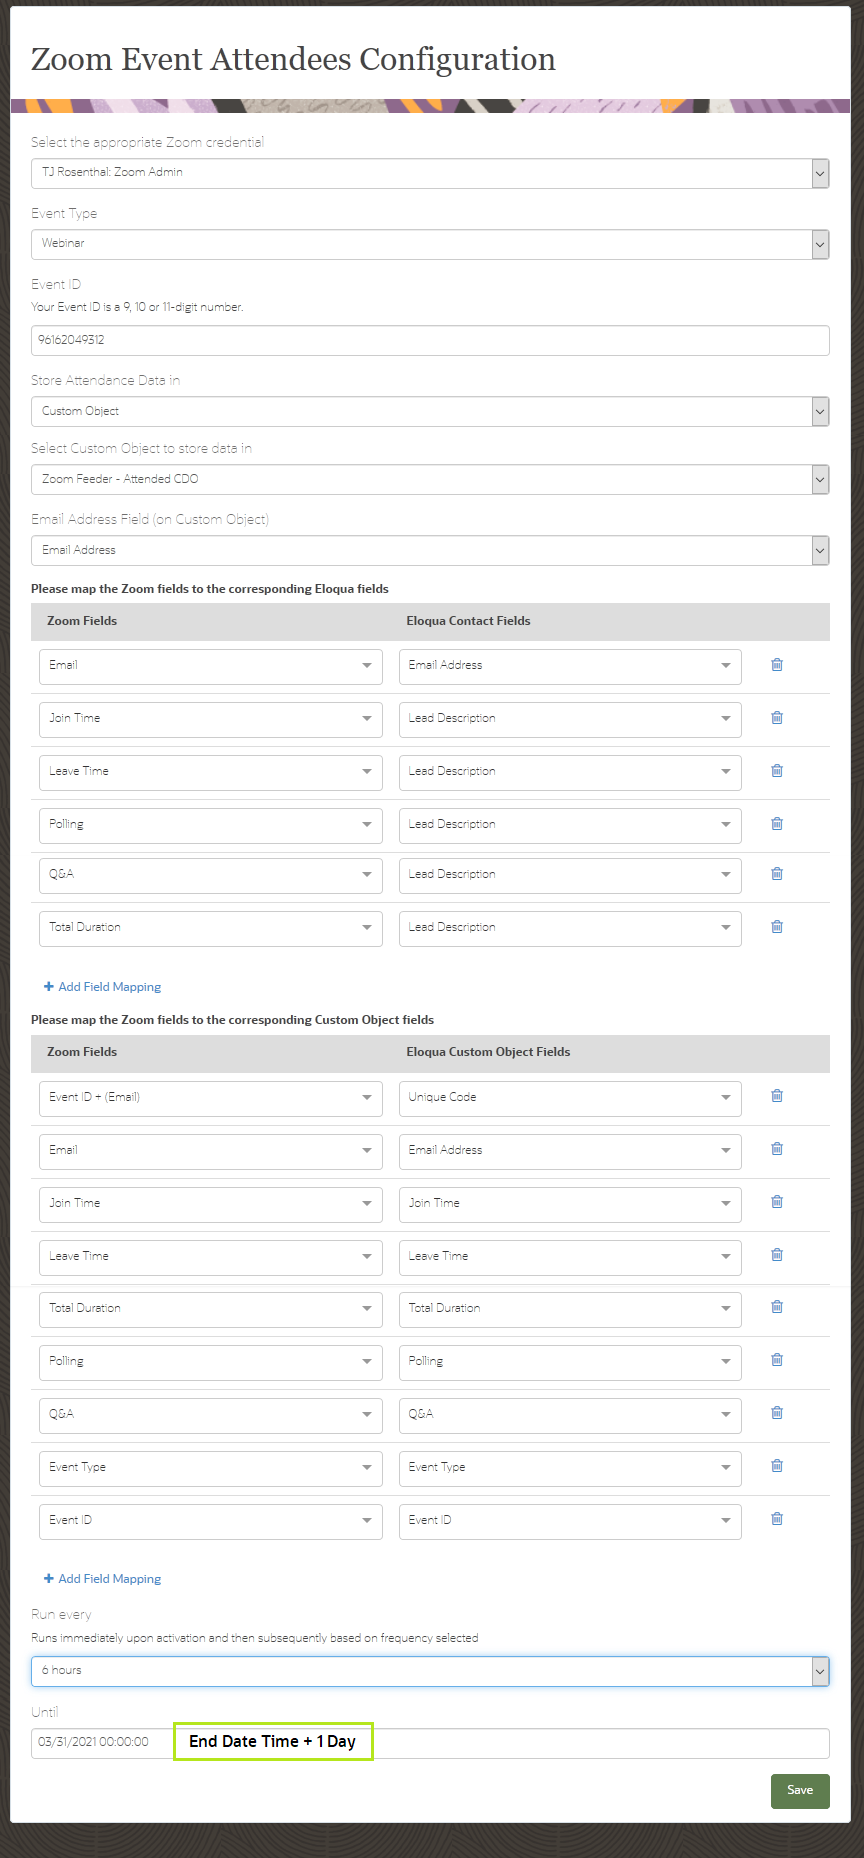
- Add Attended form - Rename to Attended Form Submission
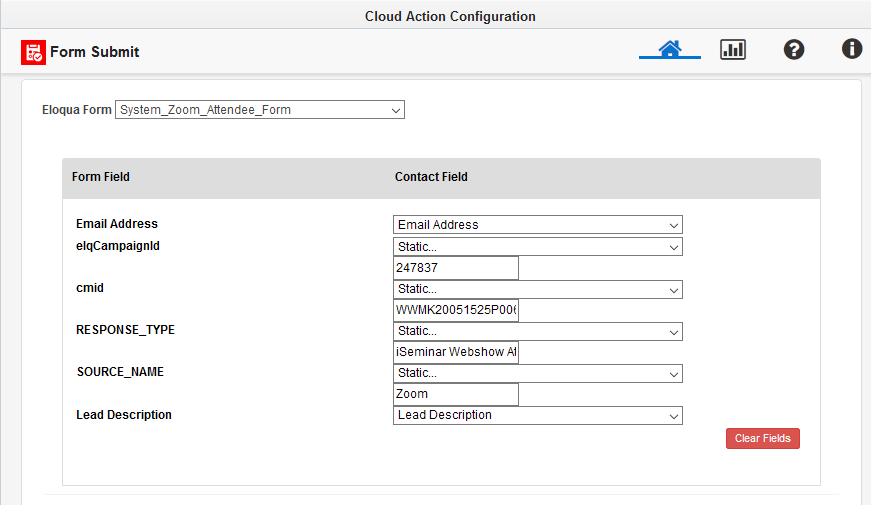
Update Form feilds as mentioned below:
i) Edit and search Eloqua Form name to "System_Zoom_Attendee_Form"ii) Map Emailaddress to contact level, cmid (Select Static and then update Program code NOT Channel code), elqcampaignid (Select static and update the campaign id of Respective Program Code Canvas)
iii) Update RESPONSE_TYPE (Select Static and then update “iSeminar Webshow Attended”)
iv) Update SOURCE_NAME (Select Static and then update “Zoom”)
v) Map Lead Description to Lead Description
vi) Save Form Submit and attach Thank you Email.
● Add Wait period and set it to 1 month
● Connect it to email asset for Post Event Thank You Email (if required, and above wait can be removed)
-
Add Forms for reporting - System_Zoom_Attendee_Form, System_Zoom_NoShow_Form
-
Go to Campaign Settings → Advanced → UNCHECK → "Allow contacts to enter campaign more than once".
-
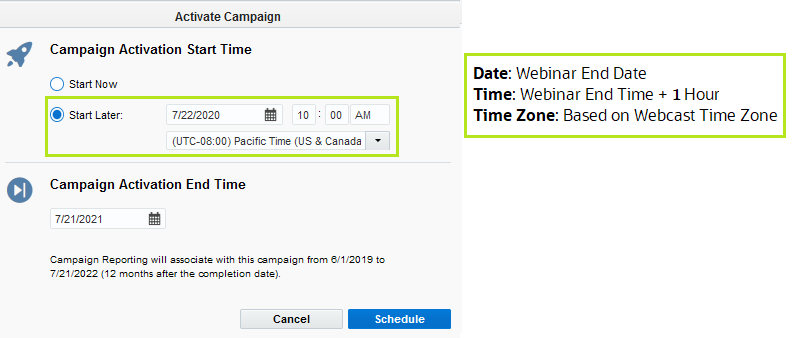
Activate → Schedule Campaign on the set date (Webinar End Date, Webinar End time + 1 Hour). Refer screenshot below.
Canvas 3 - Channel code 2 - Form Submit

Form Submit canvas needs to be set up in the separate canvas with the individual program code provided for the webinars. This would help the system gather the proper leads within the flow by adding a delaying system to correctly capture each registration. Copy the below canvas and update the sections as required. Associate the respective form and pages into Canvas.
MultiSelectRegistration-Canvas3
• After the initial Wait step, the first component in the canvas is also a Compare Custom Object Field for each webinar. Configure the same way like the second canvas and select 'Zoom-Multireg-Registered' with the corresponding value per webinar.
• Now, connect it to the Form Submit update it accordingly for this Webinar selected. Map the Form fields as shown below.
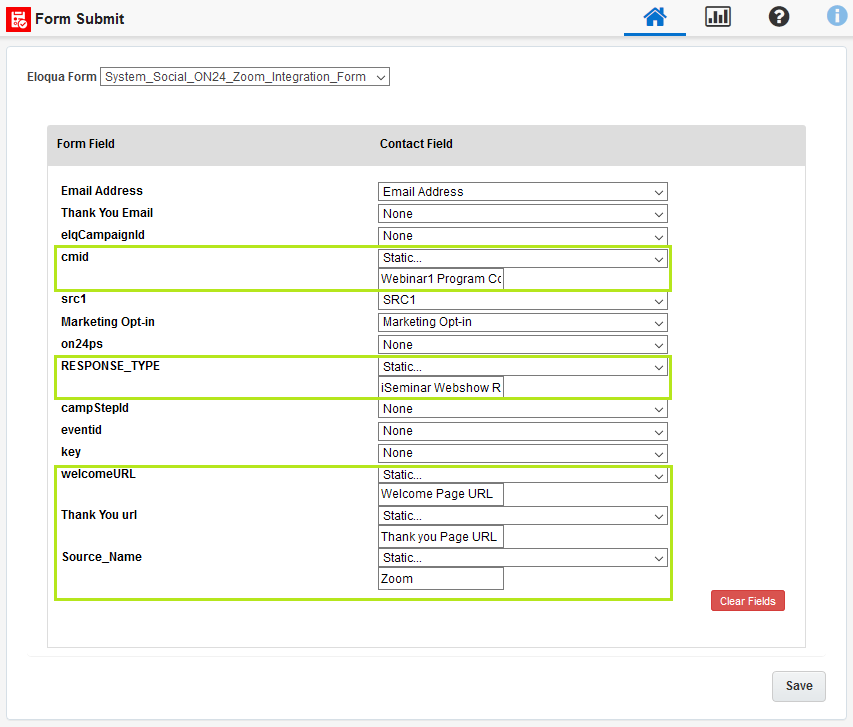
Update Form fields as mentioned below:
i) Edit and search Eloqua Form name to "System_Social_ON24_Zoom_Integration_Form"
ii) cmid - Select Static and update Program code of 'Live Webinar1'.(pick details from document provided by marketer.)
iii) RESPONSE_TYPE - Select Static and update “iSeminar Webshow Registered”
iv) welcomeURL - Select Static and update “Welcome Page URL of Zoom Multi Select Registration Page”
v)Thank You url- Select Static and update “Thank Page URL of Zoom Multi Select Registration Page”
vi) SOURCE_NAME - Select Static and update “Zoom”.
• Once the setup is complete, connect it to a Wait Step with 3 hours as the time to have a delay in the flow. This will buy time for the system to capture each lead flowing through the webinars.
Canvas 4 - Channel code 2 - Post Event Activities
Post Event mails need to be set up in the separate canvases with the individual program code provided for the webinar. Copy the below canvas and update the sections as required. Associate the respective form and pages into Canvas.
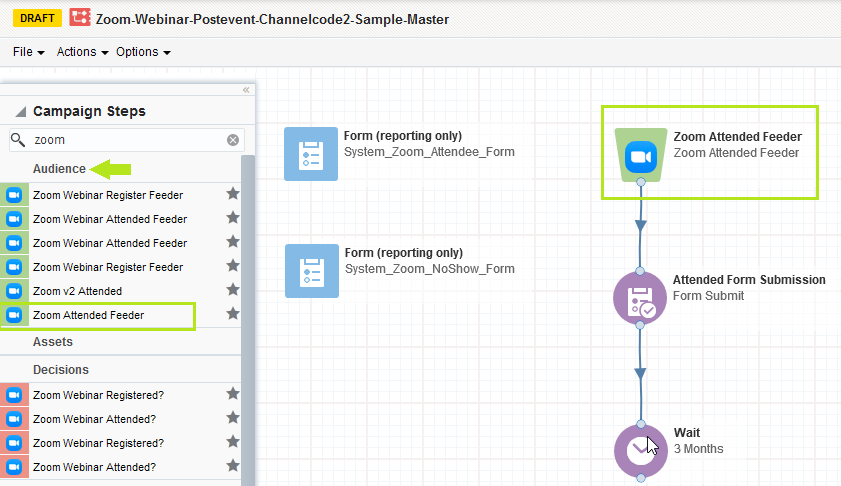
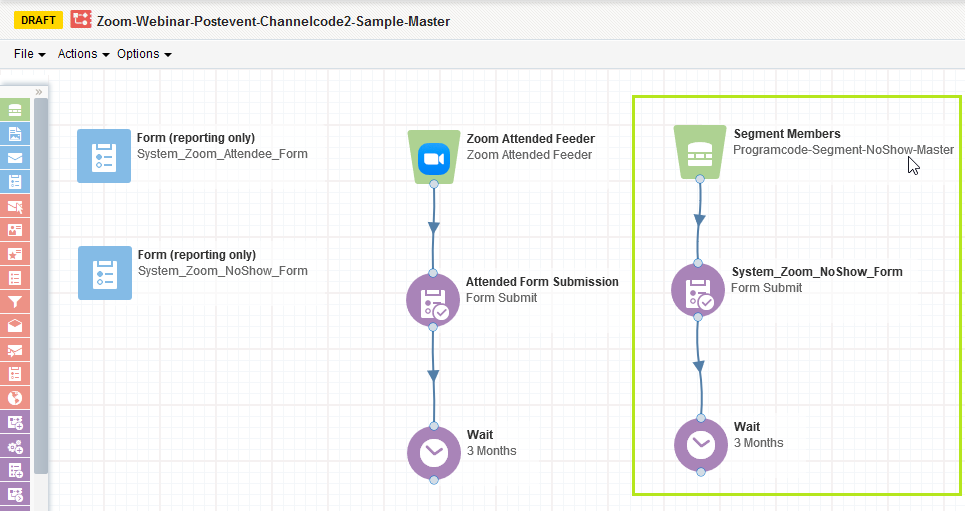
Zoom-Webinar-Postevent-Channelcode2-Sample-Master
• If requester would like to have attendee data but does not need to send out post event emails, you still need to set-up the attendee flow. Otherwise, this canvas is required to be set-up as normal for post event activities.
Note: You do not need to set-up a Zoom Registered Canvas, the action is taken care of on the Registration Canvas.
Attendee Form Submission Guidelines and Thank you Email Execution
-
Deactivate Canvas after Post event Attendee Form has been processed
-
a) No Show Segmentation: (Refer Master Segment Canvas - Programcode-Segment-NoShow-Master)
b) Go to Segments → Search the "Programcode-Segment-NoShow-Master" and duplicate segment (Rename to Programcode-NoShow).
IMPORTANT! DO NOT modify and use "Programcode-Segment-NoShow-Master" segment directly in your campaign.
This will cause incorrect data enter into your campaigns and send post event emails to wrong audience.
Please make sure to create a copy of the master segment and save it for your campaigns.
Please refer the step below to copy.
1. Go to segments in Eloqua and Search for the master segment. Right-Click and "Copy".
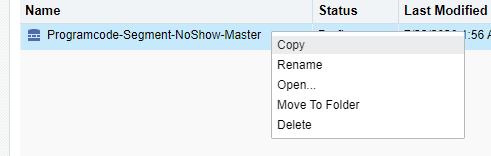
2. Copy and rename
c) Save the segment to the regional folder (FY20_XXXX)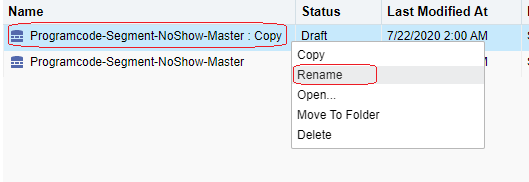
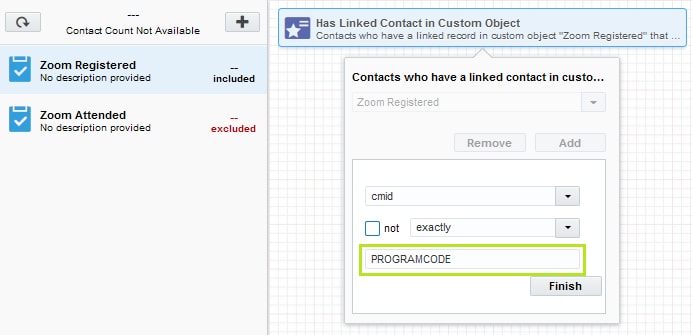
d) Registered Contacts: Click "+" to add the filter (Has Linked Contact in Custom Object)
Edit and Select "Zoom Registered"→ cmid = programcode → Save.
e) Attended Contacts: Click "+" to add the filter (Has Linked Contact in Custom Object)
Edit and Select "Zoom Attended" → cmid = programcode → Save.
f) Right click on the Zoom Attended filter and select "Switch to exclude" to remove the attendee counts for Noshow.
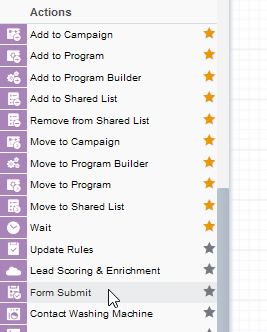
g) No Show Form: Drag and Drop from Campaign Steps → Form Submit
f) Rename it to No Show Form Submission
Update the following: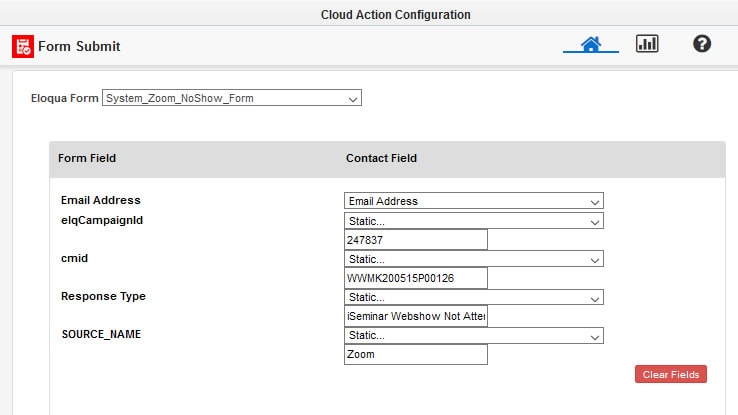
i) Edit and Search Eloqua Form name to "System_Zoom_NoShow_Form"
ii) Map Emailaddress to contact level, cmid (Select Static and then update Program code NOT Channel code), elqcampaignid (Select static and update the campaign id of Program Code Canvas)
iii) Update RESPONSE_TYPE (Select Static and then update “iSeminar Webshow Not Attended”)
iv) Update SOURCE_NAME (Select Static and then update “Zoom”)
v) Save Form Submit
● Add Wait period and set it to 1 month
● Attach Sorry Email (if required).
No Show Form Submission Guidelines and Sorry Email Execution
-
Deactivate the Canvas and update accodingly.
-
Add the OnDemand validation at the bottom and connect to the Thank You Email (Optional only).
-
Remove related zoom register action feeder and confirmation email if present, connect the form to the next custom compare object.
-
Deactivate the Canvas and update accodingly.
-
Edit the value of the related custom compareobject. ensure to add the correct label value.If completed live webinar label is "lb" value should be updated to "ob".
Note that this value change should be only in canvas level, dont update the label in page level

-
Edit the form and Change RESPONSE_TYPE - from “iSeminar Webshow Registered” to “iSeminar Webshow Downloaded”
Converting completed event to on-demand on registered canvas
Follow the below steps once the live event is completed and on-demand video is updated to the Multiselect-page
Canvas: MultiSelectRegistration-Canvas-2
Canvas: MultiSelectRegistration-Canvas3
Note to always do a self test to ensure that the form submissions are going to the correct values.
Related Topics
Nailed it?
If yes, click below to confirm completion of this topic.
Yes, I have understood this topic well