Zoom Multi-registration Webinars - Setup Guide
Zoom Webinar can be setup to support Multiple registrations from a single page that supports registrations for Live Webinars and On Demand Webinars.
Here, you will learn:
- Multiple Registration Design
- Home Page - Content Update
- Form Page - Content Update
- Thank You Page - Content Update
- Canvas Setup
- Additonal - On-demand only page

 People
1 |
 Time
60 min |
 Difficulty
Moderate |
STEP 1 - Multiple Registration Design
Master Template Link: https://go.oracle.com/LP=94825
Registration Form link: https://go.oracle.com/LP=104387
Thank you page link: https://go.oracle.com/LP=104388
Zoom Multi-Reg Webinar Series – Content Template: Find it here.
Template Design - Live Webinar
STEP 2 - Home Page Content Update
OVERVIEW: As per the content attached in the document.
ADD / REMOVE TAB COMPONENT:
• Default tabbed layout added with webinar (live and ondemand) details
• If you want to add another tab, then copy the entire HTML code between the comment lines.
<! --- Complete Tabbed Component Live webinars Starts--->
<! --- Complete Tabbed Component Live webinars Ends--->
• Add the id to the below component to differentiate the tab names
<div class="ct10 ct10v1" id="tabname">
-
ADD / REMOVE LIVE OR ONDEMAND WEBINAR COMPONENT
• Find the component starts, copy the entire DIV code between the commented lines and paste.
<!-- start  Webinars first-->

  <div  class="c72w2 lwblock">    </div>

 <!--  end  Webinars first-->
• For All Webcast this field is mandatory to add webcast endtime as data-wendtime="Tue Dec 1 2020 23:00:00 GMT+0530" so when date passed its automatical remove from live webcast tab, this field you have to add/update next to lwblock class please refer below screenshot

Do not alter / delete Modify the class Names

Class names which are highlighted in the webinar modules are important to fetch the values and display dynamically in the thank you page.
• CheckLabel – for Title
• Wdate – for Date
• Wtime – for TimeRead More (lightbox format Id declaration)
<a href="#lwmore1" rel="lightbox" data-theme="dark" data-lbl="lightbox-open-read-more" data-trackas="lightbox" class="">Read More</a><!-- start read more popup-->
<div class="cb52 cb52v0" data-trackas="cb52" style="display: none;" id="lwmore1">lwmore1, lwmore2,… for live webinar
odmore1, odmore2… for On-demand webinarUpdate id for the start read more popup div and call the same to href tag for the Read More link
When Ondemand video is ready then add “ODready” next to lwblock Please refer screenshot
div class="c72w2 lwblock ODready" data-wendtime="Tue Dec 1 2020 23:00:00 GMT+0530"
Register Now CTA / Ondemand CTA link format.
https://go.oracle.com/LP=<formlandingpageid>?src1=:ow:lp:cpo::&btn=lw1Note:
btn=lw1 - for first register now CTA for Live webinar
btn=od1 - for first register now CTA for On-demand webinarThis btn values helps to identify the webinar type and assign the form variables values.
STEP 3 - FORM PAGE CONTENT UPDATE
Update the redirect url (thank you page URL)
var redirURL = 'https://go.oracle.com/LP=<thankyoupage id>';(common URL for all the webinars, content will be displayed dynamically-refer the thank you page technical guidelines for additional information)
Add additional logic to define which register now button has been clicked by the end user. The following logic codes explain about the first webinar CTA.
For Live Webinar

For On-Demand Webinar
Note: For Zoom meetings add aditional disclaimer content for the particular webinar details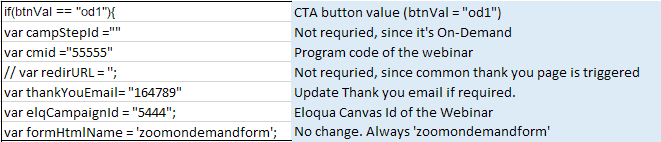
Note: Add the logic and validate the btn value (copy the live webinar logic and change the value to lw1, lw2… or copy the ondemand logic and change the value to od1, od2…).
Note: To add On-Demand video in the embedded player on the lightbox
3 Options we have
1. Videohub
2. YouTube
3. Brightcove1. Videohub
For Videohub we need to update 3 fields
videoplayer = "videohub"; //videohub, youtube, brightcove
videoid = "1_ocx0tprz"; // entry id
var wid = "1_a9hbfu5l";- Open the video hub URL and copy the values for entry_id and wid. Use this decoder link if you want to decode the code and pull out the entry id and wid id if not noticable.

2. YouTube
For YouTube we need to update 2 fields
videoplayer = "youtube"; //videohub, youtube, brightcove
videoid = "AT0_F5wxZ64";
Exmaple link: https://youtu.be/Z5DNqx7mAFk
here Z5DNqx7mAFk this is video link3. Brightcove
For Brightcove we need to update 2 fields
videoplayer = "brightcove"; //videohub, youtube, brightcove
videoid = "5808108438001";
STEP 4 - THANK YOU PAGE CONTENT UPDATE - TECHNICAL GUIDELINES

Note: Created content for each registration type, appended document.write to display the title, date and time dynamically. Only content can be modified to match with the requirement (if custom provided).
Step 5 - Canvas Setup
- For Individual webinars, the Registered and Post event canvas steps remain the same process as standard zoom webinar setup
For Multi-reg canvas setup. The created Welcome page, Thanks page and Form page along with Zoom Live/On-demand form should be placed in the Digital- Microsite code canvas
Check "Allow contacts to enter" in campaign settings and activate the canvas

Additional - Creating only on-demand pages
- Add the related on-demand webinar content under
<div class="ct10 ct10v1" id="On-Demand-Webinars" > - Use ODDirect - Enables addition of On-demand video when there is no Live webinar available. data-wendtime="" to be set to blank.
<div class="c72w2 lwblock ODdirect" data-wendtime=""> - Update the CTA link with the related od value
In the scenario when only on-demand videos are to be added to a multi-reg page.
An example for on-demand only page can be found here
https://go.oracle.com/LP=119007
Note: To obtain ideal results we recommend that:
- Pages list no more than 9 upcoming webinars (3 rows).
- On-demand webinars over the age of 9 months be removed.
- In total the very maximum recommended is 15 events (5 rows) aged no more than 1 year.
We also request to add a date whenever an On Demand Only Webinar is added to a page. Currently in our template, it is already added so we highly encourage you to place it within those commented codes. Kindly adjust based on the number of On Demand Webinars.
Related Topics
Nailed it?
If yes, click below to confirm completion of this topic.
Yes, I have understood this topic wellIntegrated Cloud Applications & Platform Services
We're here to help
- For any issues raise a ticket under the appropriate section in the communication tracker.
Discussion Forum
- To participate in our discussion forum join the slack channel #mktg-demandcenter or click here