Zoom Webinar Setup - Monitored
Eloqua Zoom Integration process requires setting up 3 canvases.
Canvas 1 - with program code for Registration Page and Sending out Invite Emails.
Canvas 2 - with a channel code created to send capture Zoom contacts to Eloqua. Find out how to create it.
Canvas 3 - with a channel code created to send out Post event mails. Find out how to create it
Here, you will learn:
- Identify request
- Registration Types
- Email Executions
- Zoom Register Feeder Setup
- Post Event Activities
- Create Channels
- Zoom Recorded Webcast Flow
Supported Languages:
- English - French - German - Japanese - Korean - Portuguese - Russian - Spanish - Simplified Chinese - Traditional Chinese

 People
2 |
 Time
30 min |
 Difficulty
Moderate |
Step 1 - IdentifY Zoom Webinar Request
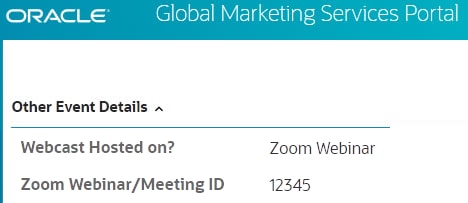
Go to GMS Portal → Other Event Details
• Identify if the Webcast is Hosted on 'Zoom Webinar'.
• In addition, the ID will also be provided - Zoom Webinar ID
Go to GMS Portal → Event Setup Details
• Identify the Registration Method : 'Standard' or 'Monitored'.
STEP 2 - REGISTRATION TYPES & PAGE SETUP
- MONITORED REGISTRATION PAGE
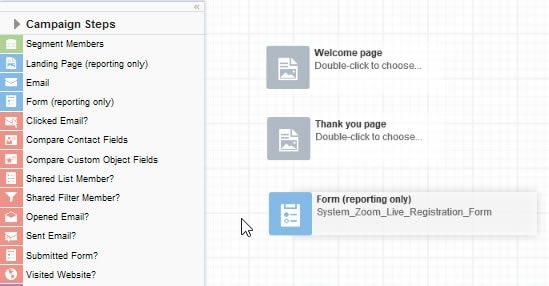
Upload the following assets from the Template Builder into Eloqua:
● Welcome page
● Thank you page
● Confirmation Email (as Pending Email)
● Post Event Thank you Email (based on requirement)
● Post Event Sorry Email (based on requirement)
REGISTRATION TYPES
- WELCOME PAGE:
Update the following variables in stage properties:
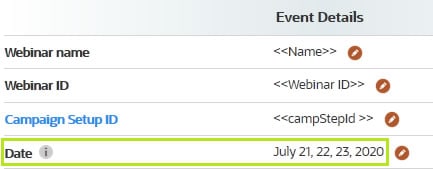
● var campStepId ="XXXXX"
Ensure Campaign Setup ID has been updated in Stage Properties (with value identified under the developer tools. Know more.) Note: The campStepId will be different for each campaign, every time this has to be obtained from Network tab from developer tools.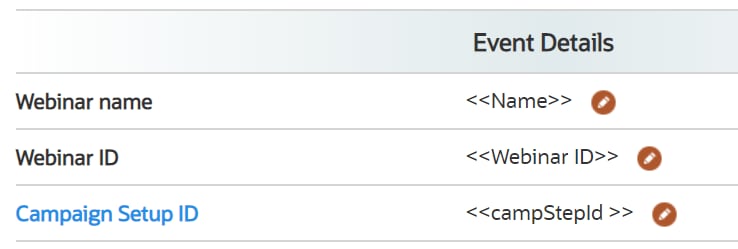
● formHtmlName = "zoomregform"
● var formType = "8"

● If a Multiple date webcast: Update the Date in Template Builder Stage Properties
- PENDING EMAIL: (only for Monitored Registration)
Update Thank you Email ID in Stage Properties with Thank you email ID. Download the asset from Template Builder and Upload it to Eloqua.
IMPORTANT NOTE: You need to re-upload the event assets into Eloqua once all Stage Properties sections are complete, so the codes carry over onto the final Eloqua pages.
REGISTRATION PAGE CONTENT UPDATE
STEP 3 - Email Executions (Program code Canvas)
-
Add the following assets and associate the respective form and pages into canvas as shown in the below screenshot.
- If an invitation email needs to be sent, add the email asset & list segment and activate the campaign again to deploy the emails. If there is a second invitation, deactivate the canvas again and repeat.
Note: If you don’t have your invitation email and segment ready at this point, delete the 2 elements from your canvas and activate. Come back when you have them ready > deactivate the canvas > add both placeholders back and map your invite email and segment > activate to trigger the invitation email.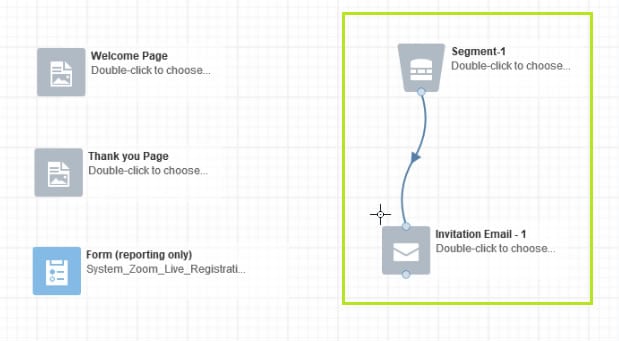
Copy the below canvas and update the sections as required.
Zoom-Webinar-Email-Canvas-Sample-Master
PRO TIP
● For invitation emails, footer type in Eloqua will always be Resp_Generic_Language_
Footer
The footer type in Template Builder should be Generic.
● For event notifications, footer type in Eloqua will always be Resp_Event_Notification_
Language_Footer
The footer type in Template Builder should be Webinar Notification.
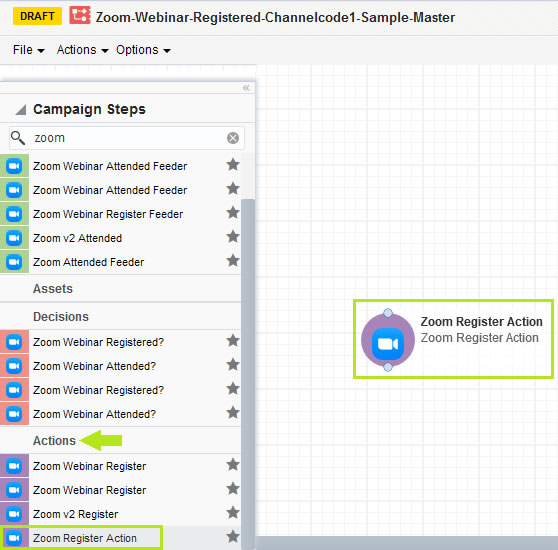
STEP 4 - Zoom Register FEEDER (CHANNEL CODE1 CANVAS)
-
Create Channel code1. Find out how. Name it as "Registered".
-
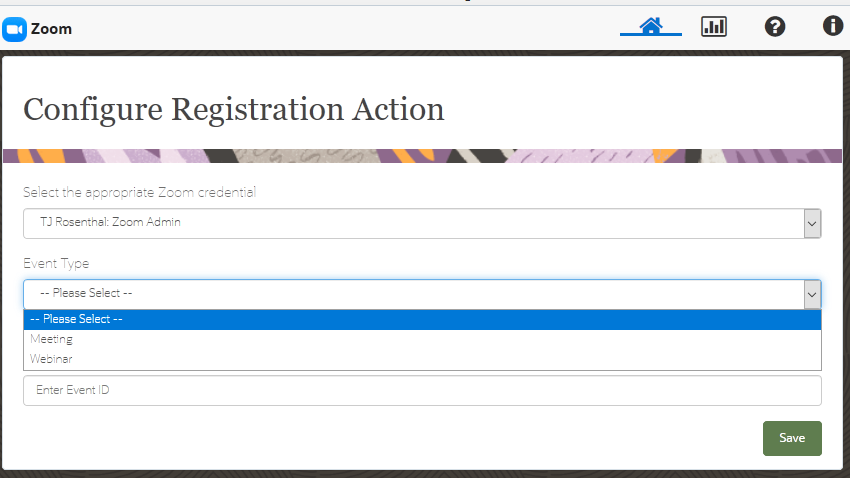
a) Zoom Register Action: On the Campaign Canvas Tools → Campaign Steps → Actions → Drag and drop Zoom Register Action. Select Meeting/Webinar as required and update the Event ID (Note: Update ID without any space) given by the requester in the GMS Portal/ Template Builder → Stage Properties.
b) Configure Zoom Register Action feeder as shown below (This helps to route the contacts whenever they are stuck in feeder with errors)
- Add a wait and set to 0.5 hours
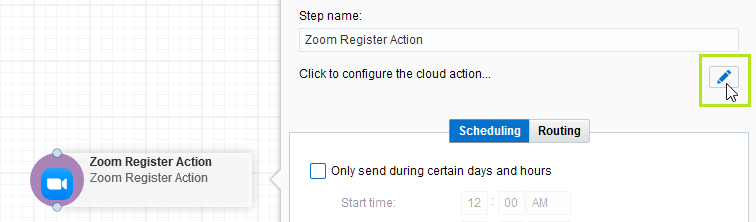
- Double click Zoom Register Action
- Go to Routing Tab.
- Enable the check box next to "Automatically route contacts with errors from cloud app"
- Click Choose and specify a target. In this case we will add it to Wait step
- Click Save and close the tab once you have completed your configuration.
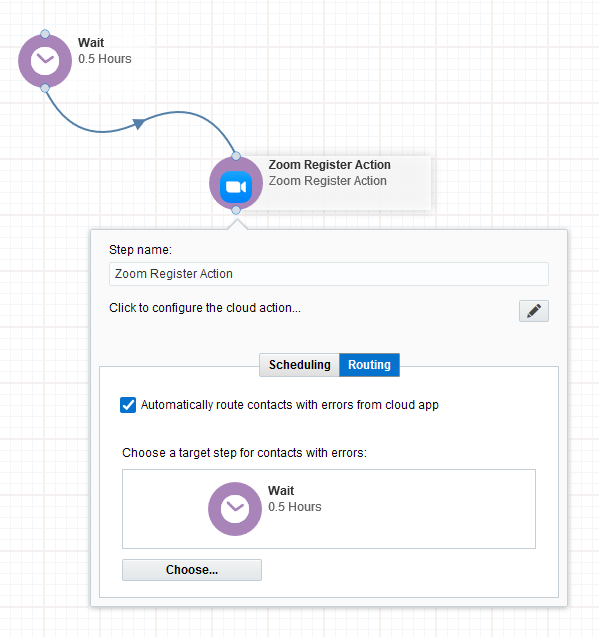
c) Link to flow contacts from wait back to feeder. (Please see image for reference)
d) Delete the 0.01 hours Wait Step and the Registration Confirmation Email elements from your canvas (this will be triggered from Zoom, not Eloqua for Monitored setup)
e) Save and close window. Save Canvas. -
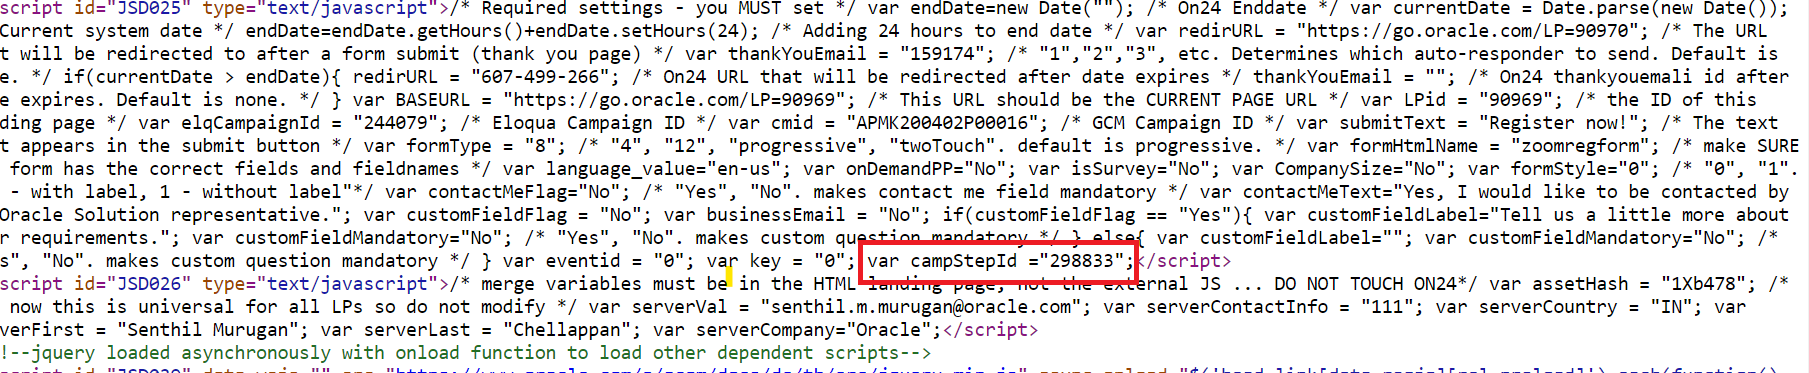
Identify the Eloqua Webinar setup ID (it will be different for each campaign). Keep this handy to update in (Template Builder -> Stage Properties -> Campaign Step ID) to connect Zoom to Welcome Page:
a) Open Eloqua in browser (preferably Google Chrome).
b) In the browser, go to Developer Tools → Network tab.
c) If there are no links displayed, refresh the page again.
d) Search for link with same number as the Eloqua Campaign ID of canvas.
e) Identify link as shown below: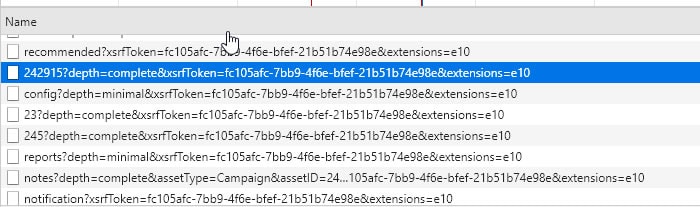
-
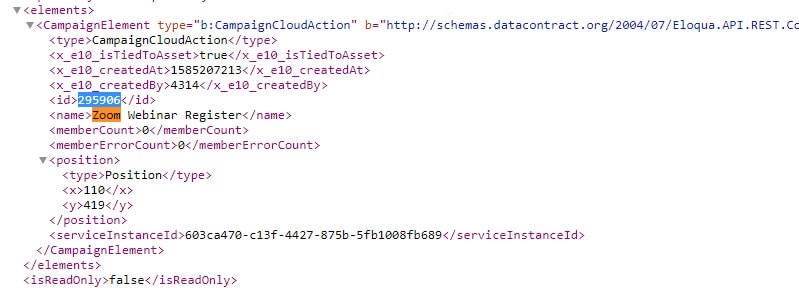
Double-click on link to open script and identify id just above Zoom Webinar Register
-
Activate Canvas.
Note: Allow contacts to enter the campaign more than once should be checked.
Copy the below canvas and update the sections as required.
Zoom-Webinar-Registered-Channelcode1-Sample-Master
PRO TIP
● Update the webinar ID without any space in Feeder
STEP 5 - Post Event Activities Setup (CHANNEL CODE2 CANVAS)
-
Create Channel code2. Find out how. Name it as "PostEvent".
-
a) Edit Zoom Attended Feeder (Campaign Steps → Segment → Zoom Attended Feeder(Last one).
b) Update the following:
1. Zoom Credential: Select default
2. Event Type: Select Meeting / Webinar
3.Store Attendance Data in :Select Custom Object
4.Select Custom Object to store data in: Zoom Feeder - Attended CDO
Note: By the selecting required CDO Name, you can save the attendee details to it.5. Mapping value from Zoom Fields to Eloqua Contact Fields. :
Email - Email Address
Join Time - Lead description
Leave Time - Lead description
Total Duration - Lead description
Polling - Lead description
Q&A - Lead description
6. Mapping value from Zoom Fields to Eloqua CDO:Event ID + (Email) - Unique Code
Email Email - Address
Event Type -Event Type
Event ID - Event ID
Join Time - Join Time
Leave Time - Leave Time
Total Duration - Total Duration
Polling - Polling
Q&A - Q&A
7. Run Every: 6 hours
8. Until: End Date Time + 1 Day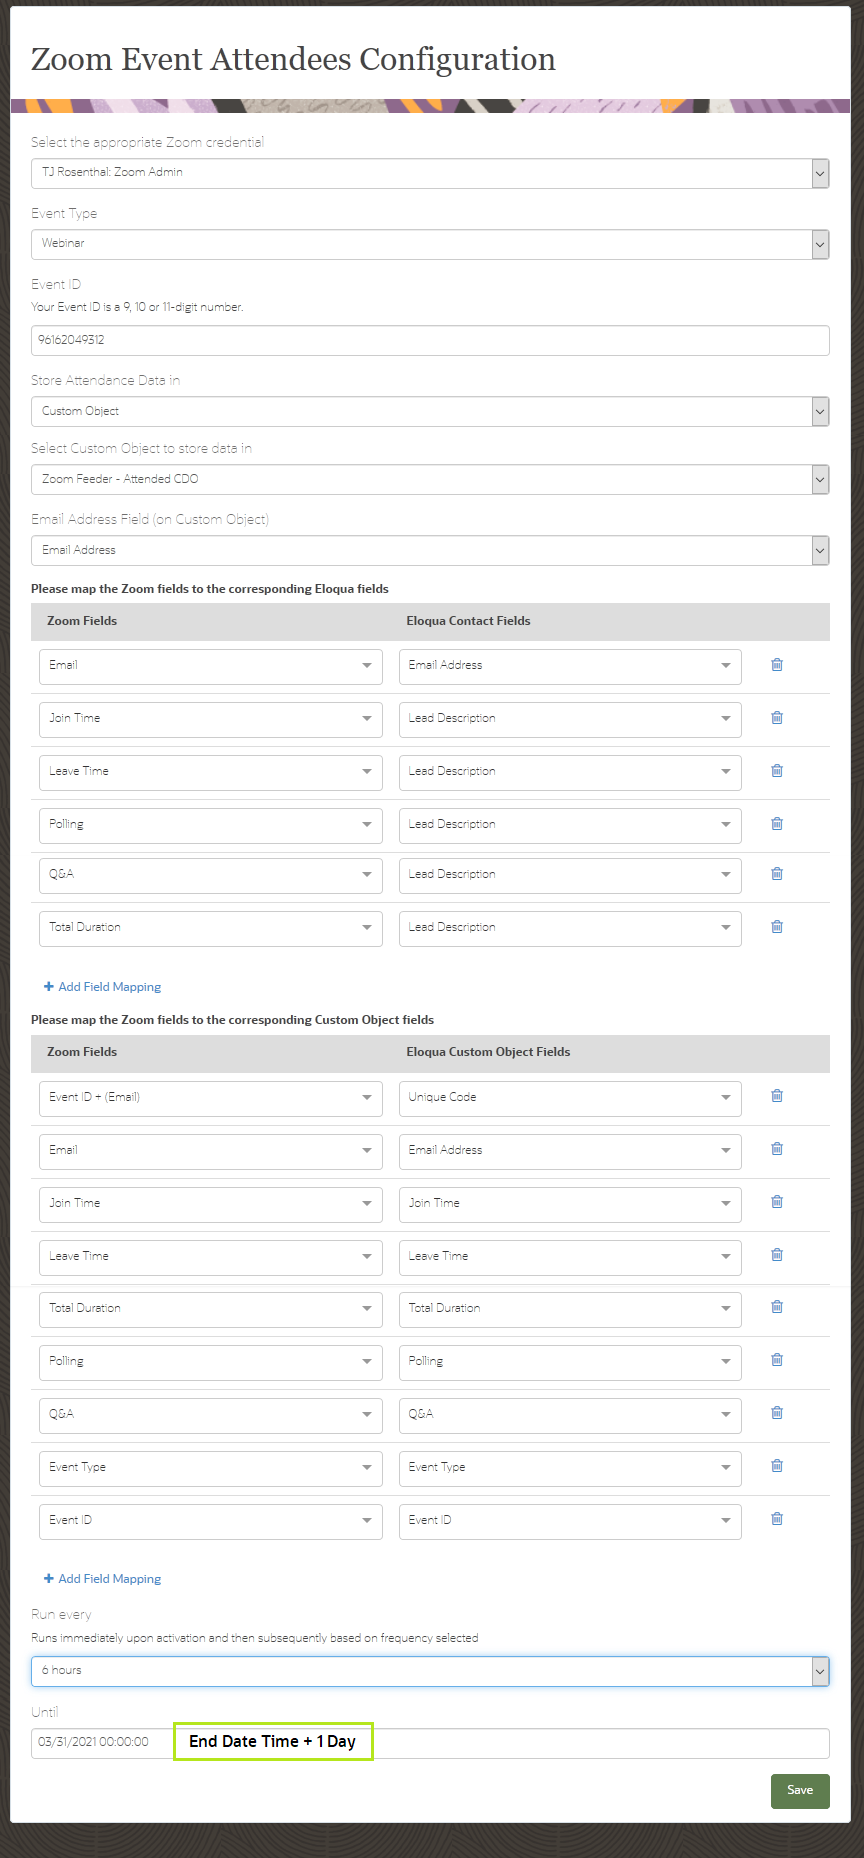
- Add Attended form - Rename to Attended Form Submission
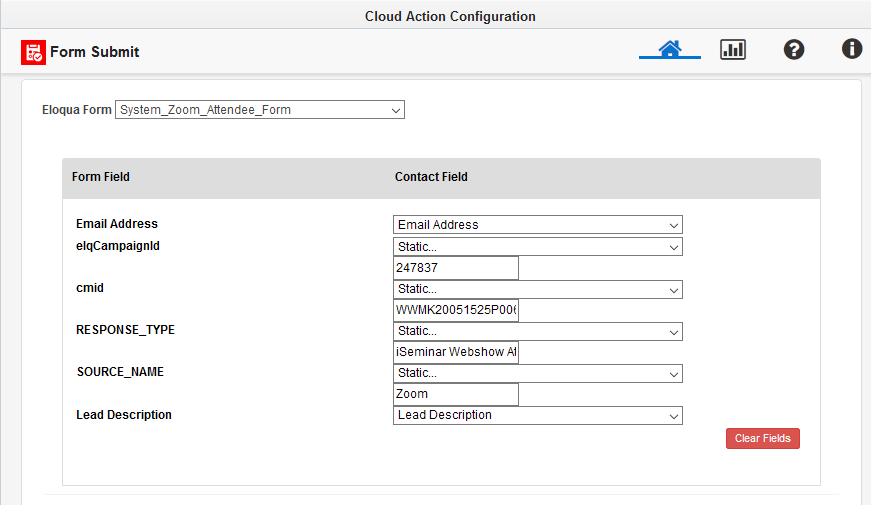
Update Form feilds as mentioned below:
i) Edit and search Eloqua Form name to "System_Zoom_Attendee_Form"ii) Map Emailaddress to contact level, cmid (Select Static and then update Program code NOT Channel code), elqcampaignid (Select static and update the campign id of Program Code Canvas)
iii) Update RESPONSE_TYPE (Select Static and then update “iSeminar Webshow Attended”)
iv) Update SOURCE_NAME (Select Static and then update “Zoom”)
v) Map Lead Description to Lead Description
vi) Save Form Submit and attach Thank you Email.
● Add Wait period and set it to 1 month
● Connect it to email asset for Post Event Thank You Email (if required, and above wait can be removed)
-
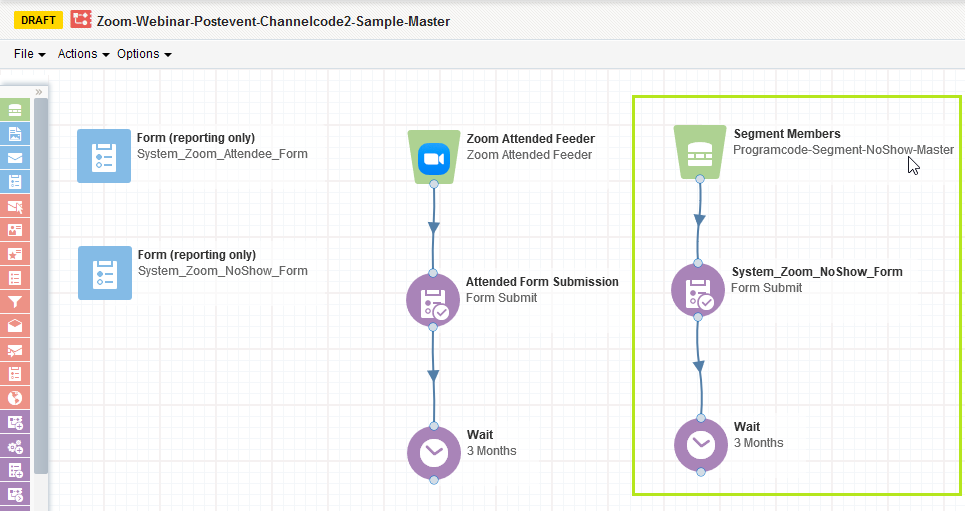
Add Forms for reporting - System_Zoom_Attendee_Form, System_Zoom_NoShow_Form.
-
Go to Campaign Settings → Advanced → UNCHECK → "Allow contacts to enter campaign more than once".
-
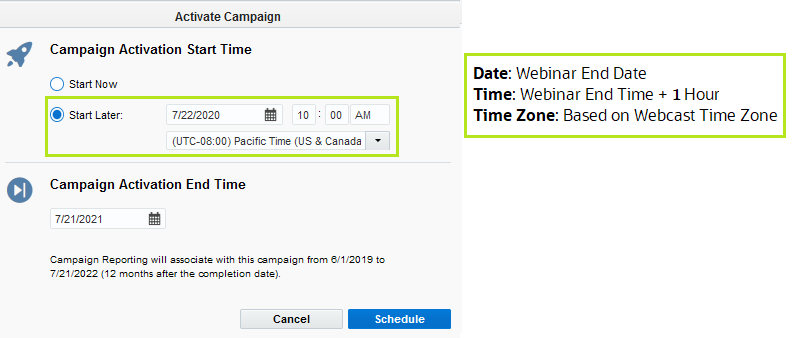
Activate → Schedule Campaign on the set date (Webinar End Date, Webinar End time + 1 Hour). Refer screenshot below.
Copy the below canvas and update the sections as required. Associate the respective form and pages into Canvas.
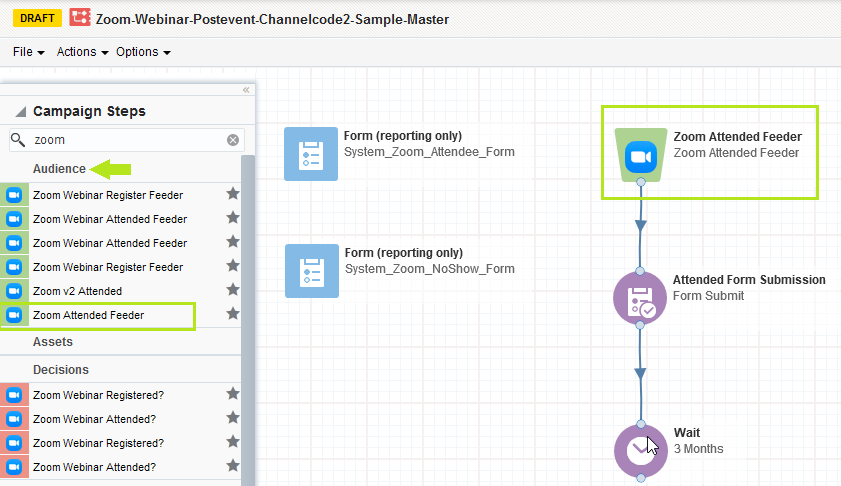
Zoom-Webinar-Postevent-Channelcode2-Sample-Master
Attendee Form Submission Guidelines and Thank you Email Execution
-
Deactivate Canvas after Post event Attendee Form has been processed
-
For the No show segment, Please take the No show list from the marketer and do the manual upload.
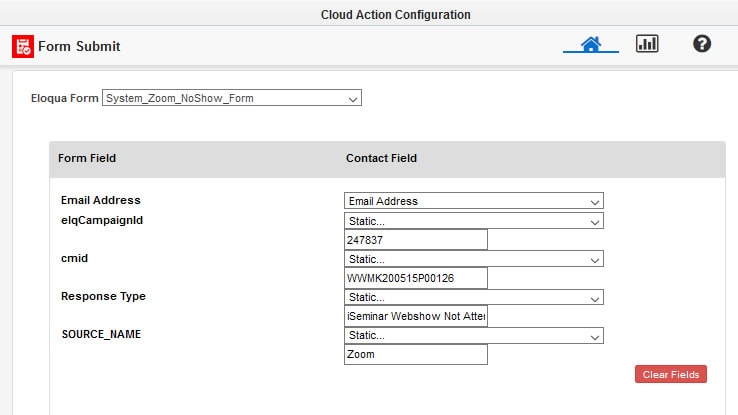
Update the following:
i) Edit and Search Eloqua Form name to "System_Zoom_NoShow_Form"
ii) Map Emailaddress to contact level, cmid (Select Static and then update Program code NOT Channel code), elqcampaignid (Select static and update the campign id of Program Code Canvas)
iii) Update RESPONSE_TYPE (Select Static and then update “iSeminar Webshow Not Attended”)
iv) Update SOURCE_NAME (Select Static and then update “Zoom”)
v) Save Form Submit
● Add Wait period and set it to 1 month
● Attach Sorry Email (if required).
No Show Form Submission Guidelines and Sorry Email Execution
POST EVENT SURVEY: REQUESTED BY MARKETER TO UPDATE IN ZOOM SETUP
- Create an Eloqua NPS Form as per guidelines (Note: Use the program code of Live webinar)
-
Append NPS Form link created with Tracking.
E.g.: ?src1=:ex:pw:::ZoomPostEventSurvey&pcode=BUMK180531P00018 Share the Tracked NPS form link to the Marketer through Portal, which helps Marketer to update into their Zoom setup.
IDENTIFY AND SETUP POST EVENT EMAIL GUIDELINES
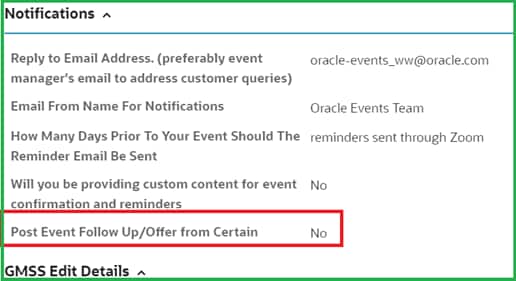
Note: Kindly check the option selected by the Marketer related to the post event activities.
-
USE CASE: Post Event Follow Up/ Offer from Certain = No
DC Responsibility: Not required to add the ONLY post event emails into Canvas but rest of the elements should be added and canvas should remain in Active.
-
USE CASE:
Post Event Follow Up/ Offer from Certain = Yes
Post event email send date: DD-MM-YYY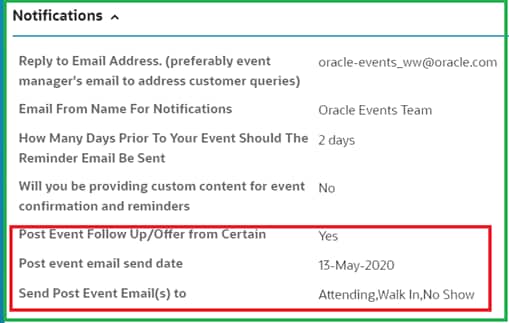
DC Responsibility:
- Kindly Review the content provided in TB, and follow-up with requester if any missing
DO NOT Connect the post event emails in the Canvas until the content is ready and approved.
PRO TIP
● Allow contacts to enter the campaign more than once should be unchecked.
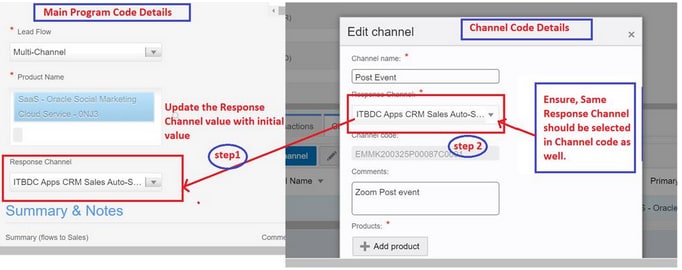
Create a new Channel
-
-
Select the Lead Flow “Multi Channel”, so that it enables channel code creation.
- Create Channel #1 and name it Registered; remember to set the Response Channel, Lead Flow and Product to the value chosen by the marketer; click on Add Channel in order to save it.
-
Click on +Add button again to create Channel #2 and name it PostEvent; remember to set the Response Channel, Lead Flow and Product to the value chosen by the marketer; click on Add Channel in order to save it.
Take the screenshot of the current program code details in MRM for reference purpose.
Related Topics
Nailed it?
If yes, click below to confirm completion of this topic.
Yes, I have understood this topic well